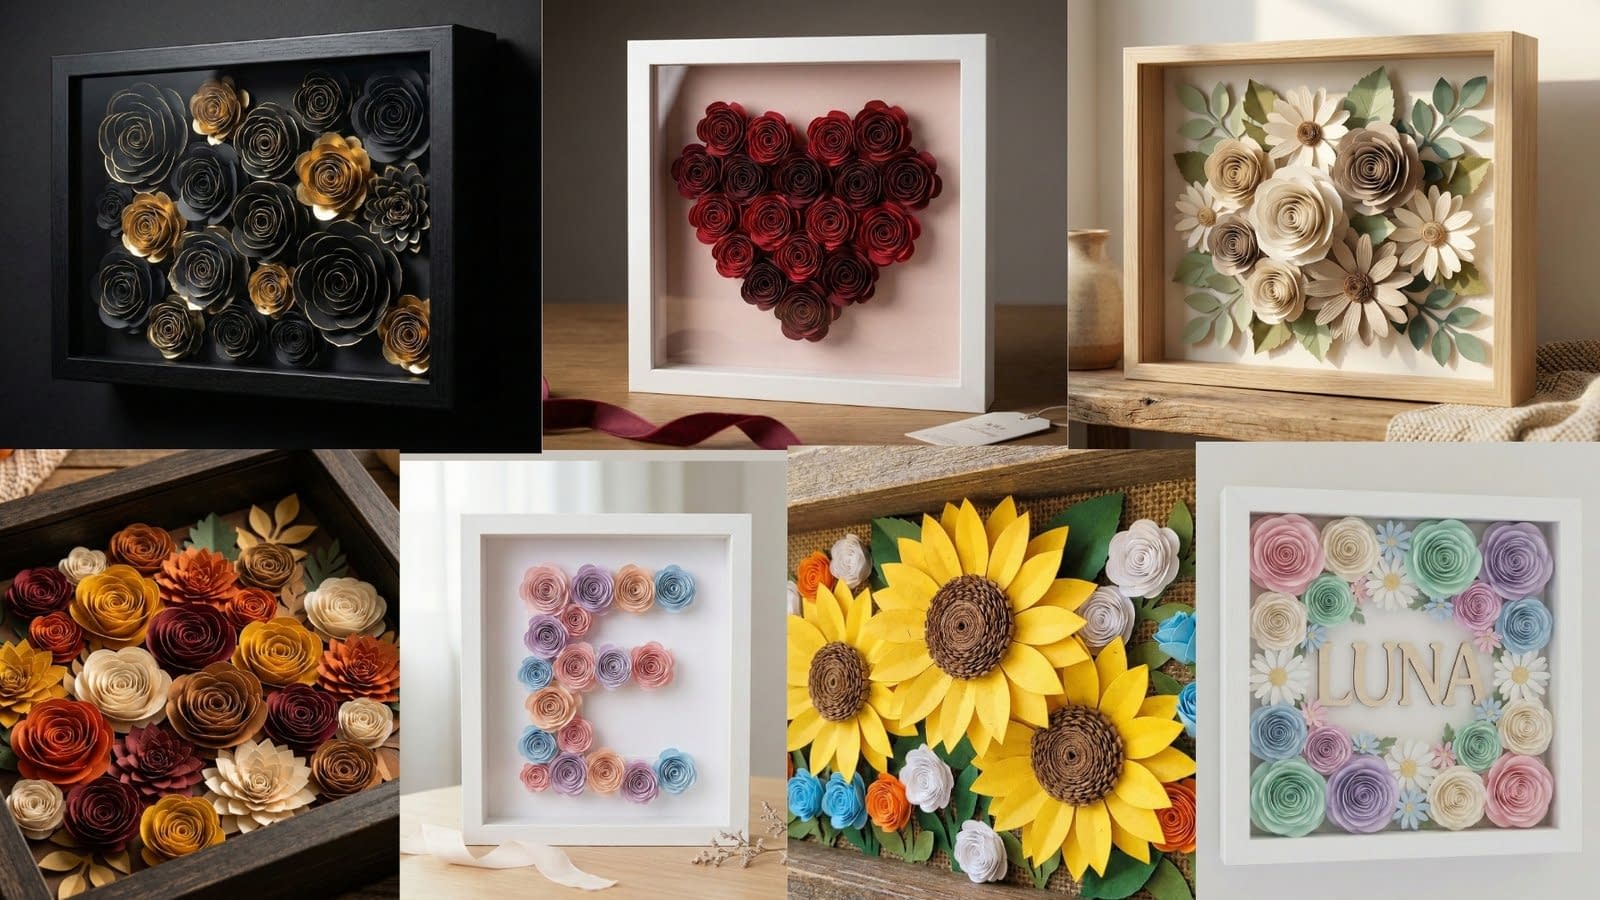
Bringing a touch of nature indoors does not always require a green thumb or constant watering. One of the most creative and lasting ways to decorate your home is by crafting your own floral arrangements using simple materials. In this guide, we are exploring the beautiful world of the 6 DIY Paper hanging flower basket. These projects combine the therapeutic art of paper weaving with the delicate skill of flower making, resulting in decor pieces that are both timeless and unique. Whether you are looking to add a soft romantic vibe to your bedroom or a splash of vibrant color to a sunny balcony, these handmade baskets offer a versatile solution that fits any style.
Creating a 6 DIY Paper hanging flower basket is an accessible craft that allows for endless customization. By selecting different textures of paper, varying your color palettes, and experimenting with flower shapes, you can design something that perfectly complements your interior design. This blog post is designed to walk you through every single detail. We will not skip over the small stuff; instead, we will focus on the nuances of folding, the specific angles for cutting, and the exact techniques for gluing that ensure your basket holds up and your flowers look realistic. We have structured these tutorials to be beginner-friendly but detailed enough for seasoned crafters who want to refine their skills. Below, we begin with the first three distinct styles, covering everything from the elegant pastel rose to the cheerful marigold and the modern white daisy.
Pastel Paper Rose Hanging Basket
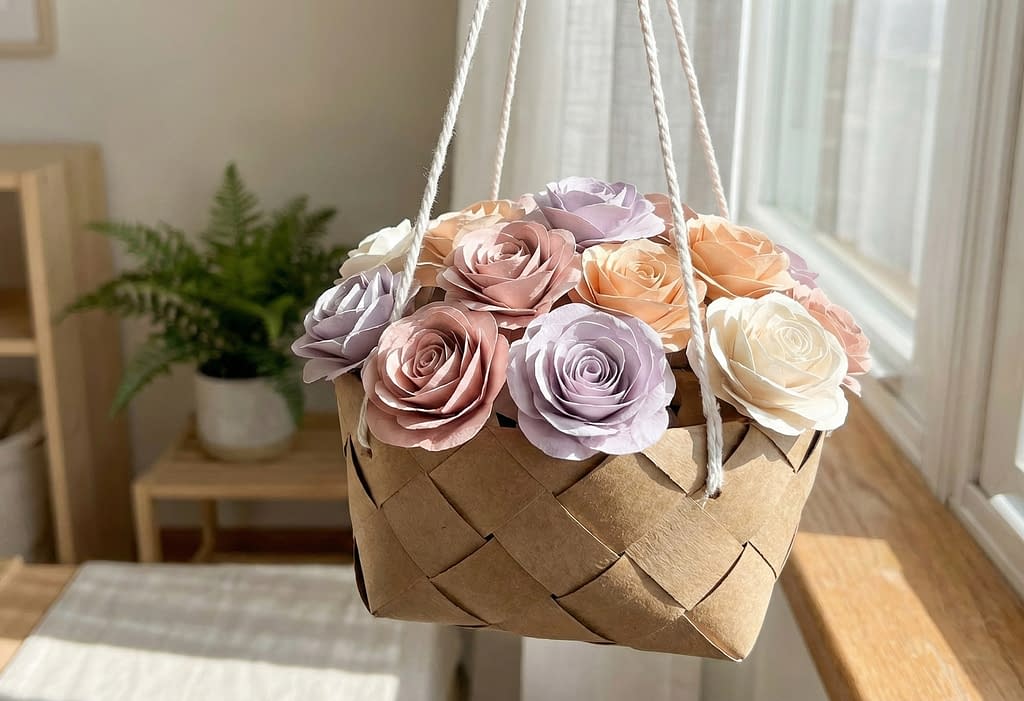
The first project in our collection of the 6 DIY Paper hanging flower basket focuses on soft elegance. This basket features a classic woven texture made from brown kraft paper, filled to the brim with lush, hand-rolled paper roses in blush pink, lavender, and creamy white. It captures a romantic, vintage aesthetic that looks wonderful hanging near a window where the light can catch the curves of the petals.
Materials Needed
For the Basket: Heavyweight kraft paper or brown cardstock sheets A ruler and a pencil Scissors or a craft knife High-quality craft glue or a hot glue gun White cotton twine for hanging Clothespins or paper clips (for holding strips in place while drying)
For the Roses: Pastel-colored cardstock or construction paper (blush pink, lavender, soft peach, cream) A quilling tool or a toothpick A circle template or a compass Green paper for leaves
Step 1: Preparing the Basket Strips
To begin the basket base, you need to prepare your weaving strips. Take your heavyweight kraft paper and measure out strips that are approximately 1 inch wide and 12 inches long. You will need about 12 to 14 strips for the vertical base and another 10 to 12 strips for the horizontal weaving, depending on how large you want your basket to be. Use your ruler and pencil to mark these lines lightly, then cut them out precisely with scissors or a craft knife to ensure clean edges. If your paper is thin, you can fold the strips in half lengthwise to double the thickness, gluing the layers together for extra sturdiness. This makes the basket more durable and able to hold the weight of the paper flowers.
Step 2: Weaving the Base
Lay out half of your vertical strips horizontally on a flat surface, spacing them evenly. Take one of your remaining strips and weave it vertically through the horizontal ones, using an over-under pattern. If you go over the first strip, go under the second, over the third, and so on. Slide this woven strip to the center of the layout. Repeat this process with the remaining vertical strips, alternating the pattern (under-over-under) for each new strip. Push them famously close together so there are no gaps in the base. Once you have a square woven base, use a tiny dot of glue at the corners of the woven square to secure the outer strips so they do not shift as you build the walls.
Step 3: Forming the Basket Walls
To create the sides of the basket, you need to fold the unwoven ends of your strips upward. Crease them sharply at the edge of the woven base so they stand up vertically. Now, take a new long strip of kraft paper to act as your horizontal weaver. Glue the end of this strip to the inside of one of the upright strips near the base. Begin weaving this strip in and out of the uprights, continuing the over-under pattern around the perimeter of the base. As you turn corners, crease the paper strip slightly to maintain a defined shape. Continue weaving rows until you reach your desired height, which should be about 4 to 5 inches for this design. When you run out of a strip, simply glue a new one to the end of the previous one, hiding the seam on the inside of the basket.
Step 4: Finishing the Basket Rim
Once you have reached the top, you will likely have excess length on the vertical upright strips. Fold these excess ends over the top edge of the last horizontal woven row. Glue them securely to the inside of the basket. For a cleaner look, you can glue an additional strip of kraft paper around the entire top rim, covering the folded ends. Punch two small holes on opposite sides of the rim and thread your white cotton twine through them, knotting securely on the inside to create the hanging loop.
Step 5: Cutting and Rolling the Roses
Now we move to the floral element of this 6 DIY Paper hanging flower basket project. Cut several circles out of your pastel papers. The circles should range from 4 to 6 inches in diameter; larger circles make larger roses. Starting from the outside edge of a circle, cut a spiral shape towards the center, keeping the strip width roughly half an inch. The resulting shape should look like a coiled snake. To form the rose, take the outer end of the spiral and begin rolling it tightly around a quilling tool or toothpick. Keep the bottom edge of the roll aligned as you wind the paper toward the center.
Step 6: Securing the Blooms
When you reach the center of the spiral, you will be left with a small circular tab. Remove the rolled paper from the tool and let it uncoil slightly to relax into a natural flower shape. Apply a generous amount of hot glue to the center tab and press the rolled coil down onto it. Hold it in place for a few seconds until the glue sets. Gently curl the outer petals outward using your fingers or the edge of your scissors to give the rose a blooming effect. Repeat this process until you have enough roses to fill your basket.
Step 7: Assembly
Cut simple leaf shapes from green paper and fold them slightly down the center to create a vein. Glue these leaves to the bottom of your roses or directly onto the rim of the basket. Arrange the roses inside the basket, gluing them to a piece of floral foam placed at the bottom or gluing them directly to each other and the basket rim to create a domed, full appearance. Ensure the colors are mixed evenly—placing a lavender rose next to a peach one—to achieve that soft, balanced pastel aesthetic.
Bright Marigold Paper Flower Basket
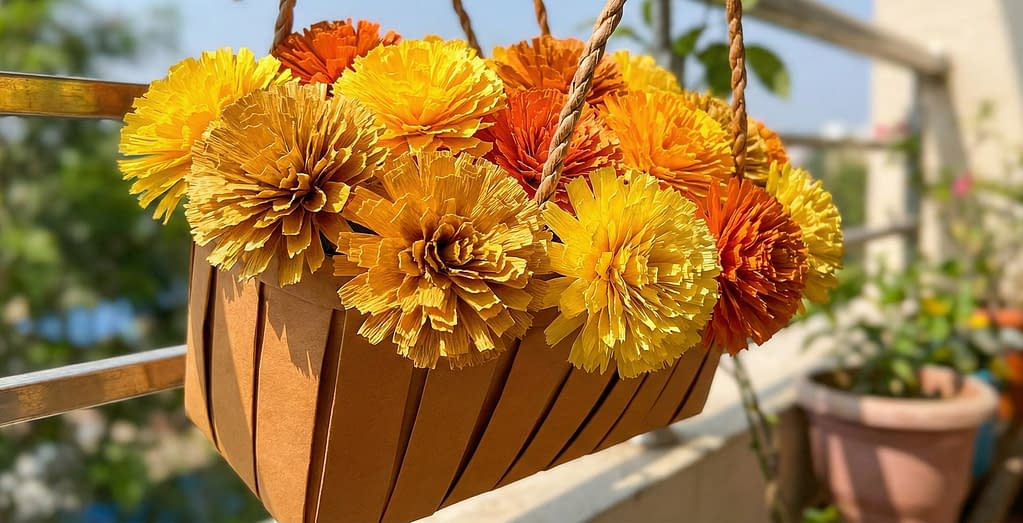
The second style in our 6 DIY Paper hanging flower basket series is the Bright Marigold Paper Flower Basket. This design is all about texture and vibrancy. The basket itself uses wider strips of brown paper for a sturdy, rustic look, while the flowers are fluffy, fringed orbs of intense yellow and orange, mimicking the joyful appearance of real marigolds. This is perfect for a balcony or a bright kitchen corner.
Materials Needed
For the Basket: Thick brown cardstock or corrugated cardboard sheets A stapler or strong double-sided tape Brown braided cord or rope for handles Scissors
For the Marigolds: Crepe paper or lightweight construction paper in deep yellow, bright orange, and gold Floral wire or green pipe cleaners Green floral tape Fringe scissors (optional but helpful) or regular scissors
Step 1: Constructing the Basket Structure
For this basket, we want a slightly different shape, perhaps rectangular or oval with vertical emphasis. Cut a rectangular base from your thick brown cardstock, approximately 4 inches by 6 inches. Next, cut vertical strips that are 1 inch wide and about 8 inches long. Glue or staple these vertical strips around the perimeter of your base, spacing them very slightly apart to allow for a little flexibility. Instead of weaving horizontally, we will use a second layer of horizontal bands. Cut three long bands of brown paper. Glue one near the bottom, one in the middle, and one near the top, wrapping them around the vertical strips to hold them in place. This creates a “crate” look rather than a tight weave.
Step 2: Adding the Handles
Cut two lengths of brown braided cord, each about 12 inches long. Attach the ends of the cords to the inside of the basket on the wider sides. You can use hot glue for this, but for extra security, cut a small square of cardstock and glue it over the cord end on the inside, sandwiching the rope between the basket wall and the cardstock square. This ensures the handle won’t pull out when the basket is hanging.
Step 3: Preparing the Marigold Strips
Marigolds are known for their dense, many-petaled look. To achieve this, cut long strips of your yellow and orange crepe paper or lightweight paper. The strips should be about 2 to 3 inches wide and 12 to 18 inches long. Fold the strip over several times so you are cutting through multiple layers at once to save time. Use your scissors to make deep cuts along one long edge of the strip, cutting about three-quarters of the way down. The cuts should be very close together, creating a fine fringe. Be careful not to cut all the way through the strip.
Step 4: Rolling the Marigolds
Take a piece of floral wire or a pipe cleaner to serve as the stem. Apply a dab of glue to the uncut edge of your fringed strip. Place the wire on the glue and begin rolling the paper strip tightly around the wire. As you roll, add small dots of glue along the bottom uncut edge to keep the flower secure. Continue rolling until you have used the entire strip. If you want a fuller flower, glue the start of a second fringed strip to the end of the first one and keep rolling.
Step 5: Fluffing the Petals
Once the glue is dry, use your fingers to push the fringed layers outward, starting from the outer layers and working your way in. Ruffle the fringe gently to separate the layers and give the flower that characteristic pom-pom shape. The more you fluff it, the more realistic and organic it will look. Wrap the bottom of the flower (where the paper meets the wire) with green floral tape, winding it down the stem to create a clean finish.
Step 6: Final Arrangement
Fill your brown paper basket with these vibrant blooms. You can place a block of dry floral foam inside the basket to stick the wire stems into, which allows you to adjust the height of the flowers. Arrange the marigolds so that they form a dense, overflowing dome of color. Mix the yellow and orange flowers randomly to create a natural, festive look. The contrast between the simple brown paper crate and the intricate, fluffy flowers makes this entry in the 6 DIY Paper hanging flower basket list particularly striking.
Minimal White Paper Daisy Hanging Basket

For those who prefer a cleaner, more modern aesthetic, the third tutorial in our 6 DIY Paper hanging flower basket guide is the Minimal White Paper Daisy Hanging Basket. This design features a crisp white woven basket that holds a bouquet of simple, cheerful white daisies with bright yellow centers. The look is Scandinavian-inspired: airy, bright, and uncluttered.
Materials Needed
For the Basket: Matte white cardstock or thick white drawing paper Ruler and pencil Clear craft glue Thin jute rope or white ribbon for hanging
For the Daisies: Bright white printer paper or smooth cardstock Yellow cardstock (for the centers) Green cardstock (for leaves) Green floral wire
Step 1: Cutting the White Weaving Strips
To achieve the pristine look of this basket, accuracy is key. Cut strips of white cardstock that are 1.5 inches wide. You will need about 10 strips that are 14 inches long. Ensure your hands are clean while working, as white paper shows smudges easily. If you have access to a paper trimmer, use it to ensure perfectly straight lines.
Step 2: Diagonal Weaving Pattern
Instead of a standard perpendicular weave, you can attempt a diagonal weave for a more modern look, or stick to a tight standard weave. For this tutorial, we will use a tight standard weave similar to the first basket but with a focus on seamless edges. Lay out 5 strips vertically and weave 5 strips horizontally across the center to form a base. As you fold the strips up to create the walls, pay close attention to the creases. Run a bone folder or the back of a spoon along the folds to make them sharp and crisp.
Step 3: Constructing the Basket Body
Weave the walls up to a height of about 5 inches. Because the paper is white, gaps will show dark shadows, so push the weave very tightly together. When you reach the top, fold the vertical strips over the top edge and glue them on the inside. To finish the rim, cut a long strip of white paper, 1.5 inches wide, and glue it around the very top edge of the basket, creating a smooth band that hides the woven ends. This solid rim gives the basket a polished, ceramic-like appearance from a distance.
Step 4: Making the Daisy Centers
Cut thin strips of yellow cardstock, roughly 0.5 inches wide and 6 inches long. Use your scissors to fringe the long edge of these yellow strips, making very fine cuts. Roll the fringed strip tightly into a small coil and glue the end. This will form the textured center of the daisy. Fluff the yellow fringe slightly so it looks like pollen.
Step 5: Cutting the Petals
For the petals, you can create a simple template shaped like a long, thin oval. Trace this onto your white paper and cut out about 12 to 16 petals per flower. Alternatively, you can cut a circle of white paper and make cuts toward the center, shaping the segments into rounded petal tips. If cutting individual petals, apply a small dab of glue to the bottom of each petal and attach them to the back of the yellow coiled center. Arrange them in a circle, slightly overlapping each petal to avoid gaps.
Step 6: Attaching Stems and Leaves
Glue a piece of green floral wire to the back of the flower head. To hide the attachment point and the base of the petals, cut a small green circle (a sepal) and glue it over the back where the wire meets the flower. Cut long, slender leaves from green paper. Unlike the rose leaves, daisy leaves should be longer and thinner. Glue these lower down on the wire stems.
Step 7: Assembling the Display
Attach the jute rope to the sides of the white basket for a natural contrast against the stark white paper. Place the daisies inside. Since daisies have thin stems, they look best when they have some “air” between them. Do not pack them too tightly; let the individual flower shapes stand out. The combination of the geometric white basket and the classic white-and-yellow flowers creates a fresh, calming visual that fits perfectly in modern living spaces or bathrooms.
Rustic Brown Paper Basket with Wild Paper Flowers
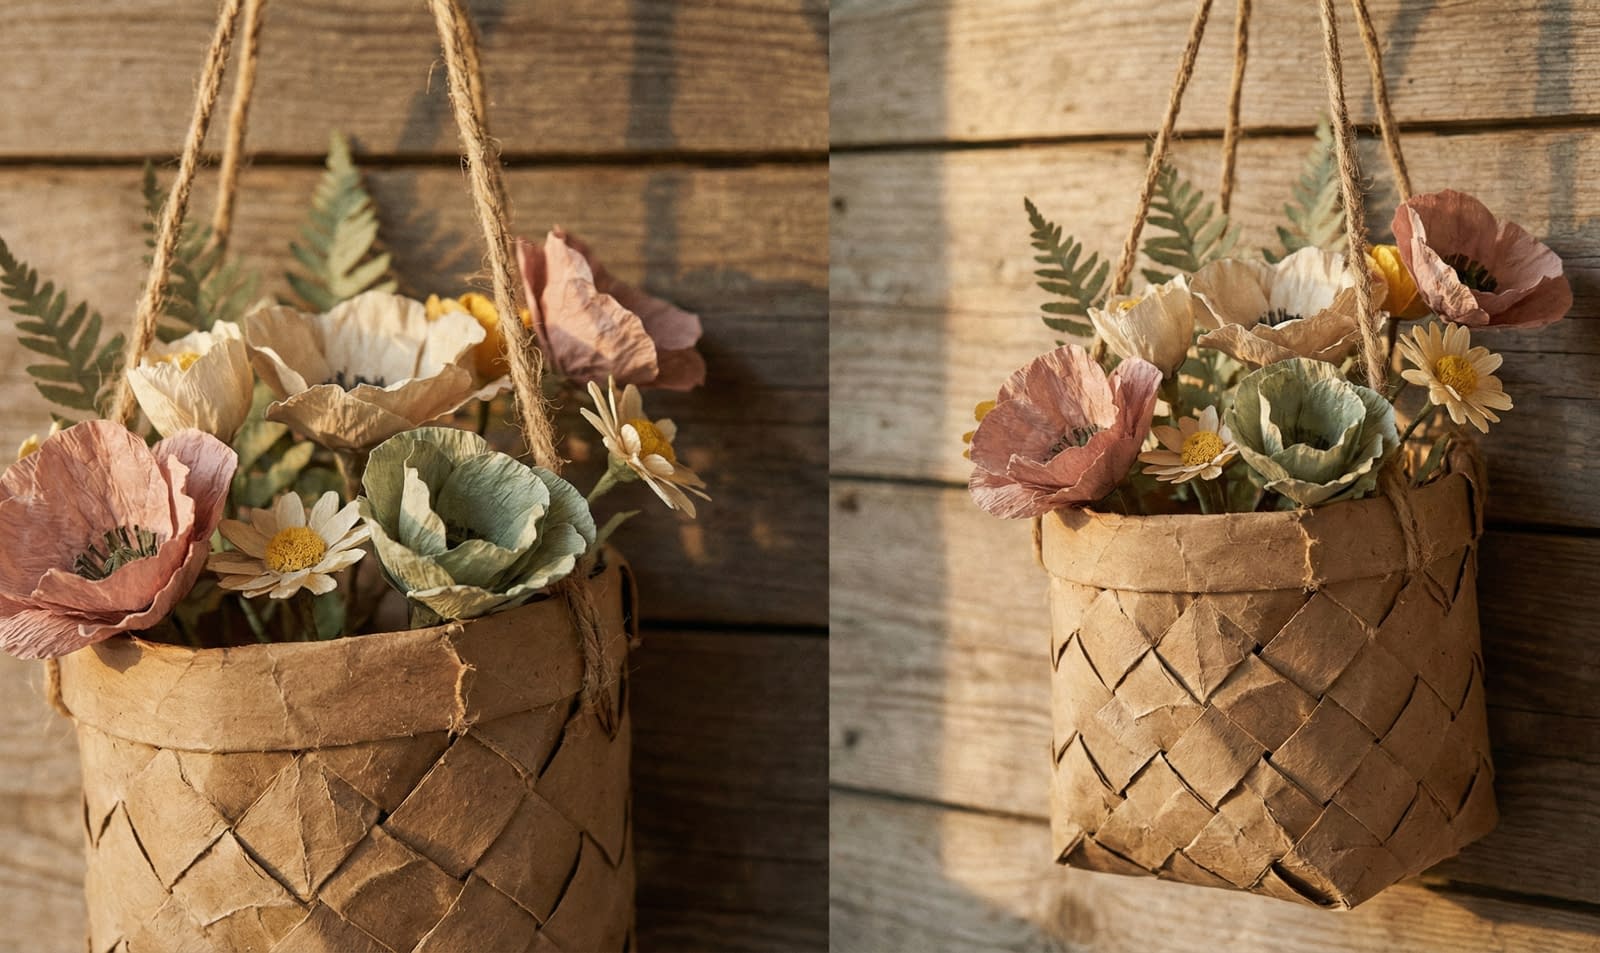
Moving on to the fourth design in our 6 DIY Paper hanging flower basket collection, we embrace the beauty of imperfection. This Rustic Brown Paper Basket focuses on natural, earthy charm. Unlike the crisp lines of the previous tutorials, this project encourages a bit of messiness. We use recycled brown paper or kraft paper that has been deliberately distressed to create a vintage, cottage-style look. The flowers here are wild and asymmetrical—think dusty pink poppies, cream wildflowers, and sage green foliage—giving the impression that they were just gathered from a meadow.
Materials Needed
For the Basket: Recycled brown grocery bags or heavy kraft paper Water spray bottle (optional, for distressing) Thick jute twine for hanging Hot glue gun Scissors
For the Wildflowers: Crepe paper or text weight paper in muted tones (dusty rose, mustard yellow, sage green, off-white) Black or dark brown cardstock (for flower centers) Floral wire Floral tape
Step 1: Distressing the Paper
To achieve that weathered, rustic look, we start by manipulating the paper texture. Cut your brown paper into large strips or panels. Before cutting them into weaving strips, crumple the paper tightly into a ball in your hands. Squeeze it hard to break the stiff fibers. Unfold it and smooth it out slightly, then crumple it again. You can repeat this two or three times until the paper feels soft, almost like fabric or leather. If the paper is very stiff, a light mist of water before crumpling helps, but let it dry completely before gluing.
Step 2: Creating a Rough Weave
Cut your softened brown paper into wide strips, about 1.5 to 2 inches wide. Because the paper is crinkled, the edges might not be perfectly straight, and that is exactly what we want. Lay out your base using the standard over-under weaving method described in the first tutorial, but do not pull the strips too tightly. Leave a little breathing room between the weaves to enhance the relaxed, country vibe. Weave the walls up to about 5 or 6 inches.
Step 3: Rolling the Rim
Instead of a clean, folded edge, we want a rolled, organic rim for this basket. When you reach the top of the basket walls, take the excess length of the vertical strips and roll them outward and down. You can also glue a thick piece of jute twine along the top edge and roll the paper over it to create a sturdy, chunky rim. Use plenty of hot glue to secure the rolled paper in place. The visible creases and wrinkles from your earlier distressing will catch the light and add immense character to the final piece.
Step 4: Making Wildflower Petals
Wildflowers often have delicate, papery petals that are not perfectly symmetrical. Cut teardrop shapes from your muted colored papers. For a poppy-style flower, you will need about 4 to 6 petals. Gently stretch the center of each crepe paper petal between your thumbs to create a cupped shape. If you are using regular paper, curl the edges inward using a pencil. Crinkle the edges of the petals slightly to match the texture of the basket.
Step 5: creating Textured Centers
The center of a wildflower is often dark and textured. Cut a small strip of black or dark brown cardstock, about 1 inch wide and 3 inches long. Fringe it finely with scissors. Roll this fringed strip tightly around the top of a piece of floral wire and glue it in place. Use your fingers to spread the fringe outward, creating a starburst effect. This dark center provides a striking contrast to the dusty pink or cream petals.
Step 6: Assembling the Wildflowers
Glue your petals around the dark center. Place them slightly irregularly; they do not need to be perfectly spaced. Overlap some petals more than others to mimic how flowers grow in nature. Wrap the base of the flower and the wire stem with floral tape. Add leaves that are cut with jagged or wavy edges to resemble wild foliage.
Step 7: Final Styling
Place the wildflowers into the rustic basket. Bend the wire stems so the flowers droop slightly over the edge, rather than standing straight up. This enhances the “wild” aesthetic. Attach a thick piece of jute rope to the sides for hanging. This entry in the 6 DIY Paper hanging flower basket list adds a warm, cozy feeling to any room, looking especially good against wooden walls or in a farmhouse-style kitchen.
Colorful Paper Tulip Hanging Basket
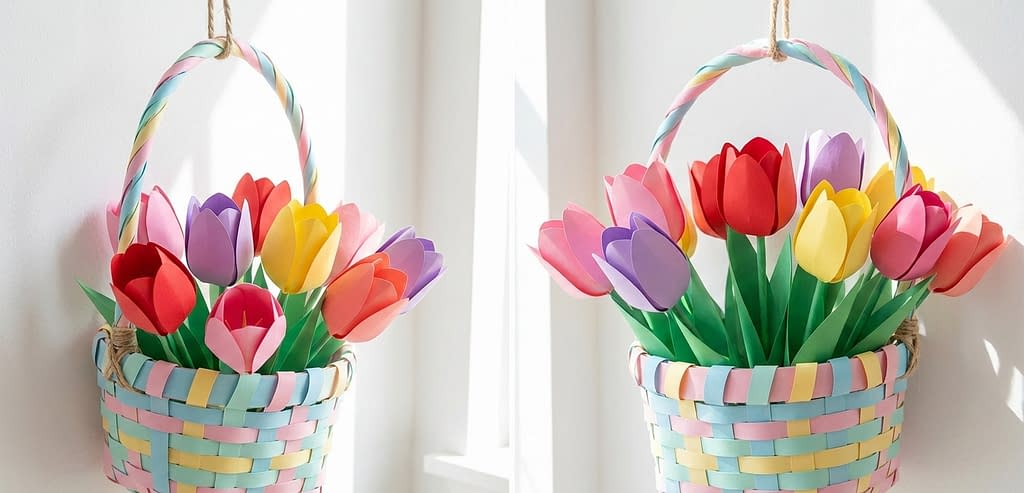
If you want to inject a massive dose of energy into your space, the fifth project is for you. The Colorful Paper Tulip Hanging Basket stands out in our 6 DIY Paper hanging flower basket guide because it utilizes color not just in the flowers, but in the basket itself. This design features a basket woven from multi-colored paper strips—think pastel blues, pinks, and yellows—holding a vibrant bunch of stiff, structured paper tulips. It is playful, bright, and perfect for spring decor or a child’s room.
Materials Needed
For the Basket: Construction paper or cardstock in three different colors (e.g., light blue, soft pink, pale yellow) A ruler and pencil Glue stick or craft glue Ribbon or braided yarn for hanging
For the Tulips: Stiff cardstock in bright tulip colors (red, purple, bright pink, yellow) Green cardstock for stems and leaves Green drinking straws or thick floral wire (for stems)
Step 1: Preparing Colored Strips
Decide on a pattern for your basket. You can alternate colors for a checkered look. Cut strips from your blue, pink, and yellow papers. Make them about 1 inch wide. If your paper is not long enough to wrap around the whole basket, glue two strips of the same color together to create the necessary length.
Step 2: Weaving with Color
Lay out your base using one color, for example, blue vertical strips. When you begin the horizontal weaving, alternate your colors. Use a pink strip for the first row, a yellow strip for the second, and a blue strip for the third. Continue this pattern as you build the walls. The result will be a cheerful, plaid-like pattern. Ensure you push the strips tight so the colors pop against each other without gaps.
Step 3: Securing the Handle
For this playful basket, a rigid handle often looks best, similar to an Easter basket. Cut a wide strip of cardstock (or braid three strips of your different colors together) and glue it in an arch shape from one side of the basket to the other. Reinforce the attachment points with extra glue and perhaps a decorative paper button or circle to hide the seam.
Step 4: Cutting Tulip Petals
Tulips have a very distinct shape. You need to cut petals that look like a rounded oval with a slightly pointed tip. You will need 6 petals for each tulip. To make them look realistic, cut a small slit (about half an inch) at the bottom center of each petal. Overlap the two sides of the slit and glue them together. This technique, called darting, forces the flat paper to curve into a cup shape, which is essential for the bulbous look of a tulip.
Step 5: Assembling the Tulip Head
Take three of your cupped petals and glue them together at the sides to form a tight inner bud. Then, take the remaining three petals and glue them to the outside of the bud, positioning them in the gaps between the inner petals. This creates the classic closed or slightly opening tulip shape.
Step 6: Stems and Leaves
Insert a green straw or a thick wire into the bottom of the flower head and glue it in place. Tulips have very distinctive leaves: they are long, broad, and taper to a point. Cut these from green cardstock. Gently curl the leaf by running it over the edge of a table or using a bone folder so it bends slightly outward. Glue one or two leaves low down on the stem.
Step 7: Arrangement
Fill your colorful woven basket with these bright tulips. Because the tulips are structured and bold, they look great when packed relatively tightly. You can mix the colors of the flowers—red next to yellow next to purple—to maximize the playful effect. This project is a highlight of the 6 DIY Paper hanging flower basket list because it is as much about the colorful vessel as it is about the flowers.
Elegant Paper Basket with Hanging Vines
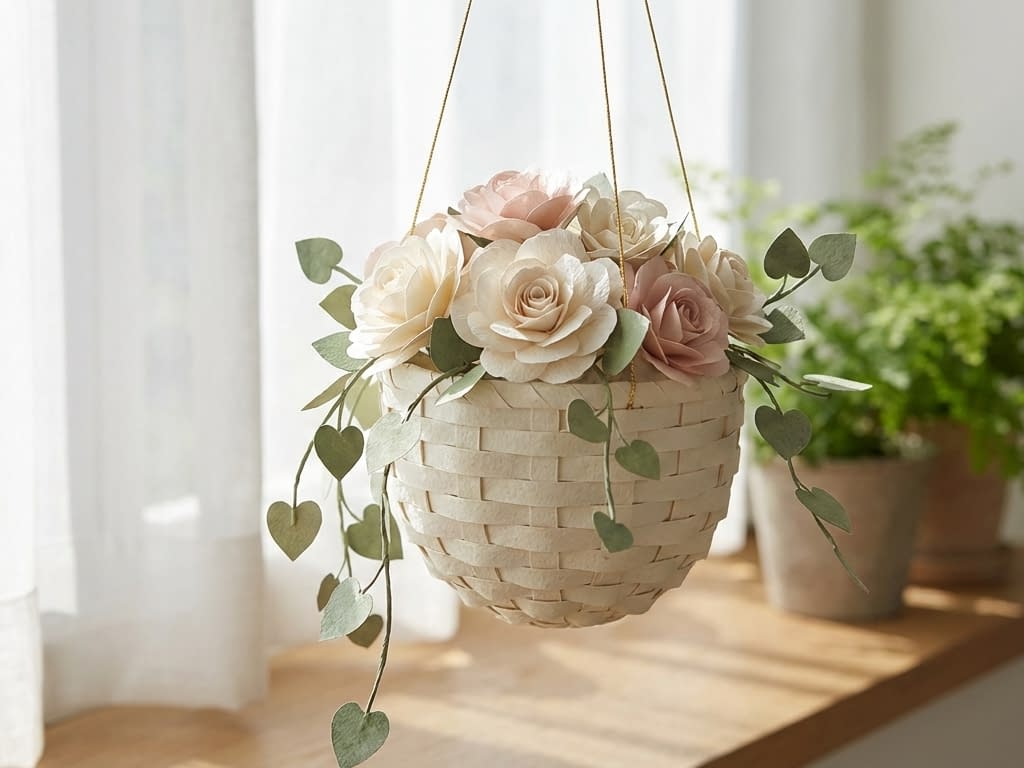
The final project in our 6 DIY Paper hanging flower basket series is arguably the most sophisticated. The Elegant Paper Basket with Hanging Vines is designed to look graceful and fluid. It features a smooth, light-colored basket (ivory or cream) filled with delicate roses and, most importantly, cascading paper vines that drape down, drawing the eye and adding movement to the piece.
Materials Needed
For the Basket: Cream or ivory cardstock with a pearlescent finish (optional) Scissors and glue Gold thread or thin metallic cord for hanging
For the Vines and Flowers: Lightweight paper in pale pink and white (for flowers) Green paper in various shades (olive, moss, mint) for depth Green floral wire or fishing line Green floral tape
Step 1: Creating a Smooth Basket Shape
To distinguish this basket, we want a smoother, more rounded shape. While you can still weave it, using wider strips (2 inches) and a softer tension creates a bowl-like shape. Alternatively, you can construct a non-woven basket by cutting a large circle, cutting a wedge out of it, and pulling the edges together to form a cone or bowl shape, then gluing decorative strips over the outside to mimic a weave without the bulk. Use cream or ivory paper to keep the look light and airy.
Step 2: Making the Vines
The vines are the showstopper here. Take a long piece of floral wire or even a piece of green string if you want it to swing freely. Cut dozens of small heart-shaped or oval leaves from your various shades of green paper. They should be small, about 0.5 to 1 inch long.
Step 3: Attaching Leaves to Vines
Start at the bottom of your wire or string. Glue two leaves together, sandwiching the wire tip between them. Move up the wire about 1 or 2 inches and glue another leaf (or pair of leaves) to the stem. Varing the direction the leaves face makes it look natural. Continue this until you have a vine that is 12 to 20 inches long. Make 3 to 5 of these trailing vines.
Step 4: Crafting Soft Blossoms
For the flowers, we want something that looks like a tea rose or a ranunculus. Cut circles of pale pink and white paper. Wavy cut the edges. Layer 4 or 5 circles on top of each other, poking a hole in the center. Thread a wire through and secure it. Crumple the layers up towards the center to create a soft, ruffled bloom. Unlike the stiff tulips, these should look soft and open.
Step 5: Assembly and Balance
Place a block of foam inside your ivory basket. First, insert the stems of your trailing vines around the edge of the basket so they spill over the rim and hang down. Once the vines are secured, fill the center of the basket with your soft pink and white blossoms. The flowers should sit low, nestling into the top of the basket, while the vines provide the vertical drama.
Step 6: Hanging
Use a thin gold thread or metallic cord to hang this basket. The delicate line of the thread complements the elegance of the vines. This design is perfect for a wedding decoration, a nursery, or a sophisticated living room corner. It rounds out our 6 DIY Paper hanging flower basket guide by offering something truly ethereal and decorative.
Conclusion
Creating your own decor is one of the most satisfying ways to personalize your home, and these projects from our 6 DIY Paper hanging flower basket guide prove that paper is a surprisingly versatile medium. From the rustic, textured charm of the wild brown basket to the structured, colorful joy of the tulip arrangement, there is a style here for every taste and every room.
As you work through these tutorials, remember that the measurements are just a starting point. Feel free to scale the baskets up to make a statement piece for a dining table, or scale them down for cute ornaments. The beauty of the 6 DIY Paper hanging flower basket concept lies in the low cost of materials and the high impact of the final result. You are not just making a basket; you are crafting a permanent botanical display that will never wilt and will always brighten your day.
We hope these detailed instructions give you the confidence to pick up your scissors and glue. Whether you start with the simple daisies or challenge yourself with the cascading vines, the result will be a unique piece of handmade art.