
Creating Cricut vinyl wall quotes has become one of the most rewarding ways to personalize your space. Whether you want something calm and botanical, fun and colorful for a child’s room, clean and modern for your living area, expressive and creative for your studio, or nostalgic with a vintage touch, these 6 different style Cricut vinyl wall quotes tutorials offer something for every taste. Each tutorial is explained with clear, highly detailed steps so beginners and experienced crafters can follow along easily. You will find instructions on folding your vinyl backing sheets, layering your colors, cutting delicate shapes, applying vinyl with alignment tricks, and even when to use glue for extra hold on curved or textured surfaces.
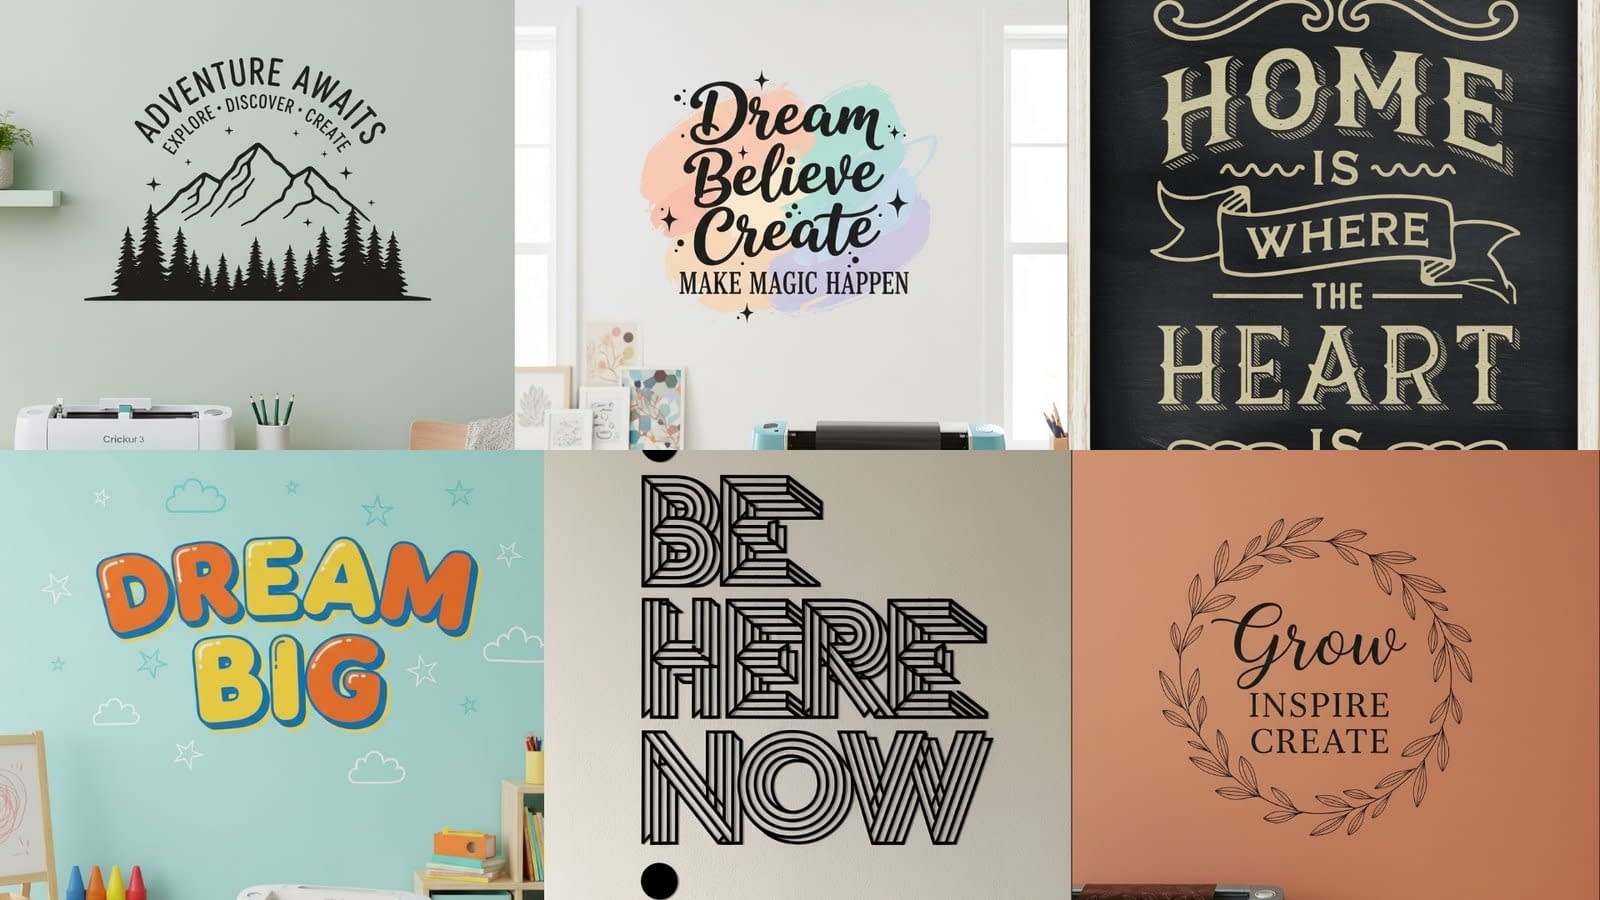
These tutorials cover six distinct styles: Botanical Line Art, Playful Kids’ Room Bubble Style, Modern Minimal Block Layout, Whimsical Brush-Stroke Style, Vintage Chalkboard Aesthetic, and Nature Silhouette Scene. Even though six styles are included, they are grouped into five main tutorial categories to keep everything organized. Each one teaches you a unique method for designing and applying wall quotes with Cricut vinyl, giving you the freedom to recreate them or adapt the techniques to your own designs.
Materials You Will Need
Before starting any of the Cricut vinyl wall quotes tutorials, gather these common tools and materials:
• Cutting machine such as Cricut Explore or Cricut Maker
• StandardGrip or LightGrip cutting mat depending on vinyl thickness
• Permanent adhesive vinyl in chosen colors
• Transfer tape (clear, grid-lined optional)
• Scraper tool or old credit card
• Weeding tool
• Scissors and craft knife
• Painter’s tape
• Measuring tape or ruler
• Clean cloth and rubbing alcohol for wall preparation
• Optional: Strong-hold glue for layered vinyl pieces on textured walls
Every tutorial below mentions additional materials if needed, but this list covers the general supplies required for most Cricut vinyl wall quotes projects.
Preparing Your Wall for Vinyl Application
Before you apply any vinyl wall quote, make sure your wall is clean, dry, and smooth.
Step 1: Clean the Surface
Use a clean cloth and a small amount of rubbing alcohol. Wipe the entire area where the quote will be applied. Allow it to fully dry before moving to the next step. This helps prevent the vinyl from peeling later.
Step 2: Measure and Mark
Using a measuring tape or ruler, lightly mark the top and bottom alignment points with painter’s tape. These guides help ensure your vinyl quote stays straight.
Step 3: Prepare Your Vinyl Transfer
Always keep your vinyl sheet flat. If it has bends or curls from storage, place heavy books over it for 10–15 minutes.
Keeping the vinyl completely flat is important, especially for long quotes.
1. Botanical Line Art Style Cricut Vinyl Wall Quote

The botanical line art style is elegant, calm, and perfect for living rooms, hallways, bedrooms, or any place where you want your décor to feel natural yet refined. This design style uses flowing line-art leaves or branches around your quote, with thin details that require careful cutting and slow weeding.
Design Planning
Choose a soft rounded script font for the quote and plan the line-art foliage to wrap around or frame the words. You can either hand-draw botanical shapes or use botanical SVGs. When placing leaves, make sure the designs don’t cross over letters too much. Keep slight spacing between text and leaves so the cut details remain clean.
Cutting Instructions
Because botanical line art includes thin strokes and delicate corners, follow these cutting specifics:
Mat Preparation
Attach the vinyl onto the LightGrip mat to avoid tearing. Smooth it out using a scraper, starting from the center and pushing outward to remove trapped air bubbles.
Cutting Settings
Use the Vinyl or Premium Vinyl setting. Before cutting the full design, load a small test cut. If the machine cuts too deeply and separates the backing, adjust the pressure to slightly lower. Thin line art needs clean, shallow cuts for easy weeding.
Weeding the Botanical Details
Start by peeling from the corner using the weeding tool. Move slowly around thin vines and leaf outlines. When removing the inside parts of leaves, bend the backing gently inward using your fingers. This helps lift small cut pieces more easily without stretching the vinyl.
Applying the Transfer Tape
Lay your transfer tape flat on a table.
Place the vinyl design face-down onto the transfer tape, not the other way around. This prevents wrinkles.
Use the scraper to press down firmly, especially around thin leaf shapes.
Applying to the Wall
Lift the design slowly while keeping the backing bent slightly backward in a curled arc. This method keeps pieces from sticking prematurely.
Align with the painter’s tape guides and press from the center outward.
Smooth over every leaf and stem using the scraper in straight strokes.
Optional Glue Use
If your wall has a slightly textured finish, thin botanical lines may lift. In that case, use tiny dots of glue only underneath the vine tips or leaf ends. Press firmly for 30 seconds until secured.
2. Playful Kids’ Room Bubble Style Cricut Vinyl Wall Quote

The bubble style is perfect for children’s bedrooms, classrooms, playrooms, or nurseries. This style includes rounded, chunky letters paired with simple star, cloud, or balloon shapes that create a cheerful atmosphere.
Design Planning
Use large bubble-themed letters in multiple colors. Add simple shapes around the quote. Space the letters far enough apart so you can individually cut and layer colors with ease.
Preparing Multi-Color Vinyl Sheets
You will cut each color separately. Before cutting:
Folding and Organizing the Vinyl
Fold each sheet lightly in half without pressing the crease too hard. This gentle fold helps divide the sheet for arranging shapes and reducing vinyl waste.
Cutting the Shapes
Cut stars, clouds, or circles separately so you can place them around the final quote during installation.
Weeding and Layering
Weed each color individually.
Lay all weeded pieces on the table and group them based on their placement in the final design.
Applying Transfer Tape and Layering
Use clear transfer tape for each color group. Layering tip:
Place the largest shapes first, such as clouds.
Then layer the letters over them.
Finish with small stars or accents.
Applying to the Wall
Use painter’s tape to create a loose outline on the wall where the design will go.
Start applying the largest vinyl layers first.
After pressing the base layer firmly, apply the individual letters and decorative shapes one by one.
Because this style mixes different colors and vinyl pieces, glue is rarely needed unless your wall is heavily textured.
3. Modern Minimal Block Layout Cricut Vinyl Wall Quote

This design is ideal for simple, clean, modern homes. The look features bold block letters, stacked or aligned with geometric structure.
Design Planning
Choose a clean sans-serif font. Use straight lines, right angles, and minimal spacing.
Avoid additional shapes to maintain the minimal aesthetic.
Cutting the Letters
Block letters are easier to cut, but accuracy still matters.
Place the vinyl sheet on a StandardGrip mat.
Cut the quote as one full design unless you plan to stack lines separately.
Folding for Clean Alignment
Before applying transfer tape, fold the backing sheet gently in half horizontally. The fold should be light, not pressed down. This creates a guide for perfect alignment.
Applying Transfer Tape
Lay the design face-up.
Starting from the center, apply transfer tape outward to avoid trapping bubbles.
Use firm scraping strokes since block letters have larger surface areas.
Applying to the Wall
Position the folded alignment line with the painter’s tape guide.
Start pressing from the fold line outward.
Smooth every letter carefully to avoid wrinkles across the broad surfaces.
Optional Glue Use
Large block letters rarely need glue, but if you apply them to textured paint, add a thin line of glue along the edges only.
4. Whimsical Brush-Stroke Style Cricut Vinyl Wall Quote

This style includes artistic brush-stroke shapes layered behind or around the quote, creating a soft, expressive look perfect for creative spaces.
Designing Brush-Stroke SVGs
Use curved, abstract shapes with uneven edges. These should look hand-painted but still cut cleanly. Choose pastel colors or soft tones to complement the quote.
Cutting and Layering Brush Strokes
Cut each brush-stroke shape separately.
Lay them on the table and plan the layering.
Brush strokes should be placed behind the text.
If they need overlap, make sure the lower layers are lighter colors.
Applying Transfer Tape to Brush Shapes
Because brush-stroke shapes often have uneven edges, use transfer tape slightly larger than the vinyl shape.
Lay the vinyl down on transfer tape slowly to avoid puckering along the jagged edges.
Applying Brush Layers to the Wall
Start with the largest shape.
Peel the backing while keeping the transfer tape tight.
Press down the vinyl, smoothing the irregular edges gradually.
Applying the Quote
Cut the quote separately and apply on top of the brush strokes.
This is where alignment matters.
Use painter’s tape to mark the top edge of the quote position.
Press down firmly since the vinyl is being applied over another layer of vinyl.
Glue Use
Use glue sparingly only where brush-stroke vinyl overlaps, especially on textured walls.
5. Vintage Chalkboard Aesthetic Cricut Vinyl Wall Quote

This style uses retro typography, banners, curved arch text, and decorative lines inspired by old chalkboard signs. It works beautifully in kitchens, hallways, cafés, or entry spaces.
Design Planning
Use a mix of serif, slab-serif, and handwritten fonts.
Add banners, lines, small flourishes, and curved top text.
Cutting Decorative Flourishes
Because vintage designs include many small pieces, consider cutting them together in one sheet of white vinyl.
Cut the quote separately so assembly is easier.
Weeding Vintage Elements
Small flourishes require slow weeding.
To weed tiny dots or curls, fold the backing sheet slightly so the cut line opens, making the small pieces easier to lift out.
Applying Transfer Tape and Assembling
Layer the decorative elements first.
Apply banners and curved text first so they guide the rest of the design.
Next apply the main quote.
Then finish with small flourishes.
Glue Use
If your curved text refuses to lie flat, add tiny dots of glue under the arch’s edges.
6. Nature Silhouette Scene Cricut Vinyl Wall Quote

This style includes mountains, trees, birds, and soft rounded fonts, creating a peaceful outdoor ambiance.
Designing Silhouettes
Choose simple mountains and tall tree shapes.
Place the quote in a curved layout that follows the mountain ridge.
Cutting the Mountain and Tree Layers
Cut mountains on one sheet.
Cut trees on another.
Cut birds separately so you can apply them freely.
Folding and Positioning
Before transferring, fold the backing sheet lightly along the center. This guides mountain placement.
Applying Mountain Layer
Use transfer tape to pick up the mountain silhouette.
Align with painter’s tape guides.
Press from the center outward.
Applying Trees
Peel tree shapes individually and apply them beside the mountain layer.
Press firmly at the branches to ensure adherence.
Applying Quote and Birds
Cut the quote separately.
Apply it following the curve of the mountains.
Birds can be placed randomly above.
Glue Use
Use glue only if wall texture causes lifting at the tips of mountain ridges or small branches.
Conclusion
These 6 different style Cricut vinyl wall quotes tutorials show how versatile Cricut crafting can be. Whether you prefer botanical elegance, playful children’s room designs, modern minimal layouts, artistic brush-stroke expression, vintage charm, or calming nature-inspired silhouettes, each style teaches you a unique way to create beautiful, long-lasting wall décor. With the detailed steps provided, including cutting techniques, layering instructions, alignment methods, folding techniques, and glue usage, you can confidently recreate these styles at home.


