
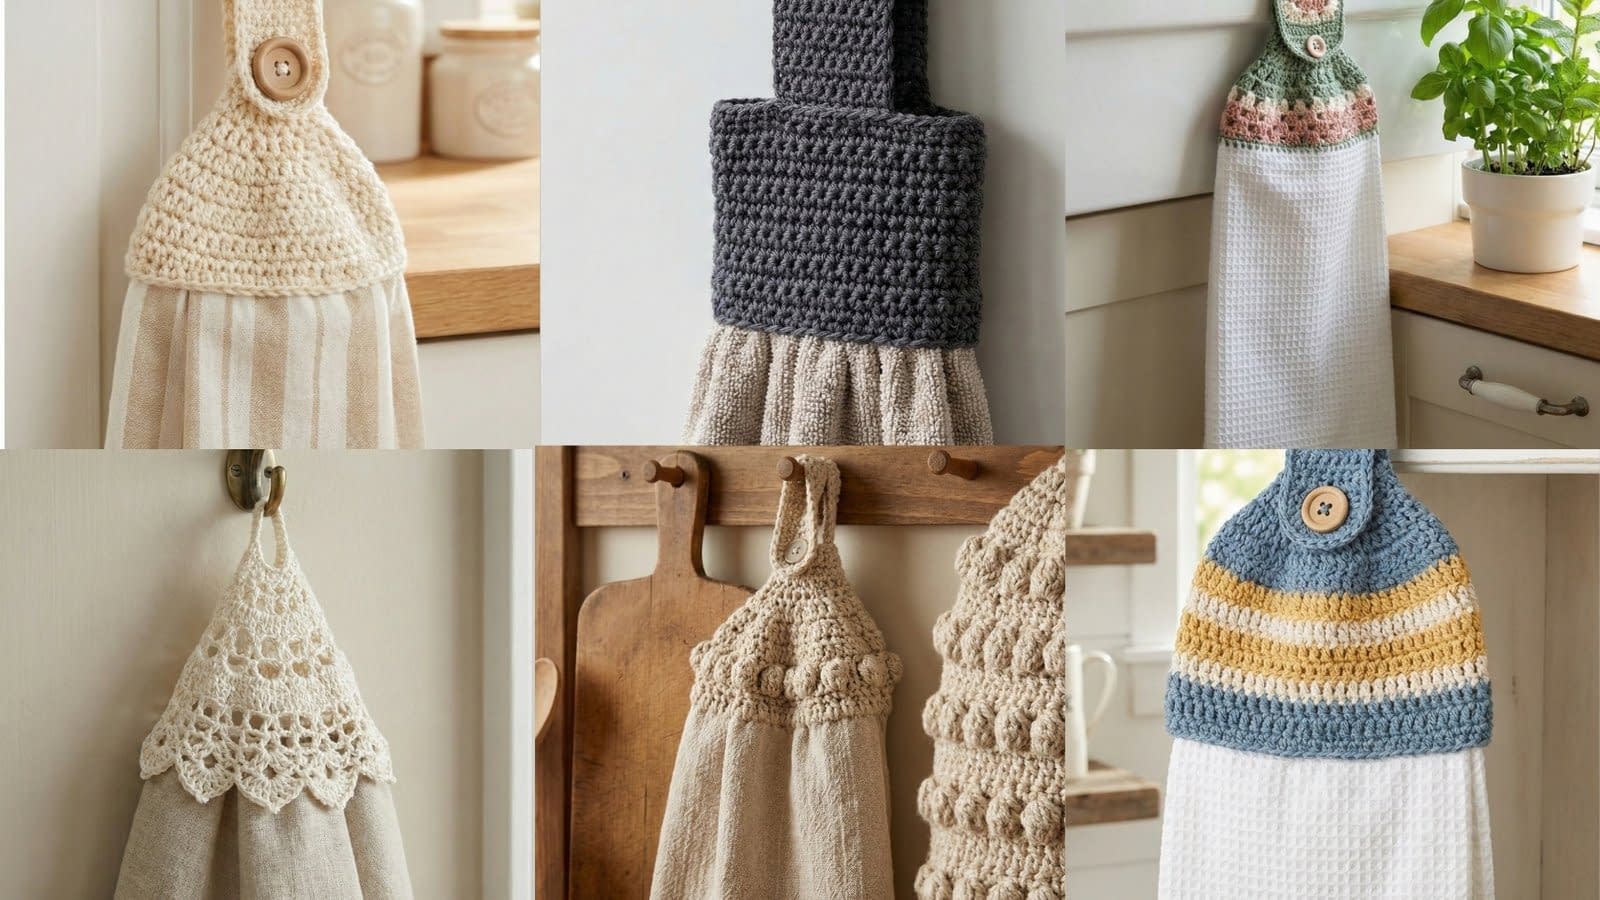
In every busy household, the kitchen serves as the heart of the home. It is where meals are prepared, stories are shared, and, unfortunately, where hand towels constantly slide off the oven handle and end up on the floor. If you have ever felt the frustration of picking up a damp towel for the tenth time in a single afternoon, then crochet towel toppers are the perfect solution for you. These charming and practical accessories combine the softness of a high-quality kitchen towel with a sturdy, crocheted handle that buttons or loops over your stove, refrigerator, or dishwasher handle. Not only do they keep your towels within arm’s reach, but they also add a touch of handmade elegance to your kitchen aesthetic.
The beauty of these projects lies in their versatility. Whether you prefer a clean, modern look with neutral tones or a rustic, textured feel with intricate stitch work, there is a pattern in this collection for every style. These toppers also make incredible gifts for housewarmings, bridal showers, or holiday exchanges. Because they require a relatively small amount of yarn, they are excellent for using up your stash of cotton or acrylic leftovers.
In this comprehensive guide, we are going to walk through the first three patterns of our collection. We have meticulously analyzed the visual details of each design to ensure that your finished project looks exactly like the professional results pictured. We will avoid all confusing abbreviations and shorthand, providing instead a long-form, descriptive tutorial that even a brand-new crocheter can follow with confidence.
1. The Classic Ribbed Button Topper with Neutral Stripes
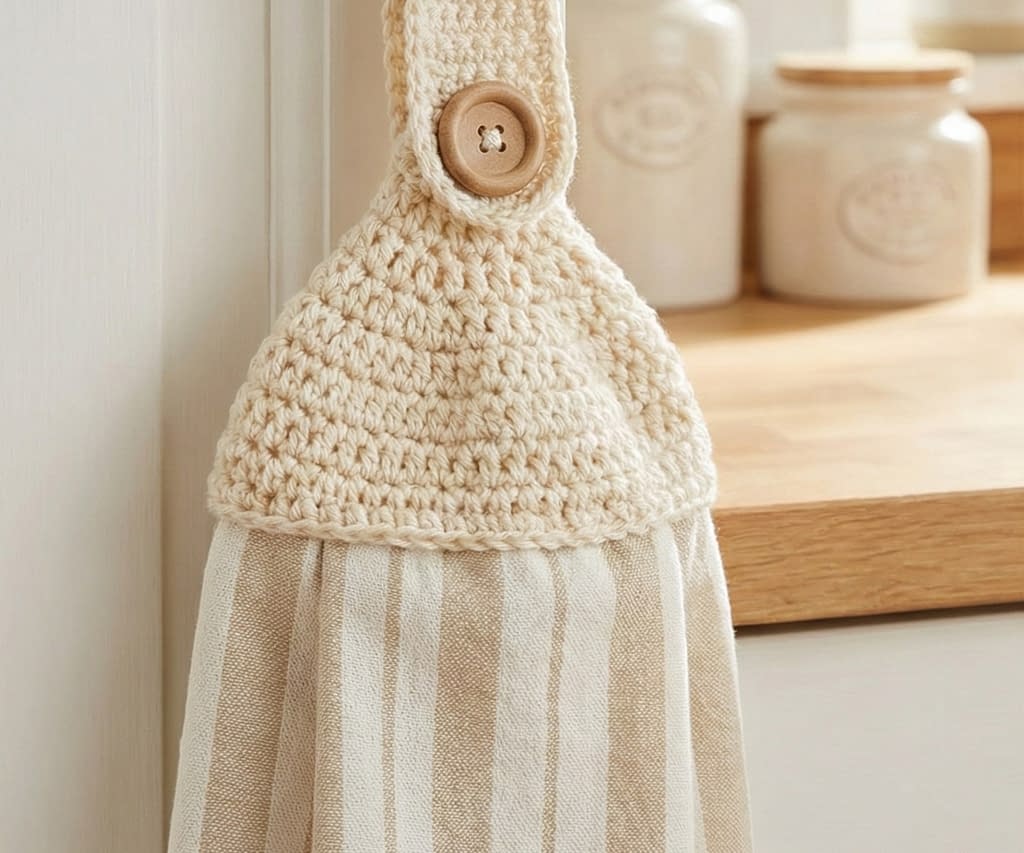
The first design in our series is a timeless masterpiece that focuses on clean lines and functional simplicity. As seen in the first image, this topper uses a beautiful cream-colored yarn paired with a tan and white striped towel. This design is characterized by a tapered triangular base that transitions into a sturdy vertical hanging strap, finished with a large, rustic wooden button.
Materials and Preparation
To begin this project, you will need approximately 50 to 70 yards of medium-weight category four cotton or acrylic yarn in a cream or off-white shade. Cotton is highly recommended for kitchen items because of its durability and ability to withstand frequent washing. You will also need a 4.0 millimeter crochet hook, which is often referred to as a Size G hook. For the assembly, have a sharp pair of scissors, a large-eyed tapestry needle, and a one-inch wooden button ready.
Before you start crocheting, you must prepare your kitchen towel. Take a standard rectangular kitchen towel and fold it in half widthwise. To create the pleated look seen in the image, you will gather the top edge of the towel until it is approximately five to six inches wide. You can use a sewing machine to run a gathering stitch across the top, or you can use your tapestry needle and a length of yarn to hand-sew a running stitch and pull it tight to create the pleats.
Detailed Crochet Instructions for the Topper Base
We will begin by creating the wide base that attaches directly to the fabric of the towel.
Step One: Start by creating a slip knot and placing it on your hook. Create a foundation chain of twenty-six chain stitches. This width will allow the topper to cover the gathered edge of your towel comfortably.
Step Two: For the first row, insert your hook into the second chain from the hook. Complete one single crochet stitch. Continue to place one single crochet stitch into every chain across the row. You should have a total of twenty-five single crochet stitches. Turn your work.
Step Three: Chain two. This chain two will count as your first half double crochet stitch throughout the pattern. In the second stitch from the previous row, work one half double crochet. Continue placing one half double crochet into every stitch across the row. Turn your work.
Step Four: Now we will begin the shaping process to create the triangular taper. Chain two. Work a half double crochet decrease across the next two stitches. To do this, yarn over, insert your hook into the next stitch, yarn over and pull up a loop, then yarn over and insert your hook into the following stitch, yarn over and pull up a loop. You will have five loops on your hook. Yarn over and pull through all five loops. Continue working one half double crochet in each stitch until you reach the last three stitches of the row. Work another half double crochet decrease over the next two stitches, and then place one regular half double crochet in the final stitch. Turn your work.
Step Five: Repeat the process from Step Four. By decreasing at the beginning and end of every row, your piece will gradually narrow. Continue this pattern until you have only six or seven stitches remaining across the top. This creates the slanted “shoulders” of the topper.
Constructing the Hanging Strap and Finishing
Once your base has reached the desired narrow width, it is time to transition into the strap that will wrap around your oven handle.
Step Six: Without fastening off, chain two and turn your work. Work one half double crochet into each of the remaining stitches across the narrow edge.
Step Seven: Continue working rows of half double crochet back and forth. Do not add any more decreases. This will create a straight, rectangular band. Continue until the strap measures approximately five to six inches in length.
Step Eight: To create the buttonhole, work halfway across your final row. Chain three, skip two stitches, and then half double crochet into the remaining stitches. This creates a gap in the center of the strap.
Step Nine: For the final row, work one single crochet into every stitch and work three single crochet stitches into the chain-three space created in the previous step. Fasten off your yarn, leaving a long tail for sewing.
Step Ten: Use your tapestry needle and the yarn tail to sew the wide, bottom edge of the crochet topper onto the gathered edge of your kitchen towel. Ensure the stitches are firm and secure. Finally, sew your wooden button onto the center of the triangular base, positioning it so that the strap can fold over a handle and loop through the button.
2. The Textured Charcoal Waffle Stitch Topper

The second design features a deep charcoal grey yarn that offers a striking contrast against a light beige terry cloth towel. This pattern is perfect for those who love a modern, industrial, or farmhouse aesthetic. The texture is much denser and more robust than the first pattern, making it very durable for heavy use.
Choosing Your Materials
For this design, select a sturdy worsted weight yarn in charcoal, slate, or navy blue. A 5.0 millimeter crochet hook (Size H) is appropriate here to ensure the textured stitches have enough definition without being too stiff. You will also need your standard finishing tools: scissors and a tapestry needle. Unlike the first pattern, this design features a fold-over loop style that does not necessarily require a button, though one can be added for extra security.
Creating the Textured Foundation
This topper is worked from the bottom up, starting with a wide rectangular section that provides a lot of surface area for the towel attachment.
Step One: Create a foundation chain of thirty stitches.
Step Two: Work one double crochet into the third chain from the hook and into every chain across the row. Turn your work.
Step Three: This row introduces the texture. Chain two. Work one front post double crochet around the post of the next stitch. To do this, yarn over, insert your hook from the front to the back and then to the front again around the vertical post of the stitch below, yarn over and pull up a loop, then complete your double crochet as normal. In the next stitch, work a standard double crochet into the top of the stitch. Alternate between front post double crochets and regular double crochets across the entire row. This creates a ribbed, architectural texture. Turn your work.
Step Four: Continue this alternating pattern for six rows. This creates a thick, textured band that will sit at the top of your towel.
Tapering and Strap Construction
Step Five: To begin the transition to the strap, we will use rapid decreases. Chain one and work a single crochet decrease across every pair of stitches in the row. This will cut your stitch count in half in a single row, creating a gathered effect at the top of the textured band.
Step Six: For the strap, work rows of single crochet back and forth over the remaining stitches. To make the strap extra strong, work into the back loops only of the stitches from the previous row. This creates a slight ridge and prevents the strap from stretching out too much over time when the weight of a wet towel is added.
Step Seven: Work the strap until it is eight inches long. This longer strap is designed to be pulled through a loop or fastened with a large toggle.
Step Eight: To finish, attach the bottom of the charcoal crochet piece to your towel. In the reference image, the towel is tucked slightly inside the crochet piece before being sewn, which hides the raw edge of the fabric completely and results in a very professional, store-bought appearance.
3. The Sage and Rose Moss Stitch Topper

The third pattern is perhaps the most decorative of the set. As seen in the third image, it features a white waffle-weave towel topped with a multi-colored crochet section. It uses a sophisticated palette of sage green, dusty rose, and cream. The stitch used here is a variation of the granny stitch or moss stitch, creating a beautiful “blocky” texture that looks intricate but is easy to achieve.
Yarn Selection and Color Planning
To achieve the look in the image, you will need small amounts of three different colors of cotton yarn. We suggest a soft sage green for the top section and strap, and a combination of rose and cream for the decorative stripes. A 4.0 millimeter hook is best for this mid-weight design.
Working the Decorative Stripes
Step One: Start with your cream yarn. Chain twenty-five. Work one row of single crochet across and turn.
Step Two: Change to the dusty rose yarn. Chain three (this counts as your first double crochet). Work two more double crochet stitches into the very first stitch. Skip two stitches. In the next stitch, work three double crochet stitches into the same spot. This is known as a “shell” or “cluster.” Continue skipping two stitches and working three double crochets into the next stitch across the row. This creates a row of little blocks. Turn your work.
Step Three: Change back to the cream yarn. Chain three. Work three double crochet stitches into the spaces between the clusters from the row below. This creates an interlocking brick pattern.
Step Four: Change to the sage green yarn. Work one row of single crochet across the top of your clusters to stabilize the edge and prepare for the shaping of the topper.
Shaping the Decorative Top
Step Five: With the sage green yarn, we will now decrease to form the rounded top seen in the image. Chain two. Work one half double crochet into the next stitch, then work a half double crochet decrease. Continue this pattern of one regular stitch followed by a decrease across the row. Turn your work.
Step Six: In the next row, work only decreases. This will bring your stitch count down significantly, creating a rounded, dome-like shape.
Step Seven: Once you have about eight stitches left, begin working your strap. Follow the same method as the first pattern, creating a long rectangular band of half double crochet stitches.
Step Eight: This specific design looks wonderful with a smaller, coordinating button. Sew the button onto the sage green section just above where the striped pattern ends. Attach the base of your crochet work to the white waffle towel using a hidden whip stitch. This ensures the colorful yarn is the star of the show against the crisp white fabric.
4. The Vintage Cream Lace Topper

The fourth design in our collection captures the essence of vintage elegance. As shown in the bottom-left image, this topper features a delicate, lacy shell pattern in a soft cream color, attached to a natural linen-style towel. This design is perfect for a cottage-core kitchen or a farmhouse setting where you want a softer, more romantic touch rather than a utilitarian look. The openwork stitches create a beautiful scalloped edge that drapes slightly over the towel fabric.
Selecting the Right Yarn
For this delicate design, a lighter worsted weight or even a sport weight cotton yarn works best. A heavy yarn might obscure the definition of the lace stitches. Choose a mercerized cotton in white, cream, or ecru to enhance the stitch definition and give it a slight sheen. You will also need a 3.75 millimeter or 4.0 millimeter crochet hook.
Establishing the Lacy Foundation
Unlike the previous sturdy bases, this foundation needs to set up a repeating pattern of shells.
Step One: Prepare your towel by folding and gathering the top edge to a width of about five inches. Using a sharp needle and your cream yarn, sew a blanket stitch across the top edge of the folded towel. Space your stitches evenly, aiming for a multiple of four stitches plus one extra stitch to ensure the pattern works out mathematically.
Step Two: Join your yarn to the first blanket stitch on the right side. Chain one and work one single crochet into every blanket stitch across the top of the towel. Turn your work.
Step Three: Now we begin the shell pattern. Chain three (counts as your first double crochet). Work one double crochet in the same first stitch. Skip the next stitch, work a single crochet in the next stitch, skip the next stitch, and work five double crochet stitches into the next stitch. This group of five double crochets creates a “shell” shape. Repeat the sequence between the asterisks across the row. End the row with two double crochet stitches in the very last stitch. Turn your work.
Building the Lace Structure
Step Four: Chain one and work a single crochet in the first stitch. Chain three, skip two double crochets, and work a single crochet into the center stitch of the shell from the previous row. Repeat this across the row. This creates a network of chains that opens up the pattern.
Step Five: Chain three. Work four double crochet stitches into the first single crochet (this counts as a half-shell). Work a single crochet into the chain-three space from the previous row. Then, work a full shell of five double crochet stitches into the next single crochet stitch. Repeat this across the row.
Step Six: Repeat Steps Four and Five for two or three more rows. As you work, you will see the beautiful scalloped fabric forming. To shape the topper into a triangle as shown in the image, you will simply stop working the half-shells at the beginning and end of the rows. Instead, slip stitch over the first few stitches to start your row further in. This will naturally create a stepped, triangular shape as you ascend.
Creating the Delicate Loop
Step Seven: Once you have decreased your pattern down to a single central shell or a small cluster of stitches at the top, do not fasten off. Chain twelve to fifteen stitches to create a loop.
Step Eight: Slip stitch back into the base of the chain to close the loop. Work a row of single crochet stitches around the ring of the loop to reinforce it and give it a polished look. Fasten off and weave in your ends. This topper hangs beautifully on a small hook or peg.
5. The Rustic Bobble Stitch Topper

Moving to the bottom-middle image, we find a design rich in texture and tactile appeal. This topper utilizes the bobble stitch to create rows of raised bumps that resemble popcorn kernels. Paired with a beige or oatmeal-colored yarn and a natural linen towel, this design feels earthy, rustic, and substantial. It is the thickest of all the toppers, making it very durable.
Understanding the Bobble Stitch
Before beginning, it is important to understand how to make the specific “bobble” used in this pattern. To make a bobble: Yarn over, insert hook into stitch, yarn over and pull up a loop, yarn over and pull through two loops. Repeat this four more times in the same stitch. You will have six loops on your hook. Yarn over and pull through all six loops. This creates a puffy cluster.
Creating the Textured Fabric
Step One: Start with a foundation chain of twenty-four stitches using a worsted weight yarn in a beige or tan shade. A 4.0 millimeter or 4.5 millimeter hook is recommended.
Step Two: Work a row of single crochet stitches across the chain to create a solid base. Turn your work.
Step Three: This will be your bobble row. Bobbles are typically worked on the “wrong side” of the fabric so they pop out on the “right side.” Chain one. Work a single crochet in the first two stitches. Work a bobble stitch in the next stitch, then work a single crochet in the next stitch. Repeat this alternating pattern across the row. End with a single crochet in the last two stitches. Turn your work.
Step Four: Chain one. Work one single crochet into every stitch across. This “reset” row flattens the top of the bobbles and prepares you for the next set.
Step Five: Repeat Step Three and Step Four. You can stack the bobbles directly on top of each other, or you can offset them by starting the row with three single crochets instead of two, creating a checkerboard effect. Continue this for four to five inches until you have a square or slightly rectangular panel of bubbly texture.
Forming the Top Tab
Step Six: To create the tapering seen in the image, switch to standard single crochet stitches. Work one row where you decrease at the beginning and end of the row.
Step Seven: Work straight rows of single crochet on the remaining central stitches (about six to eight stitches wide) for two inches.
Step Eight: Create a buttonhole by chaining three and skipping the middle three stitches of the row, then continue single crocheting. On the return row, work single crochets into the chain space.
Step Nine: Continue for one more inch to create the top flap. Fasten off. Sew a wooden button to the center of the bobble section. When you button this topper, the textured bobbles will face outward, adding a wonderful 3D element to your kitchen decor.
6. The Coastal Blue and Gold Striped Topper

The final design, shown in the bottom-right image, brings a splash of color to the kitchen. It features a crisp white waffle-weave towel and a topper striped with slate blue, golden yellow, and cream. This design relies on simple stitches and smart color changes to create a modern, cheerful look that mimics the horizon over the ocean.
Color Management and Materials
You will need three colors of cotton yarn: Slate Blue (Color A), Golden Yellow (Color B), and Cream (Color C). You will also need a matching button.
working the Striped Sequence
Step One: Begin with Color A (Slate Blue). Create a foundation chain of twenty-eight stitches. Work three rows of half double crochet to create a solid blue band at the base.
Step Two: Switch to Color C (Cream). When changing colors, pull the new color through on the final pull-through of the last stitch of the previous row. Work two rows of half double crochet in Cream.
Step Three: Switch to Color B (Golden Yellow). Work three rows of half double crochet. This vibrant yellow stripe acts as the focal point of the design.
Step Four: Switch back to Color C (Cream). Work two rows of half double crochet.
Step Five: Switch back to Color A (Slate Blue). This final section will form the top tapering and the strap. Work one row of half double crochet across.
Tapering and Finishing
Step Six: With the Slate Blue yarn, begin to decrease. Chain two, work a decrease, half double crochet across to the last two stitches, and work another decrease. Turn.
Step Seven: Repeat the decrease row until you have only eight stitches remaining in the center.
Step Eight: Work straight rows of half double crochet on these eight stitches for approximately four inches to create the strap.
Step Nine: To finish the strap with the rounded tab shown in the image, work a decrease at the start and end of the next row. Then, work three single crochet stitches into the very last stitch to create a rounded tip.
Step Ten: Fasten off and weave in all the loose ends from your color changes. Carefully sew the base of the blue section to your white waffle towel. Sew a cream or wooden button onto the center of the yellow stripe section. The strap will fold down and button securely, displaying the full gradient of colors.
Conclusion
Crocheting your own kitchen towel toppers is one of the most satisfying quick projects you can undertake. Not only do these toppers solve the practical problem of falling towels, but they also allow you to inject your personal style into the heart of your home. Whether you chose the intricate lace of the vintage design, the tactile comfort of the bobble stitch, or the cheerful brightness of the coastal stripes, you have created a functional piece of art.
These six patterns offer a progression of skills, from simple ribbing to color work and texture creation. Once you have mastered these, you can easily experiment with your own color combinations and stitch variations. Remember, these also make thoughtful, handmade gifts that are sure to be appreciated by friends and family. So, grab your hook, select your favorite yarn, and start transforming your kitchen one towel at a time.


