Creating custom baby onesies with a Cricut machine is one of the most heartwarming and creative crafting projects you can do. These small garments make wonderful gifts, cherished keepsakes, or even profitable handmade products for your small business.
In this detailed guide, we’ll go through 6 Cricut Baby Onesie Tutorials, each written as a complete, long-form walkthrough — from choosing designs and preparing materials to cutting, pressing, and finishing professional-quality onesies. Whether you’re a beginner or experienced crafter, you’ll learn techniques that ensure lasting, beautiful results every time.
Supplies You’ll Need for All Onesie Projects
Before starting any of these tutorials, gather the following essentials:
- Cricut Machine: Cricut Maker, Explore Air 2/3, or Joy
- Heat Transfer Vinyl (HTV): Everyday Iron-On, Glitter, or Foil Iron-On
- Blank Baby Onesies: 100% cotton or cotton blend
- Weeding Tools and Mat: LightGrip or StandardGrip Mat
- Cricut EasyPress or Household Iron
- Teflon Sheet or Parchment Paper
- Lint Roller
- Cricut Design Space Software
Preparation Step (for all projects):
- Prewash and dry your baby onesies to remove any coating that may prevent vinyl adhesion.
- Iron the fabric lightly to remove wrinkles.
- Use a lint roller to clean off dust or fibers.
- Always mirror your design before cutting HTV.
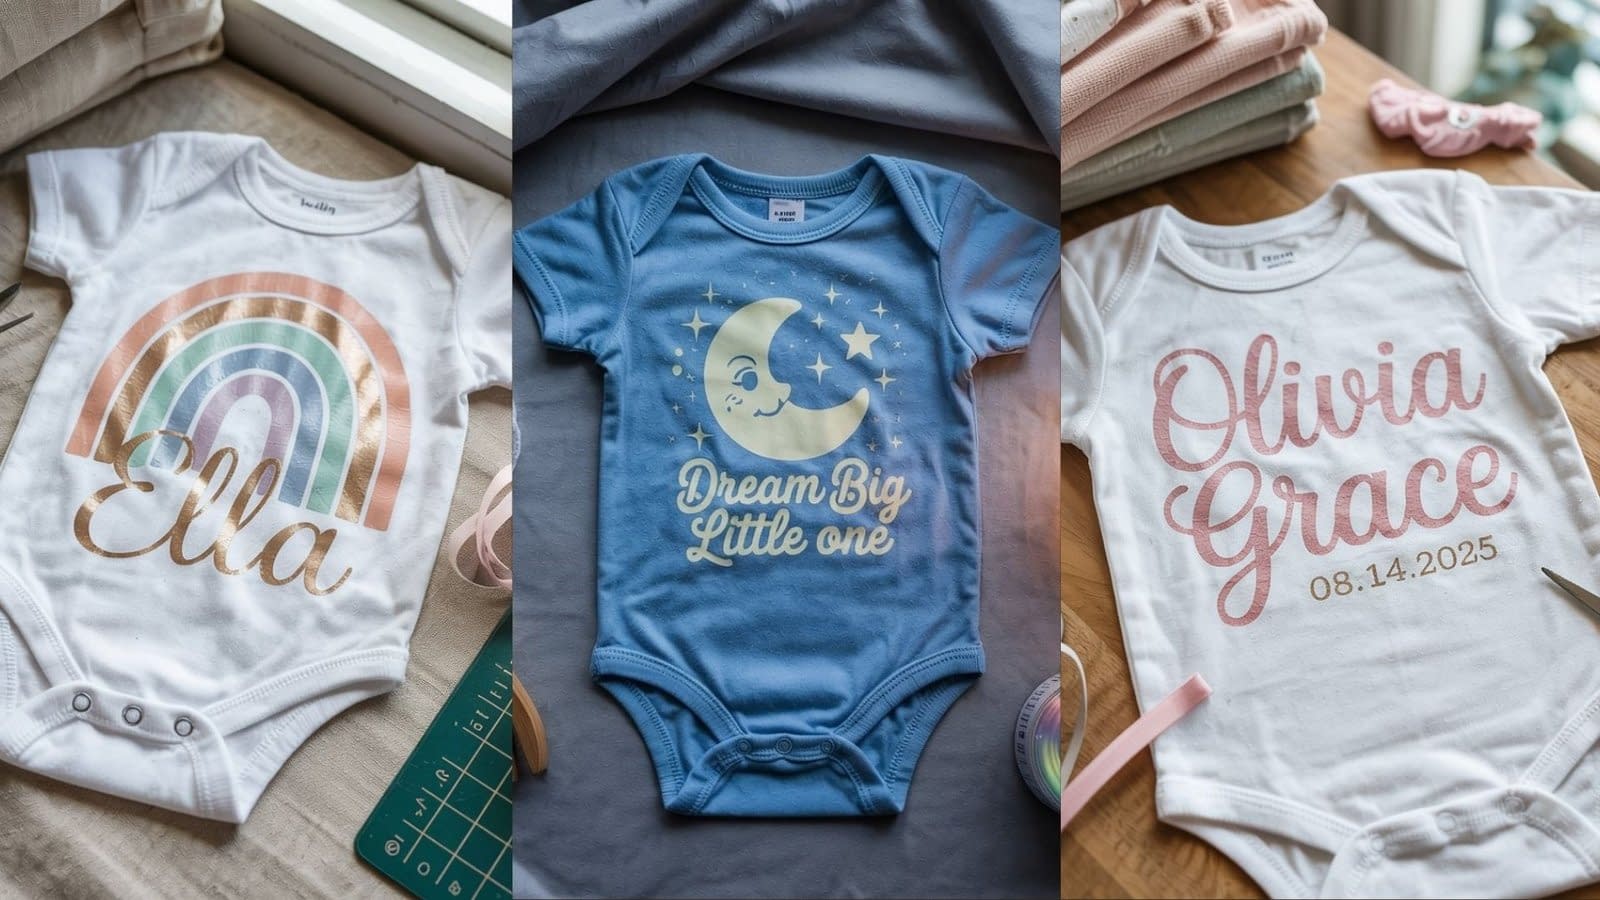
Tutorial 1: Personalized Name and Birth Date Onesie
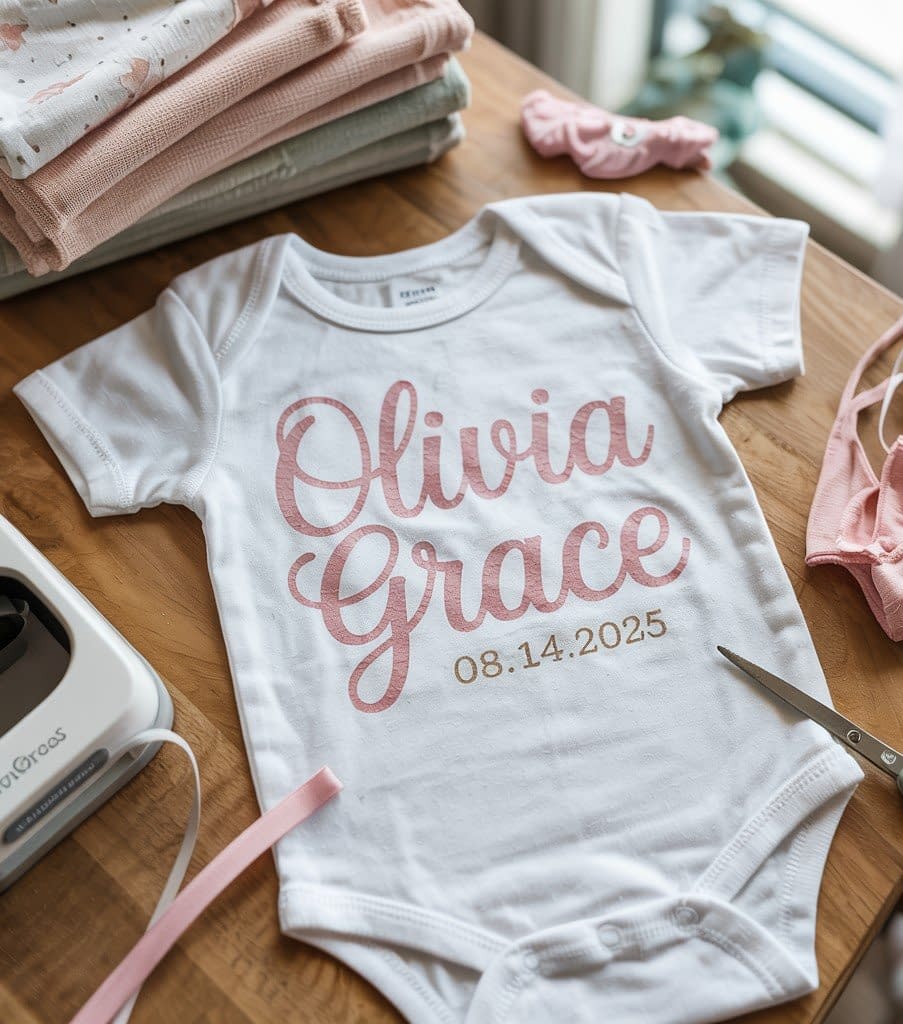
Overview
This classic and elegant design features the baby’s name and birth date — perfect for newborn photos, baby shower gifts, or keepsakes.
Step 1: Create the Design in Cricut Design Space
- Open Cricut Design Space and click “New Project.”
- Select the Text Tool and type the baby’s first name. Choose a script-style font like Babette, Hello Honey, or Buttercup.
- Add another text box for the birth date using a simple font like Arial Narrow or Montserrat.
- Adjust the size and position. The name should be the focal point — around 3–4 inches wide depending on onesie size.
- Optional: Add small embellishments like stars, hearts, or tiny footprints for decoration.
Step 2: Cut and Weed the Design
- Click “Make It” and turn on Mirror (very important for HTV).
- Place your vinyl shiny-side down on the cutting mat.
- Choose “Everyday Iron-On” as your material setting.
- Load the mat and cut.
- Weed the design carefully using a weeding tool — remove all excess vinyl, leaving only the text and shapes.
Step 3: Heat Press Application
- Preheat your EasyPress to 315°F (160°C).
- Place the onesie on a flat surface and preheat it for 5 seconds to remove moisture.
- Position your vinyl design where you want it.
- Cover with a Teflon sheet and press for 30 seconds with medium pressure.
- Let the design cool slightly, then peel the carrier sheet slowly.
Step 4: Personalization Tips
- Use different colors for the name and date — gold and navy, or pink and white work beautifully.
- Add a small heart or star to accent the name.
- For multiple babies, you can create a matching set using the same design style.
Tutorial 2: Funny Quote Baby Onesie
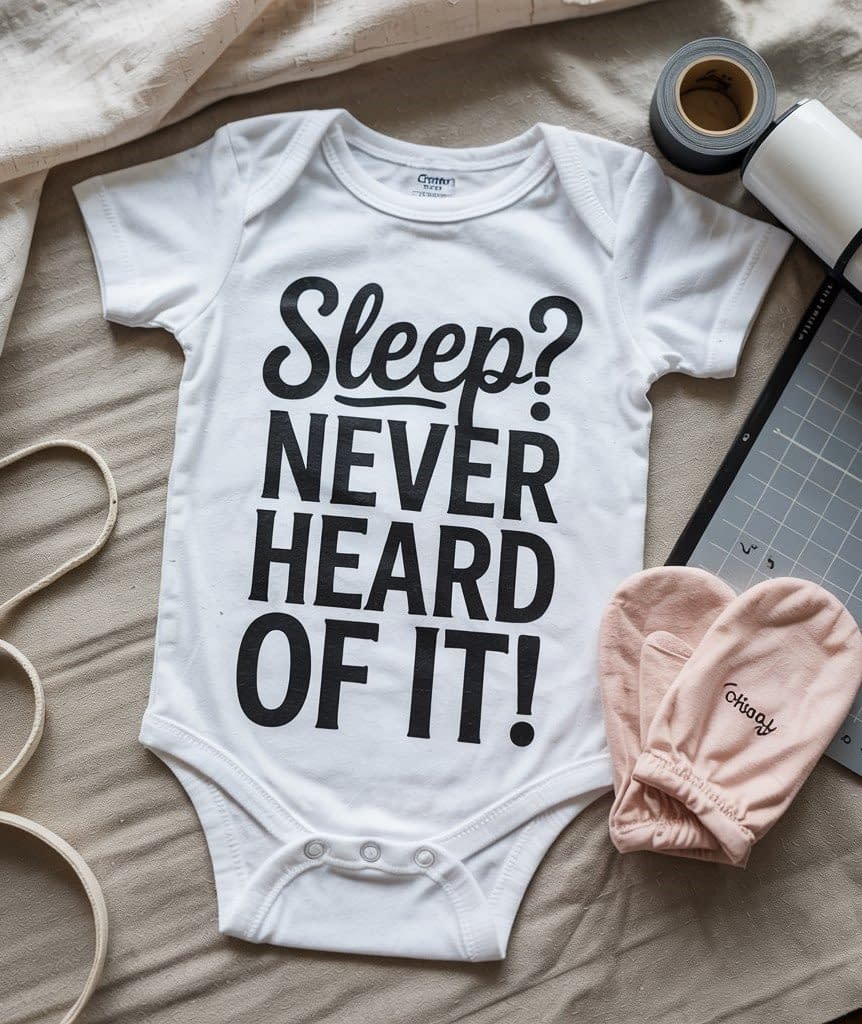
Overview
A humorous quote adds personality and charm to baby clothing. Whether it’s for daily wear or a photo shoot, this type of onesie always stands out.
Step 1: Choose or Create Your Quote Design
- Open Cricut Design Space and use the Text Tool to write your quote.
- Examples: “I Only Cry When Ugly People Hold Me,” “Sleep? Never Heard of It,” or “Mama’s Mini Boss.”
- Mix fonts for emphasis — use Impact for bold words and Babette for cursive flair.
- Center the text and adjust letter spacing for balance.
- Add small clipart such as milk bottles or pacifiers to enhance the design.
Step 2: Prepare and Cut the Vinyl
- Mirror your design before cutting.
- Place the vinyl shiny-side down on the mat.
- Use the “Iron-On Vinyl” material setting and let Cricut cut the design.
- Weed out the negative space carefully — words should remain crisp and clean.
Step 3: Applying the Design
- Preheat the onesie for 5 seconds.
- Place the vinyl text in the center of the chest area.
- Cover with a Teflon sheet and press at 315°F for 30 seconds.
- Allow to cool slightly and peel away the carrier sheet.
Step 4: Troubleshooting and Finishing
- If any letter lifts after peeling, cover again and repress for 10 seconds.
- Avoid pressing seams; use a pressing pillow to keep surface even.
Creative Variation
Add a small baby icon underneath the text or use glitter vinyl for keywords like “Mommy” or “Boss” to make them stand out.
Tutorial 3: Animal-Themed Baby Onesie
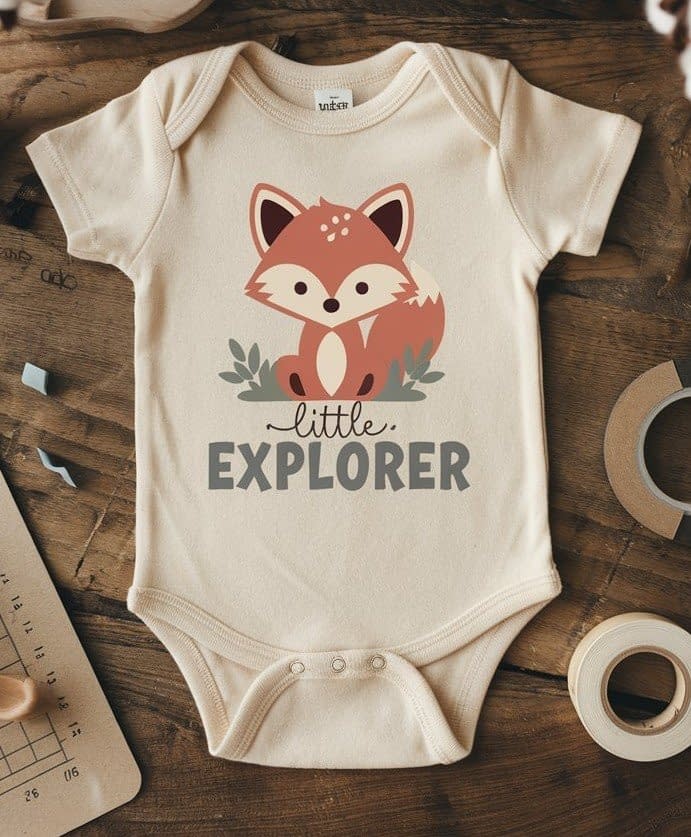
Overview
Animal-themed onesies never go out of style. You can make anything from a cute fox or elephant to a bear cub with the baby’s nickname or phrase like “Wild One.”
Step 1: Choose the Animal SVG
- In Cricut Design Space, search for animal SVGs or upload your own.
- Good examples: baby lion, bunny, elephant, fox, or giraffe.
- Size your design to fit within a 4-inch width area (for newborn to 3-month onesies).
- Add text like “Little Explorer” or “Born to Roar.”
Step 2: Prepare for Cutting
- Use multiple colors of vinyl for different parts — one for the body, another for facial details.
- Mirror all layers before cutting.
- Cut each color on separate mats or reapply vinyl one color at a time.
- Weed carefully, separating layers.
Step 3: Layering and Pressing
- Start by pressing the bottom color first for about 10–15 seconds.
- Peel the carrier sheet while warm.
- Align the next layer, cover with a Teflon sheet, and press again.
- Continue this process until all layers are attached.
- Once complete, do a final press for 30 seconds to seal all layers.
Step 4: Design Tips
- Keep designs simple with 2–3 colors maximum.
- For softer texture, use flocked vinyl or matte finish HTV.
- Avoid thick layering on very small onesies to maintain comfort.
Tutorial 4: Monthly Milestone Onesie Set
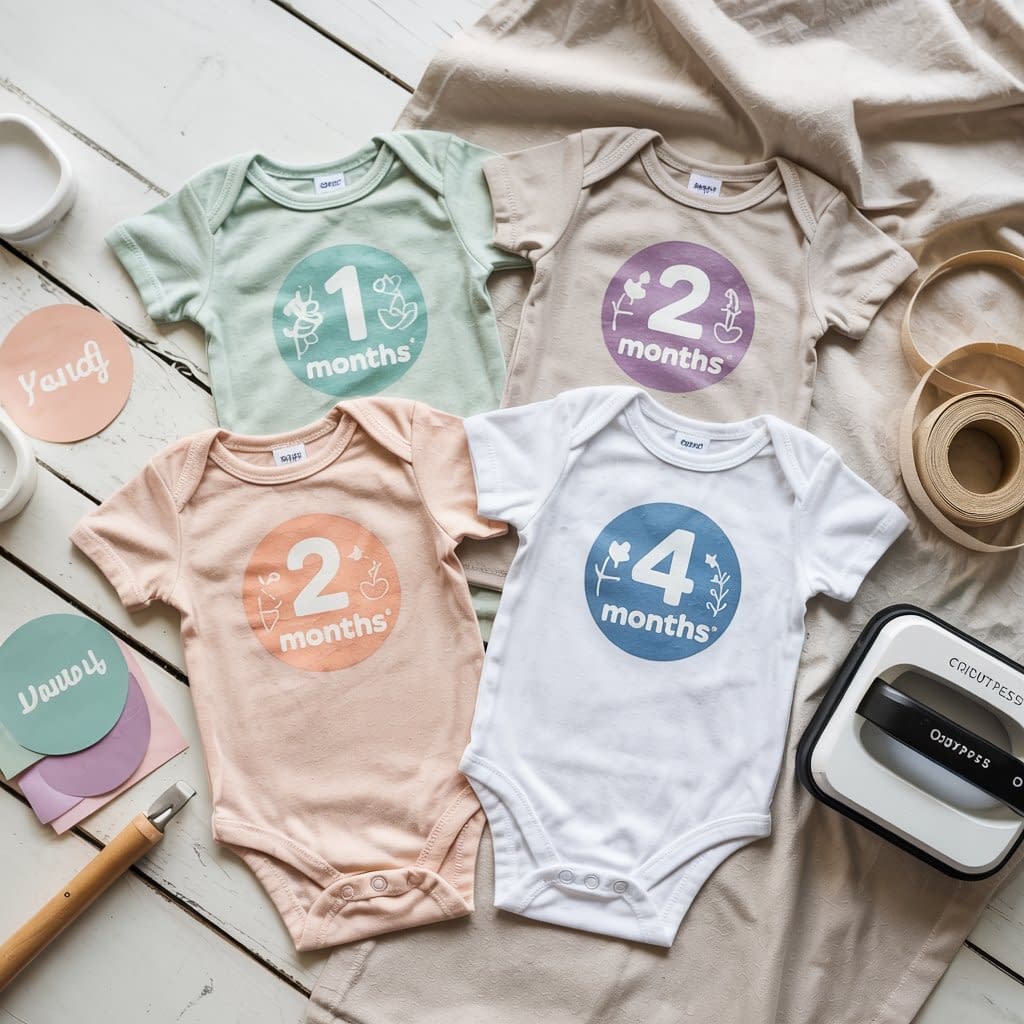
Overview
A full 12-piece set for monthly milestones is a perfect gift or photo series idea. Each onesie marks a baby’s growth month by month with charming graphics.
Step 1: Create the Template
- In Cricut Design Space, create a circular shape (around 3–3.5 inches wide).
- Inside the circle, type “1 Month” using a clean, bold font like Avenir Next.
- Add decorative elements such as leaves, stars, or simple wreaths.
- Duplicate the design 12 times and change the number for each month.
Step 2: Cut and Organize
- Mirror all 12 designs before cutting.
- Use different pastel colors for each month — mint, blush, lavender, sky blue.
- Weed all designs and keep them organized by month using labeled envelopes or folders.
Step 3: Apply the Designs
- Press each design on its respective onesie following the usual 315°F for 30 seconds rule.
- Allow to cool slightly before peeling the liner.
- Double-check alignment using a ruler to maintain uniform placement across the set.
Step 4: Presentation Idea
- Roll each onesie, tie with ribbon, and place in a gift box.
- Add Cricut-cut paper labels reading “1 Month,” “2 Months,” etc., for organization.
Bonus Tip
You can also design stickers or photo props that match the onesie graphics for parents to use in milestone photos.
Tutorial 5: Minimalist Modern Design Onesie
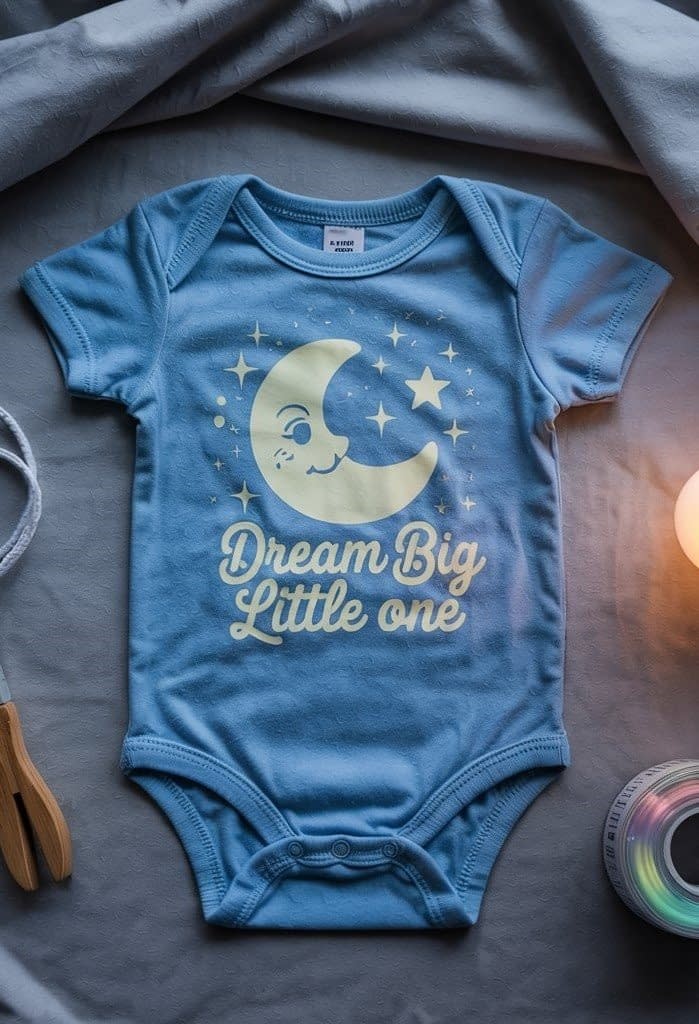
Overview
If you love simple, timeless designs with a touch of sophistication, a Minimalist Modern Design Onesie is the perfect choice. This tutorial focuses on creating clean, stylish looks using modern typography, subtle graphics, and neutral tones. These designs are versatile and gender-neutral, making them ideal gifts for baby showers, photoshoots, or everyday wear. Think phrases like “Little Dreamer,” “Tiny Human,” or “Born to Shine” — sleek and chic with a minimalist edge.
Step 1: Choosing the Design Concept
In Cricut Design Space, start by selecting a modern, clean font. Sans-serif fonts like Montserrat, Raleway, or Bebas Neue work beautifully for this look.
Decide on a short phrase or word that captures your baby’s personality — for example:
- “Little Dreamer”
- “New to the Crew”
- “Tiny Miracle”
- “Wild Heart”
You can also add a small minimalist graphic like a star, heart, or moon to balance the text. Keep the design centered and spaced evenly for a professional finish. Avoid clutter — the charm lies in simplicity.
Step 2: Preparing the Vinyl Design
Once your layout is ready:
- Set your Cricut to cut iron-on vinyl (HTV).
- Mirror the design before cutting — this ensures the text appears correctly when transferred.
- Use matte black, white, or neutral-tone HTV for a clean, understated aesthetic.
- Press “Make It” in Design Space and load your vinyl (shiny side down) onto a green or blue Cricut cutting mat.
- Let your machine cut the design, then gently weed away the excess vinyl using a weeding tool, keeping only the clean letters and shapes.
Step 3: Positioning and Heat Application
Before pressing:
- Preheat the baby onesie for about 5 seconds using a Cricut EasyPress at 315°F (157°C) to remove any moisture or wrinkles.
- Place your vinyl design centered on the chest area, about 1 inch below the neckline for the best look.
- Cover it with a Teflon sheet or parchment paper.
- Apply firm, even pressure with your EasyPress for 30 seconds.
Once pressed, peel the carrier sheet while warm and inspect for full adhesion — especially along the thin font edges. If needed, press again for 5–10 seconds.
Step 4: Finishing Touches
The minimalist look is all about polish and proportion. To make your onesie feel professional:
- Use neutral or earth-tone onesies (like beige, sage, white, or dusty pink).
- Keep fonts crisp and balanced — centered and aligned.
- For an extra design touch, add a tiny logo-style icon near the bottom hem or sleeve.
If you’re making a gift set, pair it with a matching bib or swaddle blanket using the same text design for a cohesive, boutique-style aesthetic.
Step 5: Creative Variations
Want to customize it further while keeping it minimal?
- Try tone-on-tone vinyl (e.g., cream vinyl on beige onesie) for a subtle embossed effect.
- Add a small pocket accent using patterned HTV to mix textures while maintaining simplicity.
- Create a set of minimalist quotes for every day of the week — like “Nap Time Boss,” “Snack Mode,” or “Tiny Explorer.”
Minimalist designs are timeless, photograph beautifully, and are perfect for both modern parents and classic baby styles. With this Cricut Baby Onesie tutorial, you’ll achieve a boutique-quality finish every single time.
Tutorial 6: Layered Pattern or Advanced Design Onesie
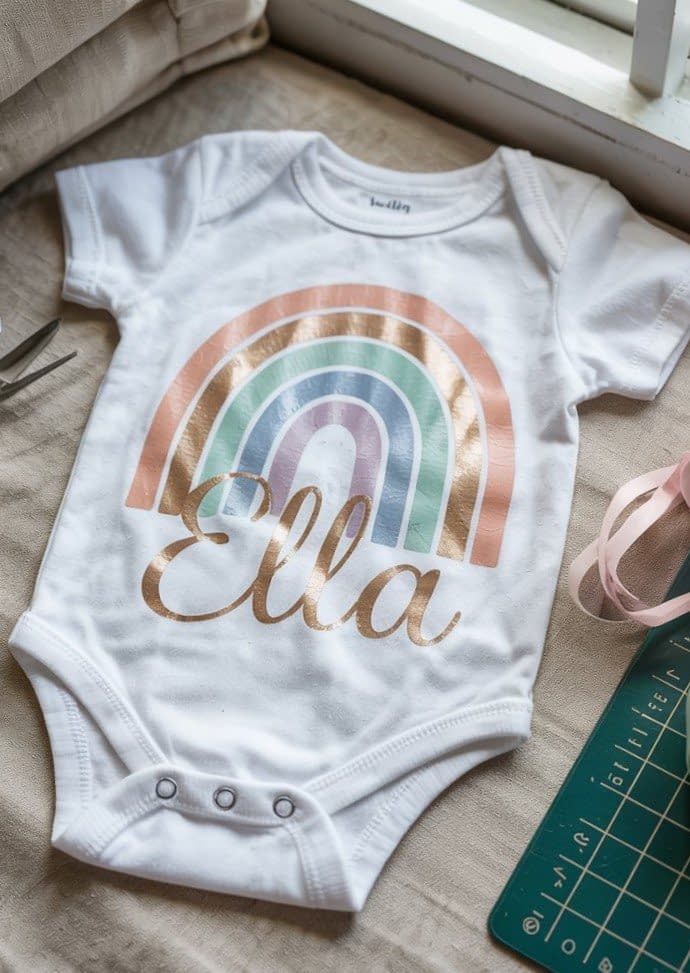
Overview
For experienced Cricut users, layered pattern designs let you create vibrant, multi-color scenes — like rainbows, jungles, or florals.
Step 1: Preparing Complex Layers
- Upload or create your layered SVG in Design Space.
- Separate each color group using the “Ungroup” and “Attach” tools.
- Use the “Align” feature to center everything perfectly.
- Label each layer (e.g., Layer 1: Sky Blue, Layer 2: Pink Petals).
Step 2: Cutting Multiple Layers
- Cut each color on its respective mat.
- Weed every layer carefully and keep them stacked in the correct order.
Step 3: Pressing in Sequence
- Preheat the onesie.
- Start with the base layer, pressing for only 10–15 seconds.
- Peel the carrier sheet, add the next layer, and repeat.
- Once all layers are applied, cover with Teflon sheet and press for 30 seconds for a final seal.
Step 4: Fine-Tuning and Design Balance
- Keep total layering under four layers to prevent stiffness.
- Use thin vinyl materials to maintain softness.
- If misalignment occurs, trim small overlaps using scissors before pressing.
Creative Variation
Try ombre gradients or patterned vinyls for the top layer to give your design depth. You can also add the baby’s name over the multi-layer background for a finished look.
Care Instructions for Cricut Baby Onesies
To make your designs last longer and stay soft:
- Wash inside out in cold water on gentle cycle.
- Use mild detergent; avoid bleach or softeners.
- Tumble dry low or hang dry.
- Do not iron directly on the vinyl.
Final Thoughts
These six in-depth Cricut Baby Onesie Tutorials provide everything you need to make unique, beautiful, and durable baby apparel. From simple names to layered graphics, each project helps you master a new skill while creating something meaningful.
The more you experiment, the more ways you’ll find to personalize each design — combining colors, textures, and patterns to make every onesie a tiny work of art. Whether it’s a sentimental gift or a creative product line, these projects show how much love and detail can fit into something so small.