
We’ve all had books sitting on our shelves, gathering dust, torn beyond repair, or outdated beyond use. Instead of tossing them into the recycling bin, why not give them a second life through upcycled book page art? Not only does this approach reduce waste, but it also transforms forgotten pages into something fresh, meaningful, and beautiful.
In this blog post, we’ll explore 5 Upcycled Book Page Art ideas that you can create with minimal supplies but maximum creativity. Whether you’re looking for wall art, functional décor, or handmade gifts, these projects offer the perfect blend of sustainability and artistry. Each idea is explained in detail, with tips for customizing the style, adding personal touches, and ensuring your art becomes a lasting treasure.
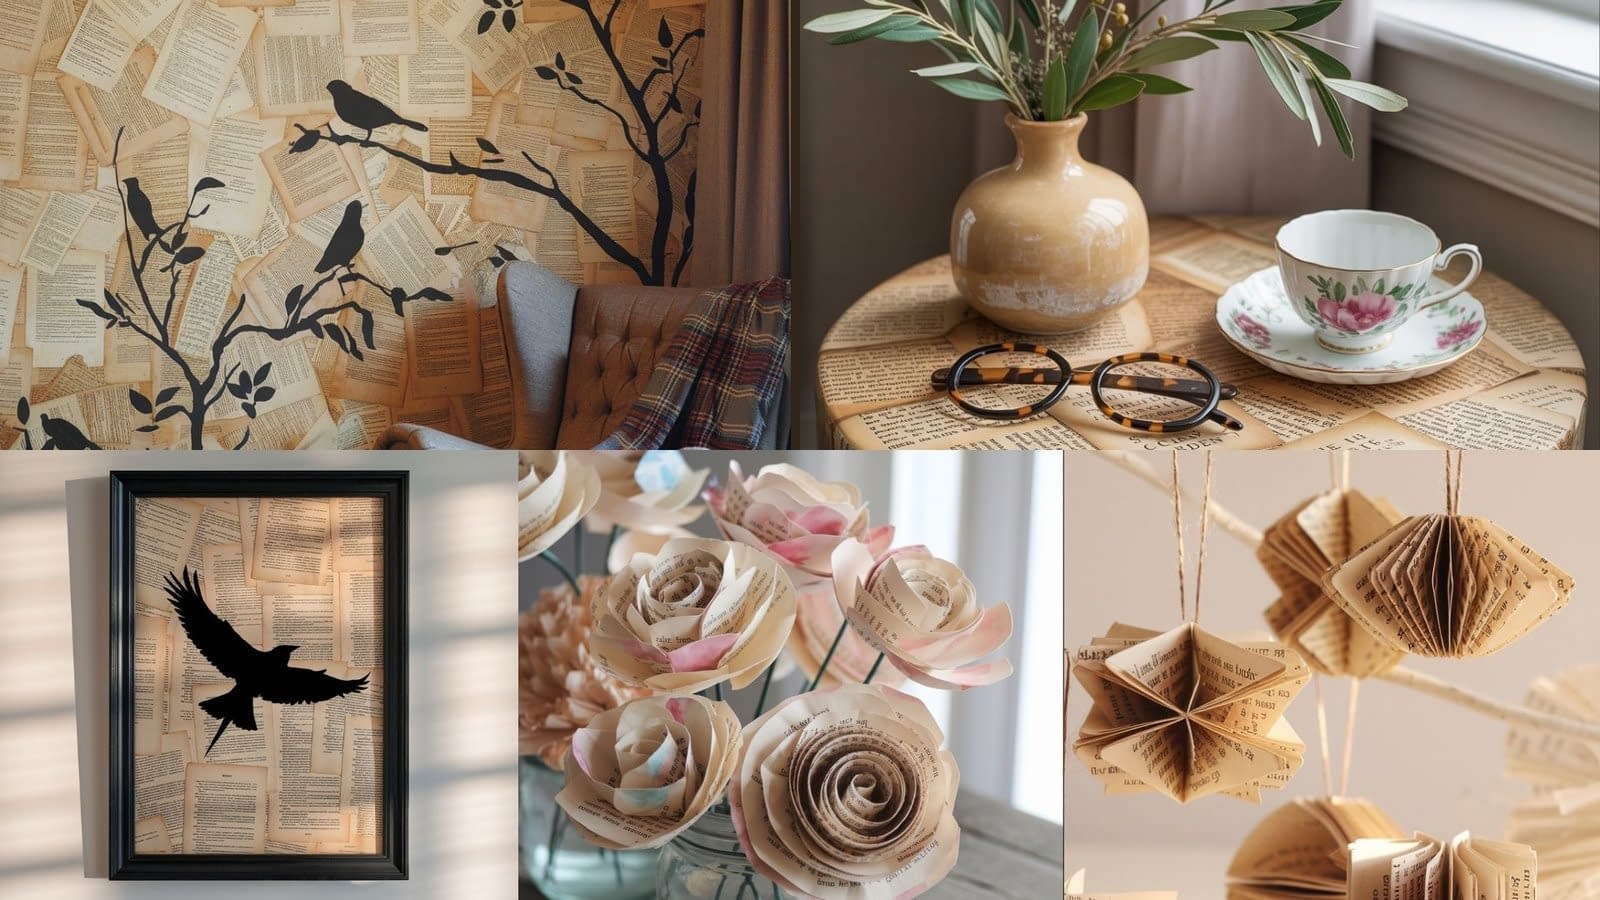
1. Book Page Wall Collage: A Statement Piece for Any Room

One of the most impactful ways to upcycle book pages is by turning them into a large-scale wall collage. This project works well as an accent wall in a reading nook, bedroom, or even a café-style kitchen.
Materials You’ll Need
- Old book pages (varying sizes and shades for texture)
- Double-sided tape or Mod Podge
- Foam brush or roller
- A blank wall, canvas, or wooden board
- Optional: stencils or printed designs for layering
Step-by-Step Guide
- Choose the foundation: Decide if you want to apply the pages directly to the wall or onto a large canvas/wooden board for a movable piece.
- Select your layout: Randomly arrange pages for a rustic look, or align them neatly for a more structured finish.
- Apply adhesive: Use Mod Podge or double-sided tape to stick each page securely. Overlapping slightly creates depth and texture.
- Seal the collage: Brush a thin layer of Mod Podge over the entire surface to protect it from wear.
- Personalize: Add stenciled quotes, silhouettes, or painted accents on top of the collage for an extra artistic touch.
Styling Tips
- Use yellowed, aged pages for a vintage vibe.
- Incorporate botanical or bird illustrations if the book contains them.
- Frame sections of the collage to create a gallery wall effect.
This book page wall collage makes a bold statement and sets the tone for a creative, literary-inspired space.
2. Book Page Flowers: Timeless Blooms That Never Fade

Floral crafts are classic, but when made from book pages, they gain a poetic twist. Book page flowers can be used in bouquets, wreaths, garlands, or as single decorative accents in vases.
Materials You’ll Need
- Old book pages
- Scissors
- Hot glue gun or craft glue
- Floral wire and tape
- Optional: watercolor paints for tinted petals
Step-by-Step Guide
- Cut petal shapes: Fold a page and cut out petal templates in varying sizes (small, medium, large).
- Shape petals: Gently curl the edges with a pencil to create natural-looking folds.
- Form the flower center: Roll a small strip of paper tightly for the bud.
- Layer petals: Attach petals around the center using glue, starting with smaller ones and gradually adding larger ones.
- Add the stem: Wrap floral wire with tape and attach it to the base of the flower.
Styling Tips
- Make a full bouquet and display it in a rustic mason jar.
- Create a wreath by attaching flowers to a circular frame.
- Lightly brush petal edges with watercolor for a romantic look.
These book page flowers not only bring charm but also serve as lasting keepsakes, perfect for weddings, anniversaries, or everyday décor.
3. Book Page Silhouette Art: Personalized and Striking

If you’re looking for a project that balances minimalism with impact, silhouette art using book pages is a perfect choice. This craft transforms plain backgrounds into striking pieces that can reflect personal interests, hobbies, or even family portraits.
Materials You’ll Need
- Book pages (preferably with interesting fonts)
- A silhouette template (animals, people, objects, etc.)
- Black cardstock or paint
- Scissors or craft knife
- Glue and a canvas or thick paper backing
Step-by-Step Guide
- Prepare the background: Mount book pages onto your canvas or backing surface.
- Choose a silhouette: Print or draw a simple silhouette shape. Popular options include trees, birds, butterflies, or children’s profiles.
- Cut and place: Either cut the silhouette from black cardstock and glue it over the book page background, or paint the silhouette directly onto the pages.
- Frame it: Place the finished piece into a frame for a polished look.
Styling Tips
- Use multiple smaller silhouettes (like a flock of birds) for a dynamic arrangement.
- Add metallic paint accents for a modern twist.
- Choose silhouettes related to literature (like quills, typewriters, or glasses) to emphasize the book theme.
Book page silhouette art offers endless possibilities for personalization, making it a thoughtful gift or a conversation starter on your wall.
4. Book Page Ornaments: Seasonal and Decorative Treasures

Old book pages can also be upcycled into ornaments that work beautifully for holidays, special occasions, or everyday decoration.
Materials You’ll Need
- Old book pages
- Scissors and craft knife
- Hot glue or Mod Podge
- Ribbon or twine
- Optional: glitter, beads, or charms for embellishment
Step-by-Step Guide
- Select shapes: Cut book pages into shapes such as circles, stars, hearts, or snowflakes.
- Fold and layer: For 3D ornaments, fold several identical shapes and glue them together at the folds, leaving space for them to fan out.
- Add hanging loops: Attach ribbon or twine at the top.
- Decorate: Add subtle glitter, metallic edges, or charms for extra sparkle.
Styling Tips
- Hang book page ornaments on a Christmas tree for a rustic holiday look.
- Use heart-shaped ornaments as wedding décor.
- Create a garland by stringing multiple shapes together.
These book page ornaments are versatile, eco-friendly, and can be tailored for any season or theme.
5. Book Page Decoupage on Furniture and Accessories

For a functional and stylish take on upcycled book page art, try decoupage. Covering furniture or accessories with book pages creates one-of-a-kind statement pieces that blend utility with creativity.
Materials You’ll Need
- Old book pages
- Mod Podge or decoupage glue
- Foam brush
- Furniture or accessory (tray, table, lamp base, etc.)
- Clear acrylic sealer for durability
Step-by-Step Guide
- Choose your surface: Decide on the piece you’d like to transform. Smaller accessories are great for beginners.
- Prepare pages: Tear or cut book pages into manageable sizes.
- Apply adhesive: Brush Mod Podge onto the surface and press book pages firmly in place.
- Smooth out wrinkles: Use a credit card or roller to flatten bubbles.
- Seal the piece: Apply multiple coats of Mod Podge, allowing each to dry before adding the next.
- Protect: Finish with a clear acrylic sealer for a long-lasting result.
Styling Tips
- Apply book pages in a diagonal or overlapping style for more texture.
- Combine with vintage illustrations for pops of color.
- Use on trays, coasters, or drawer fronts for functional everyday art.
Book page decoupage is perfect for those who want a practical yet artistic way to showcase their love for books.
Final Thoughts: Creativity Meets Sustainability
Upcycled book page art is more than just a trend—it’s a meaningful way to blend creativity with sustainability. By reimagining old books into wall collages, flowers, silhouette art, ornaments, or decoupaged furniture, you create décor pieces and gifts that carry both charm and eco-conscious value.
These 5 upcycled book page art ideas are just the beginning. Once you get started, you’ll likely find countless ways to repurpose pages, each reflecting your personal style and artistic vision.


