
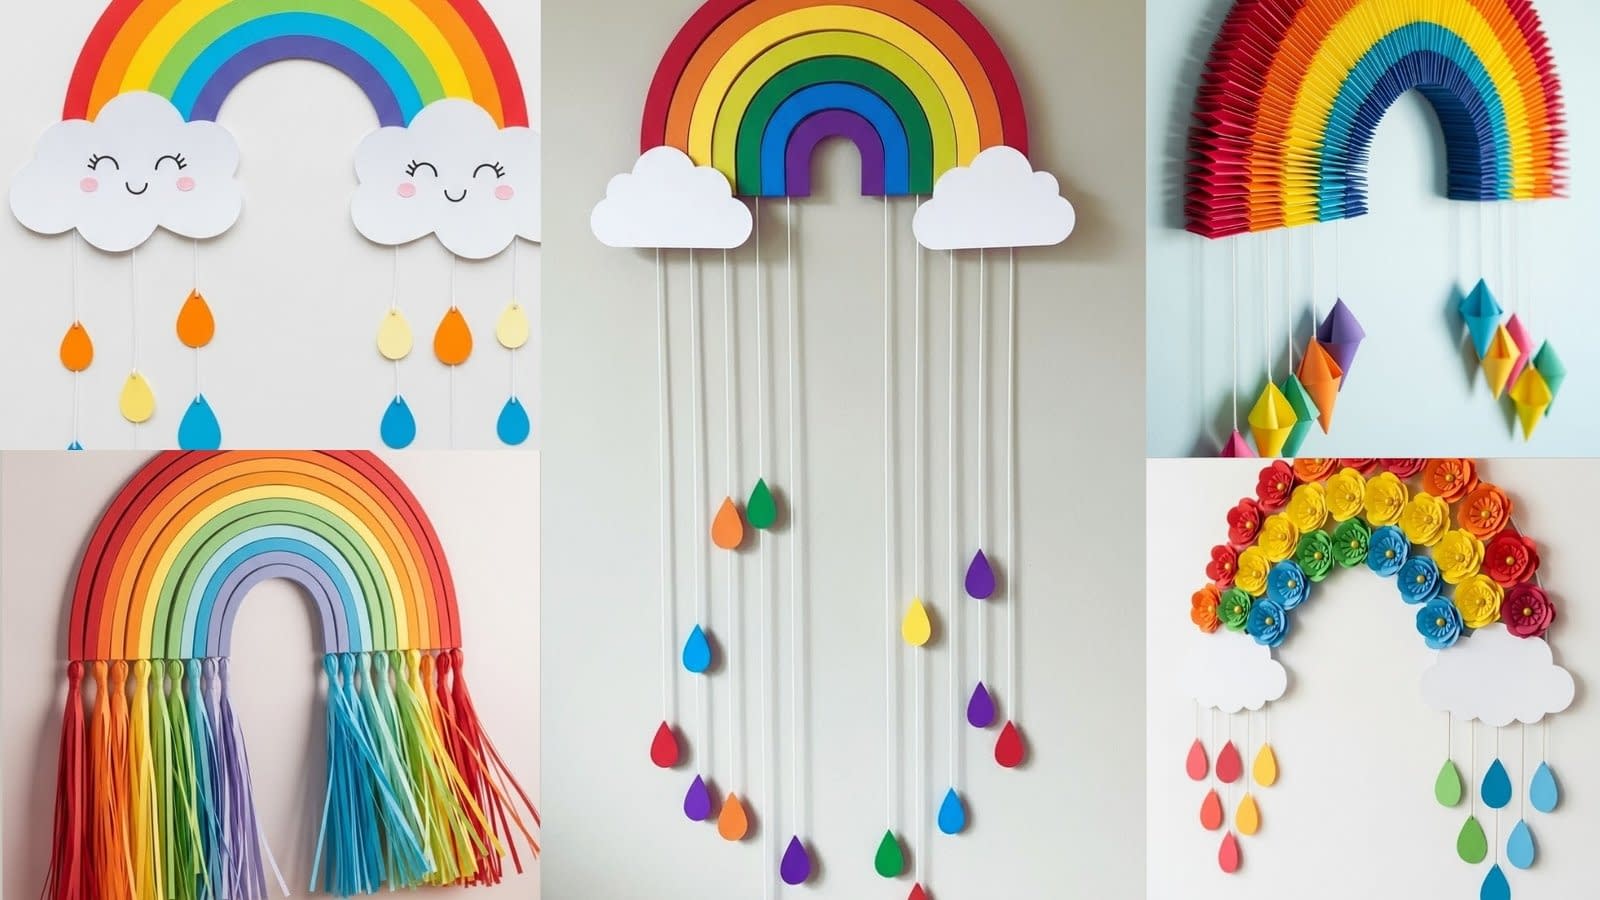
Paper rainbows are cheerful, inexpensive, and surprisingly versatile décor pieces. Whether you want a playful nursery accent, a polished wall hanging for a modern living room, or a craft to sell at local markets, these 5 Paper Rainbow Wall Hanging Tutorials cover everything you need. Each tutorial walks you through materials, sizing, cutting and folding techniques, specific glue choices and when to use them, assembly methods, and finishing touches. You’ll get precise measurements and practical tips so every step produces clean, durable results.
This post is organized so you can jump to the tutorial that fits your skill level and style, or follow all five and build a small collection. Read the general preparation and tools section first — many techniques repeat across tutorials — then follow the step-by-step guides.
Materials, Tools, and Glue Guide
Before starting any tutorial, gather the right supplies. The choice of paper, cutting tools, and adhesives is critical to a neat result.
Materials
- Paper types:
- Lightweight colored paper (80–100 gsm) — best for tassels, thin fans, and small raindrops.
- Mid-weight colored paper (120–160 gsm) — ideal for most folded fans and layered arcs where you need structure with some flexibility.
- Cardstock (200–300 gsm) — use for bases, backing, or when you want very crisp arcs.
- Textured papers (crepe, mulberry, handmade) — great for floral styles.
- White paper or white cardstock for clouds.
- Thin cotton string, embroidery floss, or fishing line for hanging raindrops / cones.
- Slim wooden dowel (3–8 mm) or a wooden craft stick depending on finished width.
- Beads, sequins, or small gold beads for flower centers or decoration.
- Small washers or thin metal weights (optional) for bottom weighting.
- Optional: LED string lights (battery-operated) for backlighting.
Tools
- Scissors: small sharp craft scissors and larger household scissors.
- Craft knife and cutting mat for precise arcs and internal cuts.
- Metal ruler (30–45 cm) and flexible ruler (for arcs).
- Bone folder or the back of a spoon for shaping petals/folding crisp creases.
- Compass or round objects (plates, bowls) for tracing arcs.
- Pencil, eraser, and permanent black marker for faces or accents.
- Hot glue gun (low-temperature recommended for kids’ projects supervision).
- PVA glue (white craft glue) for paper-to-paper bonding where a small amount and time to set is ok.
- Tacky glue or wood glue (for strong bond on dowel).
- Double-sided tape or adhesive roller for clean layered gluing.
- Clips or clothespins to hold glued layers while drying.
- Scoring tool (bone folder or dull ballpoint) for precise folding.
Glue choices — when to use what
- Double-sided tape / adhesive roller: fastest and cleanest for layered flat paper. Use for arcs and flat layers that must look crisp.
- PVA (white glue): flexible bond good for paper-to-paper where slight soak is acceptable; dries clear but needs clamping or clips.
- Tacky glue: stronger bond than PVA for heavier papers; slower set.
- Hot glue: quick, very strong, and excellent for attaching tassels, dowels, and heavier embellishments. Avoid on thin paper when visible glue blobs are unacceptable.
- Glue dots: perfect for attaching beads and small embellishments cleanly.
- Clear-drying craft spray varnish (optional): use for sealing textured or outdoor pieces.
Safety
- Supervise children with craft knives and hot glue guns.
- Work on a cutting mat when using a craft knife.
- Keep small beads and washers away from very small children.
Before You Start — Measurements, Templates, and Color Order
Choose a finished width for each project. Common finished widths:
- Small: 25–30 cm (9.5–12 in) — ideal for small nurseries or desk hangings.
- Medium: 40–45 cm (15.5–17.5 in) — standard wall hanging.
- Large: 60–75 cm (24–30 in) — statement piece.
Arc spacing: for layered arcs, choose an arc thickness between 1 cm and 3 cm depending on scale. Example for a 45 cm wide medium rainbow with 6 colors:
- Outer arc radius ~22.5 cm. If you want 6 colored bands each 2 cm wide, cut concentric arcs spaced 2 cm apart.
Color order: traditional (red, orange, yellow, green, blue, indigo, violet) or simplified 5–6 bright bands (red, orange, yellow, green, blue, purple). For minimalist and modern looks, use muted tones or neutrals.
Templates: create cardboard templates for your arcs to trace repeatedly. Use a compass or nest bowls/plates to trace concentric arcs. Label each template (outermost, second, etc.) to avoid confusion.
Paper grain: when folding or making flowers, align folds perpendicular to grain for crisper folds. For long tassels, grain direction matters for tear resistance.
Now we’ll move into each of the 5 Paper Rainbow Wall Hanging Tutorials.
Smiling Cloud Rainbow with Raindrop Strings (Cute Kids Style)

Finished size, time, and skill level
- Finished width: 30–45 cm recommended.
- Time: 1.5–3 hours depending on drying times.
- Skill level: beginner-friendly; good children’s project with adult supervision for glue use.
Materials specific to this tutorial
- Colored cardstock or mid-weight paper for arcs.
- White cardstock for clouds.
- Colored thin paper for raindrops.
- Cotton string or embroidery floss.
- Slim wooden dowel (20–40 cm long).
- Marker for faces (permanent black).
- Glue: PVA for arcs; hot glue for attaching strings to clouds.
Step-by-step
- Prepare templates and cut arcs
- Decide finished width (e.g., 40 cm). Mark center point on sheet.
- Using a compass: set radius to half width (20 cm) for outer arc. For inner arcs subtract desired band width (example 2 cm). If you prefer tracing: use a large bowl or plate to trace outer arc; use smaller plates for inner arcs.
- Trace six nested arcs on each colored sheet using your templates. Cut carefully with sharp scissors or a craft knife on a mat for smooth edges. Tip: cut slowly and rotate the paper rather than the scissors for cleaner curves.
- Layer arcs
- Start from the largest arc (outermost) and work inward. Apply a thin bead of PVA or use double-sided tape along the narrow edge where arcs overlap. Align arcs precisely and press with fingers or bone folder to remove air pockets.
- If using cardstock, clip with clothespins briefly until the glue sets.
- Make smiling clouds
- Draw or trace cloud templates on white cardstock. For medium size, each cloud 12–15 cm wide is balanced.
- For dimensional clouds, cut two identical cloud shapes per side and glue them together offset slightly to create a thicker cloud. Use hot glue or PVA (hot glue faster).
- Draw smiling faces with a permanent marker. Protect the drawing space: test on scrap paper to avoid smudges.
- Cut raindrops and prepare strings
- Draw teardrop shapes on colored thin paper; aim for sizes 1.5–3 cm depending on scale. Cut neatly.
- For each raindrop string, thread colored drops onto thin cotton string using small knots between drops or tie the drop to the string by gluing a small loop of paper around the string. Alternatively, attach drops to string with a small dab of hot glue on the back of each drop.
- Measure strings: vary lengths from 8–25 cm to create a cascading effect. Tie loops at the top for attaching to cloud underside.
- Attach strings to clouds
- Decide spacing along cloud base (e.g., 2–3 cm apart). Mark positions lightly in pencil.
- Using a hot glue gun, attach a small dot of glue at each mark and press the loop or string end into the glue. Hold until set.
- If using PVA glue, use clips and allow longer drying time.
- Attach clouds to rainbow
- Position clouds at each end of the rainbow arc and glue from behind on the back of the outermost arc so glue is invisible from front. For added strength use a small strip of cardstock as a backing brace glued across the seam.
- Add hanging hardware
- Attach the rainbow to the wooden dowel with a strip of cardstock glued to the top of the outer arc and wrapped over the dowel, or directly glue the top edge of the outermost arc to the dowel with tacky glue. Use a cotton string tied to the dowel ends for hanging.
- Final touches
- Inspect the front for visible glue and trim any stray fibers. Use an eraser to remove pencil marks.
Variations and decorating ideas
- Make clouds from felt for a soft texture.
- Add small battery LED lights behind the clouds for night glow (hide battery pack on the back).
- Personalize with a child’s name across the top in paper letters.
Kid-safe tips
- Pre-cut raindrops and supervise hot glue use.
- Use craft glue for children to attach drops and faces.
3D Folded Paper Fan Rainbow with Hanging Paper Cones

Finished size, time, and skill level
- Finished width: 40–60 cm looks best for 3D volume.
- Time: 3–5 hours (folding and assembly).
- Skill level: intermediate (requires precise folding and patience).
Materials specific to this tutorial
- Lightweight to mid-weight paper (80–160 gsm). Lighter paper creates softer fans; mid-weight keeps shape better.
- Thin wooden dowel or a sturdy hoop if you prefer a rounded top.
- Cotton string or thin twine.
- Small strips of white paper for hanging cones.
- Hot glue gun for quick attachment; double-sided tape for neat fan seams.
Step-by-step
- Plan fan segments and fold pitch
- Decide how many fan segments per color. For a semicircular 50 cm wide rainbow, plan six colors with each color formed by 2–4 fan strips depending on the depth you want.
- Choose fold width (pitch). For a textured look use 1 cm accordion folds. Use 0.5–0.8 cm for finer detail.
- Cut long strips for each color: length depends on desired fan fullness. Example: cut 4 strips 5 cm wide and 50 cm long for each color. The longer the strip, the fuller the fan.
- Scoring and folding
- Use a bone folder and a ruler to score fold lines at even intervals (every 1 cm). Scoring makes crisp accordion folds without tearing.
- Fold accordion-style: fold first line forward, second back, and continue alternating. Repeat for each strip. Keep folds tight by pressing with bone folder.
- Joining strips into thick fan segments
- For thicker fans, glue the short ends of strips together to create longer continuous strips, or stack pre-folded strips flush and glue side-by-side.
- To form a semi-circle, you’ll convert folded strip into a fan arc: slightly curve the folded strip and glue the short ends to form a gentle curve. Use hot glue sparingly because it can stiffen folds.
- Forming the rainbow
- Start with the innermost fan (smallest radius). Glue the fan’s flat edge onto a backing strip or a thin strip of chipboard cut to the same curvature as the fan. Use tacky glue to secure.
- Stack the next color outside the previous one, slightly overlapping to hide the join lines. Press and hold for setting; use clips if glue needs drying time.
- Make hanging paper cones
- Cut circles or semicircles (4–6 cm diameter) from colored paper. Form cones by bringing edges together and glue the seam with a small bead of hot glue.
- Alternatively, cut a 6 cm square and roll into a tiny cone, securing with a dab of glue.
- Make different sizes to add visual interest.
- Attach cones to strings and hang
- Cut strings in varying lengths (10–25 cm). Glue a cone to the end of each string with a small amount of hot glue. Tie a loop at the top for attachment to the dowel or backing.
- Space cone strings evenly along the bottom edge of the rainbow, and glue into place with small hot glue dots.
- Mounting and balance
- Attach the top of the outermost fan to a wooden dowel. Use a felt tape or glue strip to hide seams.
- Add a hanging cord to the dowel ends and test balance. Add small weights to the very bottom of the cones if the pieces twist.
Troubleshooting and tips
- If fans flatten after gluing, re-crease with the bone folder and reinforce seams with narrow strips of tape on the underside.
- To maintain 3D look when shipping, pack with tissue paper stuffed into the fans.
Paper Flower Rainbow with Raindrop Garlands (Floral Style)

Finished size, time, and skill level
- Finished width: 45–75 cm recommended for floral density.
- Time: 4–8 hours (flowers are time-consuming).
- Skill level: intermediate to advanced (petal shaping and positioning require patience).
Materials specific to this tutorial
- Textured paper (crepe, mulberry, or heavy-weight cardstock) for flowers.
- Small gold beads or flat-backed pearls for centers.
- Chipboard or heavy cardstock backing for mounting flowers.
- Hot glue gun and glue dots for quick adhesion.
Step-by-step
- Prepare backing and layout
- Cut a semi-circular backing from chipboard or heavy cardstock sized to your chosen width. Draw guidelines for where each color band will sit.
- Work color by color starting with the innermost arc.
- Make paper flowers
- Petal template: draw a teardrop-shaped petal around 3–5 cm tall for medium flowers; small variation for variety.
- For each flower, cut 5–9 petals. Use a bone folder or round pencil to curl the petal edges outward slightly for natural shape.
- Layer 2–3 petal rings: glue the petals in a circular arrangement, staggering the joints. Use a small bead of hot glue in the center and press a gold bead into the glue for the center.
- For denser texture, make some rosette-style flowers by cutting spirals of paper, then rolling them tight and securing at the base.
- Arrange and glue flowers on backing
- Start gluing flowers onto the backing following the color bands. Overlap flowers slightly so the backing is nearly invisible. Use hot glue to secure each flower firmly.
- For delicate petals, use glue dots to avoid seeping glue.
- Add clouds and raindrop garlands
- Cut clouds from white cardstock or felt and attach to both ends; glue the cloud partly over the flower edge so it looks integrated.
- Create raindrop garlands by stringing flat paper raindrops on thin string. Space them evenly and tie loops at the top.
- Attach garlands to the underside of clouds using a dab of hot glue or by knotting behind the cloud shape and securing the knot with glue.
- Backing reinforcement and hanging
- Reinforce the top edge of the backing with a strip of cardstock glued across the top. Glue this strip to the dowel or thread the dowel through a sleeve formed by folding the strip over the dowel.
- Add hanging cord.
Styling and variations
- Use ombre tones within each band for a sophisticated look.
- Swap paper flowers for fabric flowers if you want a textile feel.
- For a wedding backdrop, scale up the backing and add greenery.
Minimalist Flat Rainbow with Long Vertical Drop Strings

Finished size, time, and skill level
- Finished width: 30–60 cm depending on space.
- Time: 1–2.5 hours.
- Skill level: beginner to intermediate — precision cutting improves results.
Materials specific to this tutorial
- Smooth flat colored paper or thin cardstock.
- Neutral or beige wall background look.
- Fishing line for nearly invisible strings or cotton for visible white strings.
- Adhesive roller for clean layering.
Step-by-step
- Cut perfect arcs
- Use nested plates, a large compass, or create cardboard templates to trace concentric arcs. For crisp edges, use a craft knife and straight-edge on a cutting mat.
- Maintain consistent band width; 1–2 cm gives a clean minimalist feel.
- Stack and glue
- Use double-sided tape or adhesive roller along the back edge of each arc. Align precisely and press firmly; use a bone folder to ensure an even bond.
- If you want a floating look between bands, add small foam dots between layers to create slight depth (about 1–2 mm).
- Prepare long vertical drop strings
- Cut strings to uniform lengths or graduated lengths depending on the look. Space drops at equal intervals (measure and mark string lightly).
- Use small punched circles or narrow folded tabs at the top of each drop to hide the glue and secure drops to string.
- Attach strings and clouds
- Attach strings to the bottom of the outermost arc with double-sided tape or a small dab of clear glue on the back side so glue doesn’t show.
- Attach simple cloud shapes on either end without faces for a modern aesthetic.
- Finishing touches
- For a gallery-style look, use neutral tones and thin white strings. For more contrast, use black or natural twine.
Styling tips
- Use this minimalist rainbow above a desk or entryway.
- Keep surrounding décor neutral for the rainbow to stand out.
Paper Rainbow with Hanging Tassels

Finished size, time, and skill level
- Finished width: 35–60 cm.
- Time: 2–4 hours.
- Skill level: beginner to intermediate.
Materials specific to this tutorial
- Colored paper strips for arc and tassels.
- Wooden dowel for suspension.
- Thin twine or cotton for hanging.
Step-by-step
- Cut strips and build the arc
- Cut colored paper into strips 2–4 cm high depending on desired band thickness. For a 45 cm wide piece, outer arc strips might be 3 cm tall.
- Glue strips together in nested arcs to form the rainbow, using double-sided tape or thin PVA beads for invisible seams.
- Make paper tassels
- For each tassel, cut a rectangular piece (e.g., 6 cm x 10 cm). Along the long edge, cut fringe up to 0.7–1 cm from the top at even intervals (about 2–4 mm apart).
- Roll the uncut top tightly to form the tassel head, secure with a small bead of hot glue, and optionally wrap a thin thread around the top for extra security.
- Trim the bottom for evenness.
- Attach tassels
- Decide spacing (e.g., every 2–3 cm across the bottom of the rainbow). Tie tassels to a thin string looped across the dowel or glue the tassel heads directly to the underside of the rainbow with hot glue.
- For a neater look, attach a slim strip of matching paper across the top of the tassel row to hide glue.
- Balance and hang
- Attach the rainbow to the dowel using a glued sleeve or by taping the top edge over the dowel. Add hanging string to dowel ends and test balance.
Movement and photography tips
- Use lighter-weight paper for tassels that move gently in a breeze.
- For photography, capture tassels with a slight side breeze for dynamic motion.
Finishing Touches and Hanging Options
Dowels, rods, and hoops
- Wooden dowel: classic look; stain or paint to match décor.
- Metal rod: modern and slim; use for heavier, larger pieces.
- Hoop (embroidery hoop): great for smaller circular or semicircular rainbows.
Hiding hardware
- Create a fabric or paper sleeve across the top that doubles as a design element and hides glue or staples.
- For a polished finish, wrap the dowel ends in twine or thin leather.
Adding weight
- Add a small washer or metal bead inside the bottom-most tassel or cone to keep strings hanging straight.
Weatherproofing and outdoor use
- Spray a thin coat of clear craft sealer on outer layers (test on scrap first). Avoid for colored paper that may darken.
- Use synthetic ropes and UV-resistant glue if placing outdoors.
Troubleshooting & Common Mistakes
Problem: arcs look uneven
- Solution: make and use cardboard templates and cut using a craft knife on a mat. Measure band widths carefully and mark before cutting.
Problem: glue shows or wrinkles paper
- Solution: use less glue and an adhesive roller for flat seams. For PVA, apply thin layer and use clips until dry.
Problem: piece twists when hanging
- Solution: balance by adding small weights to lower center or adjust hanging cord to align center.
Problem: fans flatten or lose 3D
- Solution: re-crease with bone folder, reinforce seams beneath with thin tape.
Where to Use and Gift Ideas
- Nursery or child’s room: Smiling Cloud Rainbow and Tassel Rainbow are perfect.
- Classroom or play area: durable minimal or 3D fan styles add color without clutter.
- Weddings or baby showers: Paper Flower Rainbow scaled up makes an excellent backdrop.
- Gift idea: pair a small smiling cloud rainbow with a matching mobile for gift sets.
- Market productization: Create a size grid (small/medium/large) and price according to time invested—floral and 3D pieces command higher prices due to labor.
Care, Storage, and Reuse
- To store: place flat in a large envelope or shallow box with tissue paper. For 3D pieces, stuff with tissue and place in a box large enough to avoid crushing.
- Clean: dust gently with a soft brush. Do not use water.
- Reuse: remove strings and embellishments if you want to repurpose the rainbow base.
Conclusion
These 5 Paper Rainbow Wall Hanging Tutorials provide a range of styles from playful to elegant, each explained in step-by-step detail so you can reproduce clean, professional results. Whether you’re making a quick kids’ craft or a detailed floral installation, the key is careful measuring, choosing the right paper weight, and using the appropriate adhesive for each joint. Try the Smiling Cloud Rainbow if you want a simple, friendly starter project; choose the 3D Folded Fan or Paper Flower versions when you want texture and visual drama; use the Minimalist arc for modern interiors; and pick the Tassel Rainbow for motion and tactile charm.
If you want, start with the tutorial that matches your time and tools, and once you’re comfortable, mix techniques—add tassels to a floral base, or use a minimalist palette for a cuddly cloud rainbow—to create unique hybrids. Enjoy the process: paper crafts reward precision and patience, and these paper rainbows make wonderfully bright additions to any space.


