

The holiday season is all about sharing love, joy, and meaningful connections. One of the most heartfelt ways to express this is through thoughtful gifts. But as many crafters know, the presentation matters just as much as the gift itself. That’s where Cricut machines come in, turning ordinary paper, cardstock, and vinyl into stunning, professional-quality gift boxes.
In this guide, we’ll walk you through 5 Holiday Gift Box with Cricut Tutorials that range from simple to intricate designs. Each idea combines creativity with functionality, ensuring your handmade boxes aren’t just beautiful but also durable and practical.
Why Make Holiday Gift Boxes with Cricut?
Before we jump into the tutorials, let’s talk about why Cricut machines are perfect for holiday packaging.
- Precision Cutting: Cricut’s blades cut with exact accuracy, making it possible to create crisp folds, detailed snowflakes, or even intricate 3D shapes without the stress of hand-cutting.
- Customization: From monograms to holiday patterns, you can personalize every box with vinyl decals, cardstock cutouts, or foil embellishments.
- Time-Saving: Cricut Design Space offers ready-to-use templates, so you don’t have to start from scratch.
- Professional Finish: Even beginners can make boxes that look like they came straight from a boutique store.
Now, let’s get into the tutorials!
Tutorial 1: Classic Box

Materials Needed
- Cricut Maker or Cricut Explore
- Green, red, and gold cardstock (65 lb or higher for sturdiness)
- Scoring Stylus or Scoring Wheel
- Double-sided tape or craft glue
- Ribbon for finishing touches
Steps
- Open Cricut Design Space. Select a simple cube-style box template.
- Resize the box to fit small treats like candy canes, chocolates, or ornaments. A 3×3 inch box works well.
- Score and cut the cardstock using your Cricut machine. The scoring step ensures clean folds.
- Assemble the box by folding along the scored lines and securing the edges with glue or tape.
- Add details: Use Cricut to cut small holly leaves, snowflakes tag to glue onto the box.
- Finish with ribbon tied around the box for a festive touch.
Why It Works
This design is versatile, simple, and quick to make in bulk—perfect for classroom gifts, office parties, or stocking stuffers.
Tutorial 2: Window Treat Box with Acetate (Eid Celebration)

Materials Needed
- Cricut Maker or Explore
- Kraft cardstock
- Clear acetate sheets
- Scoring Wheel
- Gold vinyl for crescent moons and stars
- Adhesive or hot glue
Step-by-Step Instructions
- Select a Template
Search for a rectangular window box template in Cricut Design Space. This box type is perfect for Eid treats like dates, pastries, or sweets. - Prepare Materials
Cut the cardstock for the box base and acetate for the window panel. Ensure the acetate piece is slightly smaller than the cutout to fit neatly inside. - Score and Fold
Score all fold lines using the scoring wheel. This ensures neat, clean edges and easy assembly. - Assemble the Box
Attach the acetate behind the window cutout before folding the box completely. Use glue or double-sided tape to secure the edges. - Decorate with Vinyl
Apply gold vinyl crescent moons, stars, or other Islamic geometric patterns using transfer tape. These elements add a festive and elegant Eid touch. - Optional Finishing Touches
Add ribbons or small tags with greetings like “Eid Mubarak” for personalization.
Tips & Variations
- Use patterned cardstock for extra style.
- Layer thin vellum under the acetate for a frosted look.
- Fill with colorful sweets in decorative mini cupcake liners for a professional presentation.
Tutorial 3: 3D Tree Gift Box (Diwali Inspired)
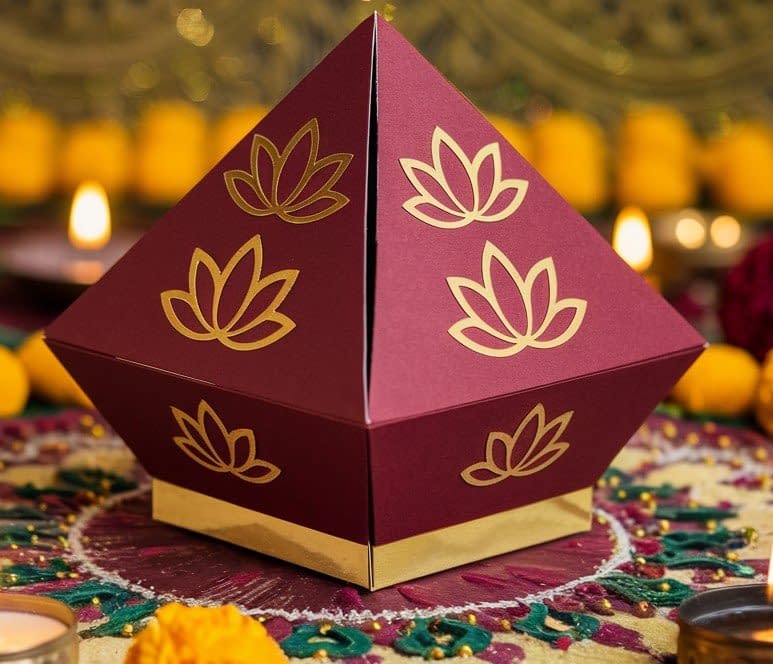
Materials Needed
- Cricut Maker or Explore
- Maroon and gold cardstock
- Scoring Wheel
- Craft glue
- Cricut-cut lotus flower motifs or gold foil accents
Step-by-Step Instructions
- Choose Your Template
Select a pyramid or 3D tree box template in Cricut Design Space. This design mimics a decorative diya shape, perfect for Diwali gifting. - Cut and Score
Cut the pieces from maroon cardstock, adding gold foil accents for sparkle. Score all fold lines carefully. - Assemble the Box
Fold along the scored lines, securing edges with glue. Ensure the base is sturdy enough to hold small gifts or sweets. - Decorate
Attach Cricut-cut lotus flower motifs or small gold embellishments to the sides of the box. Top with a gold flame-shaped cutout to resemble a diya lamp. - Display or Gift
Place on a rangoli pattern or decorate with marigolds, tealights, and colorful powders. This makes the gift both functional and decorative.
Tips & Variations
- Use shimmering cardstock for a more festive effect.
- Fill with small Diwali sweets like laddoos, chocolates, or trinkets.
- Stack multiple 3D tree boxes as part of a table centerpiece.
Tutorial 4: Pillow Box (Valentine’s Day Theme)

Materials Needed
- Cricut Maker or Explore
- Pink and metallic rose-gold cardstock
- Cricut-cut heart motifs
- Scoring Wheel
- Ribbon or satin string
Step-by-Step Instructions
- Choose a Pillow Box Template
Search “Pillow Box” in Cricut Design Space. These curved boxes are perfect for romantic gifts like jewelry, chocolates, or love notes. - Customize with Hearts
Add heart cutouts, overlays, or Cricut lettering to personalize the box for Valentine’s Day. - Cut and Score
Use your Cricut to cut the shapes and score the folds. Curved edges fold easily with proper scoring. - Assemble
Fold the curved sides inward and secure with tape or glue. Make sure the curves are smooth for a polished finish. - Decorate with Ribbon
Tie a satin ribbon around the box or create a bow on top. Optional: add small stickers or glitter accents for extra charm.
Tips & Variations
Experiment with different shades of pink, red, or gold to match your theme.
Layer metallic cardstock under the main color for depth.
Include a tiny handwritten note or card inside for a personal touch.
Tutorial 5: Personalized Monogram Gift Box (New Year’s Celebration)

Materials Needed
- Cricut Maker or Explore
- Premium cardstock (any holiday color)
- Adhesive vinyl (gold or silver works well)
- Transfer tape
- Glue or tape
Steps
- Choose a simple box template in Design Space. Square or rectangle works best.
- Cut the box base from cardstock and assemble as usual.
- Create a monogram or name design in Design Space and cut it from adhesive vinyl.
- Use transfer tape to apply the vinyl neatly to the lid of the box.
- Finish with a bow or simple embellishment.
Why It Works
This box feels personal and thoughtful, making it ideal for family members or close friends. It turns even simple packaging into a keepsake.
Tips for Perfect Cricut Holiday Gift Boxes
- Use the right cardstock weight: 65–80 lb cardstock ensures sturdiness.
- Don’t skip scoring: Clean folds are the difference between a polished box and a messy one.
- Layer colors and textures: Combine glitter cardstock, metallic foil, and patterned paper for depth.
- Make use of Cricut pens: Add hand-lettered-style messages directly onto your boxes.
- Batch your projects: Cut multiple boxes at once to save time during the busy holiday season.
Variations and Ideas Beyond the Holidays
While this post focuses on 5 Holiday Gift Box with Cricut Tutorials, the same methods can be used for birthdays, weddings, baby showers, and other special occasions. Just swap out colors, patterns, and embellishments to fit the event.
For example:
- Valentine’s Day: Red and pink heart-shaped boxes.
- Baby Showers: Pastel pillow boxes with tiny animal cutouts.
- Weddings: Elegant monogrammed boxes with lace-like cardstock overlays.
Conclusion
Creating handmade packaging with your Cricut takes gift-giving to another level. These 5 Holiday Gift Box with Cricut Tutorials offer something for everyone, whether you’re making simple favor boxes for a large gathering or intricate keepsake boxes for close family. With Cricut’s precision and flexibility, you can bring your holiday crafting vision to life and make gifts feel extra special from the moment they’re received.


