
If you love handmade crafts that combine creativity, precision, and charm, then felt flower brooches are a project you’ll absolutely enjoy. Whether you’re crafting accessories for yourself, making gifts, or adding a handmade touch to your shop, these soft, colorful brooches are a wonderful way to showcase your personal style.
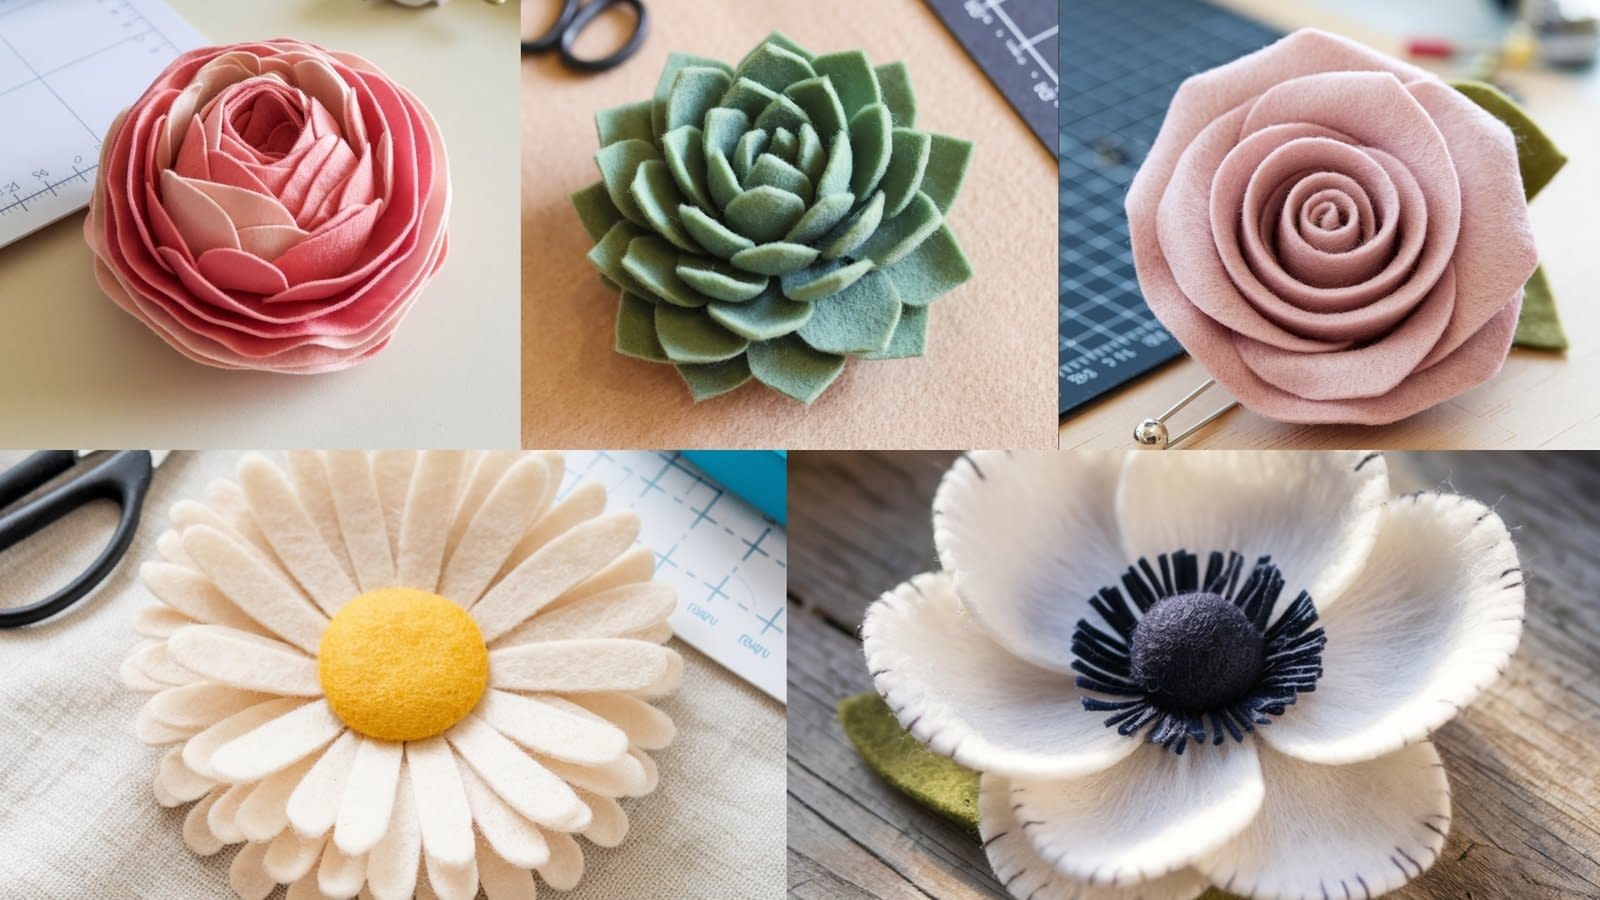
In this detailed 5 Felt Flower Brooch with Cricut Tutorial, we’ll walk through everything—from the materials you’ll need to how to cut, shape, and glue your felt flowers using your Cricut machine. You’ll learn how to create five different styles of felt flower brooches, including rolled roses, layered daisies, peonies, anemones, and succulents.
By the end, you’ll not only have a collection of stunning brooches but also the skills and techniques to design your own unique variations in the future.
What You’ll Need
Before we begin, make sure you have all the necessary tools and materials ready. Having everything organized will make your crafting process smoother and more enjoyable.
Materials:
(copy these for easy use)
- Felt sheets in multiple colors (wool or wool blend preferred)
- Cricut machine (Cricut Maker or Cricut Explore series)
- FabricGrip cutting mat (pink mat)
- Rotary blade or fine-point blade (depending on your machine)
- Hot glue gun and glue sticks
- Brooch pin backs
- Scissors (for trimming)
- Tweezers or a quilling tool (optional for rolled flowers)
- Cricut Design Space software
- SVG flower templates (either pre-designed or custom made)
Preparing Your Cricut Workspace
Before cutting the felt, proper setup is essential to ensure clean cuts and accurate flower shapes.
- Select Your Designs:
Open Cricut Design Space and upload your chosen flower SVG files. You can find a variety of free and paid templates online or create your own custom designs. Each of the five flower styles will require a different shape and layer pattern. - Resize as Needed:
Depending on how large you want your brooches, resize each flower layer in Design Space. A typical brooch looks best when the finished flower is about 2–3 inches wide. - Set Material Type:
In the “Material Settings,” choose “Felt.” If you’re using a Cricut Maker, select “Wool Felt” for cleaner cuts. If you’re using Cricut Explore, adjust the blade setting manually. - Place the Felt on the Mat:
Use the pink FabricGrip mat for cutting. Press the felt sheet firmly onto the mat to avoid slipping. You can use a brayer or a clean roller to flatten it securely. - Check Your Blade:
Ensure your blade is sharp and clean. For detailed cuts, a rotary blade (on Cricut Maker) works best, but the fine-point blade also performs well for thin felt sheets.
Cutting the Felt Flower Shapes
Once your designs are ready, it’s time to start cutting.
- Load the Mat:
Carefully load your felt-covered mat into the Cricut machine. Make sure it’s aligned properly with the guides. - Test Cut (Optional but Recommended):
Do a small test cut to check how the felt behaves with your chosen blade and settings. This ensures you don’t waste material. - Start Cutting:
Click “Go” on Cricut Design Space and let the machine do its work. Avoid touching the mat during the cutting process. - Remove the Pieces Carefully:
Once the cut is complete, gently peel away the excess felt, leaving the flower shapes on the mat. Then lift each shape off carefully using tweezers or a spatula tool to avoid stretching or tearing. - Sort by Type:
Keep all the layers of each flower together. You’ll have multiple pieces for some flowers (like daisies and peonies) and single spiral pieces for rolled ones.
How to Assemble 5 Felt Flower Brooch Designs
Now comes the most enjoyable part—assembling your flowers. Below are step-by-step guides for five unique felt flower brooch designs. Follow each carefully to get professional-quality results.
1. Rolled Felt Rose Brooch

Design Overview:
Rolled roses are among the easiest and most elegant felt flowers. They have a spiral design that’s rolled from the outer edge inward, forming a beautiful bloom.
Steps:
- Identify the Spiral Shape:
After cutting, you’ll see a spiral piece with a scalloped or rounded outer edge—this forms your petals. - Start Rolling:
Begin at the outermost end of the spiral. Roll the felt tightly toward the center, keeping the bottom edges aligned. You can use your fingers or a quilling tool to maintain control. - Adjust the Tightness:
As you roll, you can loosen your grip slightly to make the flower look fuller. The tighter the roll, the more compact the rose will appear. - Secure the Base:
Once you reach the inner circle (the center pad of the spiral), apply a small amount of hot glue to the bottom of the rolled flower. Press it down onto that pad to seal the flower in place. - Attach the Brooch Pin:
Glue a brooch pin back to the bottom center of the flower. Hold it for a few seconds to ensure it’s firmly attached. - Finishing Touches:
You can add a small felt leaf behind the rose for a more natural look before gluing on the pin.
2. Layered Felt Daisy Brooch

Design Overview:
The felt daisy has multiple petal layers that stack together to create a full, cheerful bloom.
Steps:
- Prepare the Petal Layers:
You’ll have several daisy-shaped layers, each with slightly different petal sizes. Start with the largest one at the bottom. - Shape the Petals:
Use your fingers to slightly pinch the ends of each petal upward to give them a natural, curved look. You can also gently fold them in half at the base for more dimension. - Glue the Layers:
Apply a dot of hot glue at the center of the bottom layer, then place the next smaller layer on top. Continue layering until all petals are stacked, slightly rotating each layer so the petals alternate and fill the gaps. - Add the Center:
Cut a small circle of felt (in a contrasting color like yellow) and glue it to the middle. You can also use a small felt ball or button for added texture. - Attach the Pin:
Glue the brooch pin back to the underside of the bottom petal layer. Press gently until secure.
3. Felt Peony Brooch

Design Overview:
The peony has ruffled petals that create a lush, full look. It’s slightly more advanced but worth the effort.
Steps:
- Sort the Petals:
You’ll have multiple layers of rounded petals—some large and some smaller. Keep them arranged by size. - Shape Each Petal:
Use your fingers to gently curve the tops of the petals outward. You can slightly pinch the base to create a cup-like shape. - Build the Flower:
Start with the largest petals and glue them in a circular pattern to form the base. Add smaller petals gradually, overlapping them in a natural way. - Create the Center:
Roll a thin strip of felt tightly to form a small bud and glue it in the center. Surround it with the smallest petals for a realistic peony look. - Secure and Attach:
Once the glue has dried, attach the brooch pin to the back using hot glue. You can add a small felt leaf cluster if desired.
4. Felt Anemone Brooch

Design Overview:
Anemones have striking dark centers and flat petals, making them elegant and eye-catching.
Steps:
- Prepare Petal Pieces:
You’ll have flat petal shapes—usually six to eight pieces. Arrange them evenly in a circle. - Form the Flower:
Glue the base of each petal to a small felt circle. Overlap the edges slightly for a realistic look. - Make the Center:
Cut a small black felt circle for the middle. Fringe the edges slightly with scissors to mimic the texture of an anemone’s center. You can add tiny dots of glue to give it dimension. - Add Depth:
Gently fold each petal upward slightly from the base so the flower appears more open and natural. - Attach the Pin:
Once your flower is complete, glue the brooch pin to the back circle. Hold until secure.
5. Felt Succulent Brooch

Design Overview:
Succulents make unique brooches thanks to their geometric, layered petal patterns. The Cricut can cut these shapes perfectly.
Steps:
- Arrange the Layers:
Your cut pieces will resemble pointed petal stars. Sort them by size. - Shape the Leaves:
Gently pinch each petal’s base between your fingers to curve it upward, mimicking a real succulent. - Glue Layer by Layer:
Start with the largest piece at the bottom and continue stacking smaller ones, applying glue at the center of each. Rotate slightly with each layer to create fullness. - Finishing Touch:
For extra realism, lightly brush the edges with fabric paint or blush powder for a natural gradient. - Attach the Pin:
Glue the brooch pin to the bottom of the succulent and let it set completely before wearing.
Tips for Perfect Felt Flower Brooches
- Use high-quality wool felt for smoother cuts and richer colors.
- Keep glue minimal to avoid seepage; small dots go a long way.
- Mix colors creatively—combine soft pastels or bold tones depending on the season or outfit.
- Experiment with scale: Try mini versions for subtle accessories or larger ones for statement brooches.
- Add embellishments: Beads, sequins, or tiny pearls can add a special touch to your flower centers.
Caring for Your Felt Flower Brooches
Since these brooches are made of felt, they require gentle care:
- Avoid washing or soaking them.
- Store in a dry, cool place.
- If flattened, gently reshape petals with your fingers.
- Keep away from direct sunlight to prevent color fading.
Creative Uses for Felt Flower Brooches
While these brooches look stunning on jackets and bags, they can also be used in many other creative ways:
- Pin them to hats, scarves, or headbands.
- Use them as gift toppers.
- Attach them to tote bags or belts.
- Create a matching set for wedding party accessories.
- Turn them into magnetic pins for home décor boards.
Conclusion
Making your own Felt Flower Brooches with Cricut combines creativity, precision, and personal style into one rewarding project. Each of the five designs—rose, daisy, peony, anemone, and succulent—offers its own charm and can be customized endlessly through color, size, and layering.
Once you get the hang of using your Cricut for felt projects, you’ll find that these techniques open up endless crafting possibilities—from home décor to fashion accessories and thoughtful handmade gifts.


