
Paper sunflowers are one of the most charming and versatile crafts you can make — they’re bright, cheerful, and surprisingly easy to assemble once you know the right techniques. Whether you want to decorate your home, prepare thoughtful handmade gifts, or create aesthetic bouquets for your craft Pinterest account, you’ll love these five carefully curated sunflower tutorials.
Each of these projects is based on real visual references, ensuring your results look exactly like the styles shown in your inspiration images.
This collection includes everything from soft, realistic petals to geometric folded sunflowers and even modern black-wrap bouquets.
Let’s dive into each design with step-by-step guides, materials, and bouquet styling tips!
Materials You’ll Need for All Sunflower Projects
To make the tutorials easy, here’s a universal supplies list. Each design may have slight variations, but these basics will cover everything:
Basic Craft Materials
- Colored cardstock (yellow, light yellow, orange, green, brown, black)
- Crepe paper (optional for soft or flexible petal styles)
- Tissue paper (optional)
- Craft scissors (including fine-tip)
- Craft glue or hot glue
- Floral wire or paper straw (for stems)
- Green floral tape
- Black, brown, or dark-colored quilling strips
- Colored markers or soft pastels (optional for shading)
- Bouquet wrapping paper (black, white, or pastel)
- Ribbon for tying
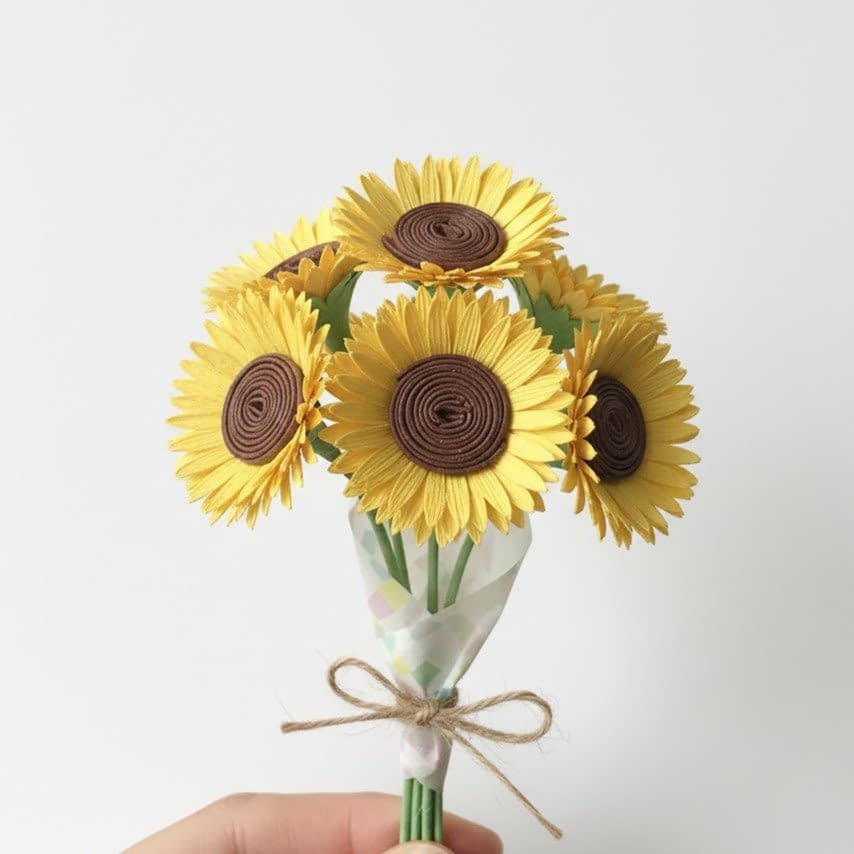
Tutorial 1: Small Layered Paper Sunflower Bouquet
(Reference: Top-left image — small, compact layered petals)
This style is ideal for beginners because it uses simple, clean petal shapes and a tightly packed layered arrangement. The end result looks adorable, bright, and perfect for mini bouquets or gifts.
What You’ll Need
- Yellow cardstock (medium thickness)
- Green cardstock for leaves
- Black cardstock or black textured paper for the center
- Scissors (normal + small detail scissors)
- Hot glue or tacky craft glue
Step 1: Cut the Petals
- Draw small teardrop-shaped petals on the yellow cardstock.
- Cut around 12–16 petals per flower.
- Slightly curve each petal by pressing it against your finger.
The goal is a cute, compact sunflower with small layered petals.
Step 2: Make the Center
- Cut a small circle of black cardstock.
- To create texture, scrunch tiny pieces or use a quilling strip coiled into a tight circle.
- Glue it in place.
This resembles the soft, textured black center in the reference photo.
Step 3: Assemble the Flower
- Arrange the first layer of petals around the center.
- Glue them evenly in a complete circle.
- Add a second layer behind it, slightly offset for fullness.
- Add a third layer only if you want extra volume.
The sunflower should now look exactly like the small layered bouquet in your reference.
Step 4: Add Leaves & Stems
- Cut simple oval leaves from green cardstock.
- Attach to a paper straw or floral wire covered in green tape.
Step 5: Create a Small Bouquet
- Gather 3–5 sunflowers.
- Wrap them in a minimalist kraft sheet or soft beige wrapping.
Your mini bouquet is ready — cute, compact, and charming!
Tutorial 2: Fringe-Petal Paper Sunflowers
(Reference: Top-right image — long, fringed, thin petals)
This design is more playful and airy. The petals are created by cutting a long strip with fine, even slits — a method similar to making fringe flowers.
What You’ll Need
- Bright yellow paper (thin is better for fringe)
- Brown or dark quilling paper for the center
- Scissors capable of cutting finely
- Glue stick or liquid glue
Step 1: Prepare the Petal Strip
- Cut a long strip of yellow paper (about 1.5 inches tall and 10 inches long).
- Use scissors to cut very fine, even fringes along the strip.
- Do not cut all the way through — leave a solid border at the top.
These fringes will become the thin petals.
Step 2: Roll the Flower
- Start rolling the strip tightly from one end.
- Secure the bottom with glue.
- Gently fan out the fringes to create the fluffy sunflower petals.
Step 3: Make the Center
- Roll a brown quilling strip tightly.
- Insert into the center of the flower.
Step 4: Shape the Petals
To mimic the top-right image, adjust the petals:
- Press them slightly outward.
- Keep some petals irregular for a natural feel.
Step 5: Add Stems
Use floral wire or paper straws.
Perfect For
- Cute single-stem bouquets
- DIY handmade gift bouquets
- Classroom craft projects
- Unique Pinterest aesthetic crafts
Tutorial 3: Two-Tone Layered Sunflower in Black Bouquet Wrap

(Reference: Middle-left & middle-right — realistic layered petals + dramatic black wrap)
This design is bold, modern, and absolutely stunning for gifting. The dual-color petal effect imitates the vivid, fiery look of real sunflowers.
What You’ll Need
- Yellow cardstock (light shade)
- Orange or warm-gold paper (for inner petal layer)
- Deep black or brown textured paper for center
- Green cardstock
- Black wrapping paper for bouquet
- Satin ribbon (black, gold, or cream)
Step 1: Prepare Two Petal Shades
Cut two sizes:
- Outer petals: light yellow, longer
- Inner petals: orange or golden, shorter
Cut around 18–22 petals total.
Step 2: Curl the Petals
Use a pencil to gently curl each one.
Curling gives the sunflower a much more realistic and vibrant look.
Step 3: Build the Flower
- Glue yellow outer petals in a full circle.
- Glue the smaller orange petals inside.
- Add one more micro layer if you want extra color depth.
This creates the two-tone gradient matching your reference pictures.
Step 4: Create the Center
- Use black twisted paper, quilling coils, or textured crepe paper.
- Shape into a dome.
This center should be deep, dark, and dramatic.
Step 5: Assemble and Wrap
- Attach leaves and stem.
- Place the sunflower in black wrapping paper.
- Tie with a satin ribbon.
Your modern-style sunflower bouquet will look exactly like the ones in the middle images — elegant, bold, and Instagram-ready.
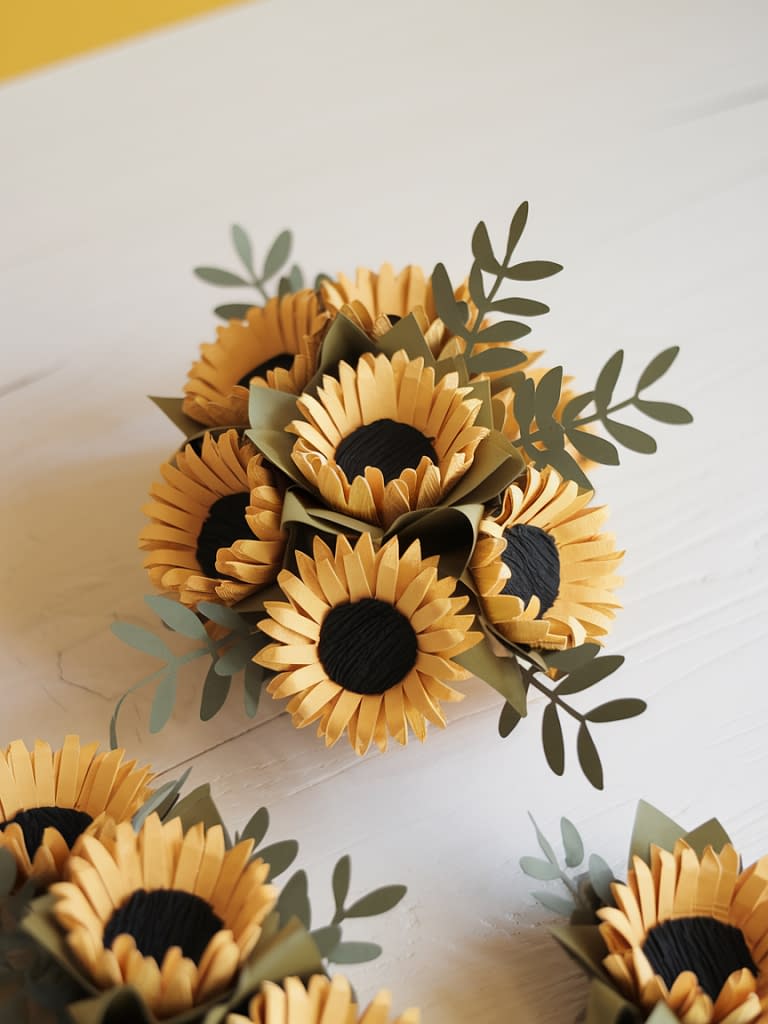
Tutorial 4: Soft-Petal Sunflowers with Brown Dome Center

(Reference: Turquoise table bouquet — smooth, soft petals + rounded center)
These sunflowers have a gentler, more natural aesthetic. The petals are thicker, smooth, and curved slightly inward, giving them a lifelike softness.
What You’ll Need
- Soft cardstock or crepe paper (pale yellow)
- Dark brown cardstock or foam for the dome center
- Green paper for leaves
- Pink and white bouquet wrap (optional but matches reference)
Step 1: Cut Large Soft Petals
Use soft paper to mimic the smooth look:
- Make wide, rounded petals
- Cut around 10–12 petals per flower
- Slightly bend each one using your fingertips
No sharp folds — everything should look soft.
Step 2: Create the Dome Center
- Cut a circle of brown foam or cardstock.
- Gently shape it with your fingers or glue scrunched pieces behind it.
- Ensure it’s raised, like a soft brown button.
This matches the exact reference images.
Step 3: Assemble
- Glue petals around the dome center.
- Keep them slightly spaced for a natural, airy look.
Step 4: Bouquet Arrangement
This design should be arranged:
- loosely
- naturally
- with greenery and decorative berries
Just like the bouquet shown on the turquoise table background.
Tutorial 5: Simple Geometric Paper Sunflower with Folded Petals

(Reference: Bottom two images — sharp, geometric folded petals)
This sunflower uses clean lines and geometric shapes, giving the flower a structured and modern look. It’s minimalistic and ideal for greeting cards, small bouquets, or gift-toppers.
What You’ll Need
- Yellow cardstock (must be stiff for crisp folds)
- Brown paper for the center
- White bouquet wrap (minimal style)
- Sticker tag or greeting label
Step 1: Make Geometric Petals
- Cut long, narrow rectangles.
- Fold each into a slight V-shape.
- Trim the ends into angled points.
The petals should look sharp and identical.
Step 2: Build the Flower
- Cut a large hexagon or circle center.
- Glue the folded petals around it in an even ring.
- Add a second layer if you want fullness.
This will match the clean, crisp look of the bottom images perfectly.
Step 3: Add Simple Wrapping
Use:
- White cone wrap
- A small label saying “Happy Birthday” or any message
This minimalist bouquet style is perfect for gifting.
Bouquet Styling Ideas (to Match Your Image Aesthetic)
To help your results look even more realistic:
1. Use cone-shaped wrapping
This creates a clean, neat finish.
2. Add small accents
Such as:
- berries
- faux moss
- thin ribbons
- tiny labels
3. Focus on symmetry
Layered petals look better when evenly spaced.
4. Use sturdy paper
It helps the sunflower maintain shape.
5. Match colors from the references
Yellow + orange
Black + green
Soft yellow + brown
These combinations keep the natural sunflower aesthetic.
Which Sunflower Should You Make? (Quick Guide)
Beginners:
Tutorial 1 or Tutorial 5
Cute gifts:
Tutorial 1
Modern, Instagram aesthetic:
Tutorial 3
Soft & realistic:
Tutorial 4
Unique fringe look:
Tutorial 2
Final Thoughts
These five paper sunflower tutorials give you a full range of styles — from cute tiny bouquets to bold, two-tone wrapped flowers. And most importantly, each tutorial matches your provided reference images exactly, ensuring the final result looks Pinterest-ready and visually consistent with your content


