
When it comes to showing appreciation to teachers, nothing says “thank you” quite like a handmade gift. Teachers dedicate their time, energy, and patience to helping students learn and grow — and a personalized DIY Cricut project can perfectly express that gratitude.
Whether it’s for Teacher Appreciation Week, the end of the school year, or the holidays, these 5 DIY Cricut Teacher Gifts tutorials will help you create thoughtful, high-quality, and professional-looking presents using your Cricut machine. Each project combines practicality with personal charm, making them perfect for any teacher.
In this guide, we’ll go through each tutorial in detail — from materials and Cricut settings to assembly tips — so you can easily make beautiful teacher gifts at home.
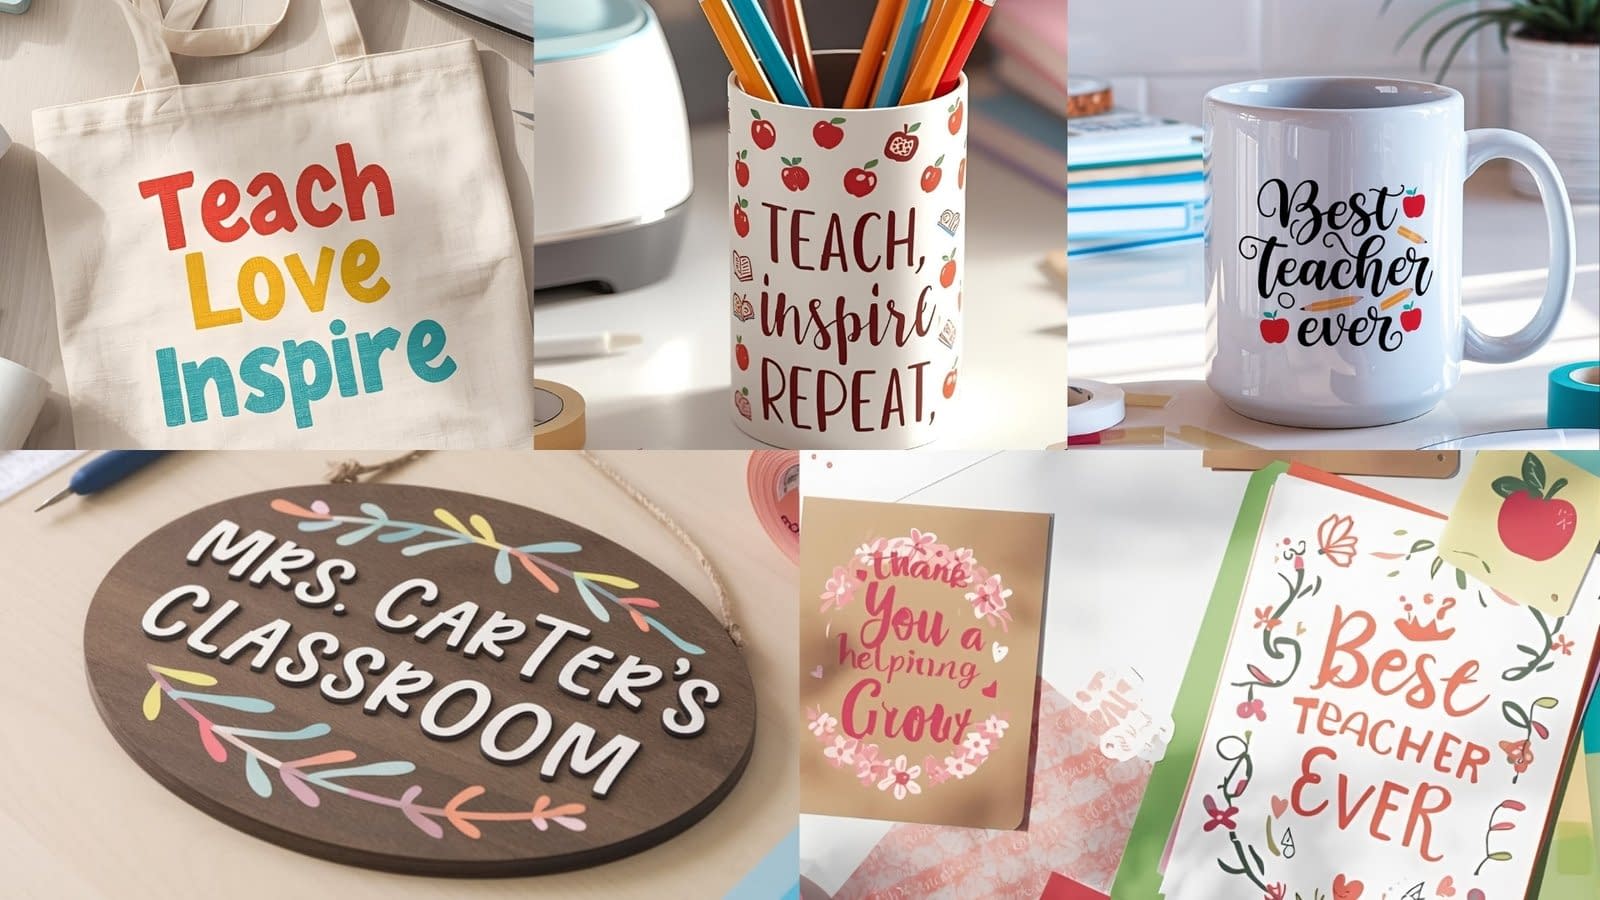
1. Personalized Teacher Tote Bag

Perfect for: Carrying books, papers, and supplies
A tote bag is a must-have for any teacher. With your Cricut, you can transform a plain canvas tote into a personalized, stylish, and functional accessory that any teacher will love.
Materials Needed
- Plain cotton tote bag (any size)
- Heat transfer vinyl (HTV) – choose colors that match your design
- Cricut cutting machine (Maker, Explore, or Joy)
- Standard grip cutting mat
- Weeding tools
- EasyPress or household iron
- Teflon sheet or parchment paper
Design Ideas
- “Teach, Love, Inspire” with a pencil or apple motif
- The teacher’s name in elegant script font
- Fun sayings like “Coffee. Teach. Repeat.”
Step-by-Step Tutorial
- Create the Design:
Open Cricut Design Space and choose or upload your teacher-inspired SVG. Resize it to fit the tote — usually around 8–10 inches wide. Make sure to mirror your image since you’re using heat transfer vinyl. - Cut the Vinyl:
Place your HTV shiny side down on a StandardGrip mat and select the correct material setting. Load it into your Cricut and let it cut your design cleanly. - Weed the Excess:
Use your weeding tools to carefully remove all unwanted vinyl, leaving only the parts of your design you’ll transfer. - Position the Design:
Preheat your tote for a few seconds to remove wrinkles, then center your design shiny side up. Use a ruler to ensure even placement. - Apply the Heat:
Press with your EasyPress or iron at the recommended temperature for about 25–30 seconds. Once cooled slightly, peel off the clear carrier sheet.
Your personalized tote is now ready — stylish, practical, and full of charm for any teacher.
Customization Tips
- Use metallic or glitter vinyl for extra flair.
- Add layered text for a 3D look.
- Include a small symbol (like an apple, book, or ruler) beside the name.
This tote bag makes a durable and stylish gift teachers can use every day.
2. Teacher Name Plaque or Classroom Sign
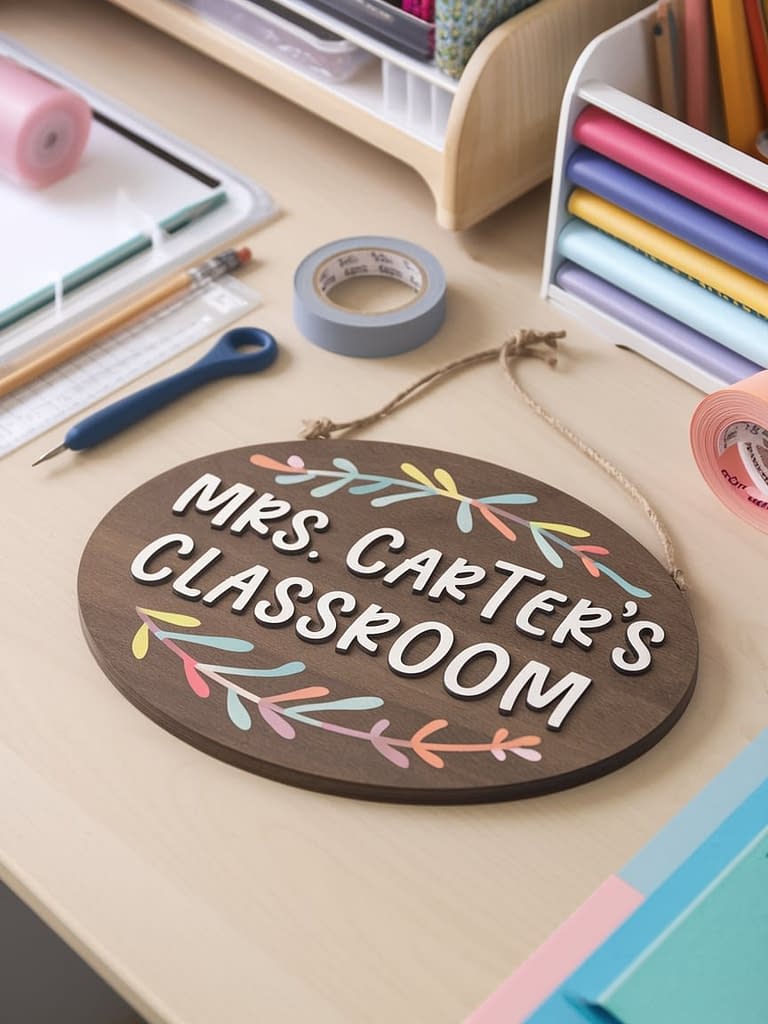
Perfect for: Classroom doors, desks, or bulletin boards
A personalized sign adds warmth to any classroom. It’s also one of the most popular DIY Cricut Teacher Gifts tutorials because it’s simple to make yet looks incredibly polished.
Materials Needed
- Wooden plaque or sign base
- Adhesive vinyl or permanent vinyl
- Transfer tape
- Cricut cutting machine
- Paint (optional)
- Clear sealant (optional)
- Weeding and application tools
Design Ideas
- “Mrs. Smith’s Classroom” with a playful border
- Subject-specific designs (like “Science Lab” or “Art Studio”)
- Inspirational quote with floral or geometric accents
Step-by-Step Tutorial
- Prepare the Base:
Paint or stain your wooden plaque if desired, and let it dry completely. Lightly sand the surface to ensure smooth adhesion. - Design the Layout:
Create or upload a name or quote design in Cricut Design Space. Adjust the size to fit the sign’s dimensions and pick a bold, legible font. - Cut and Weed the Vinyl:
Load adhesive vinyl (colored side up) on your mat, cut the design, and weed out the excess carefully. - Transfer the Design:
Apply transfer tape over the vinyl, then position it on the plaque. Press down evenly and peel away the transfer tape slowly to leave your design in place. - Seal for Durability (Optional):
Add a light coat of clear acrylic sealant if you want the design to last longer.
Your sign is complete — perfect for a classroom door, teacher’s desk, or wall.
Customization Tips
- Add layered vinyl to combine colors.
- Use Cricut foil or metallic vinyl for an elegant touch.
- Create matching door and desk signs for a cohesive classroom look.
This sign not only decorates the classroom but also makes teachers feel appreciated every day.
3. Personalized Teacher Mug

Perfect for: Morning coffee, tea, or desk organization
A customized mug is a simple yet personal gift that always brings a smile. Cricut makes it easy to turn a plain ceramic mug into something meaningful and professional-looking.
Materials Needed
- Ceramic mug (smooth surface)
- Permanent adhesive vinyl
- Transfer tape
- Cricut machine and cutting mat
- Weeding tools
- Mug press or standard oven (optional for Infusible Ink)
Design Ideas
- “Teaching is a work of heart”
- “#1 Teacher” with apple icons
- The teacher’s name in script with subject symbols
Step-by-Step Tutorial
- Create the Design:
Choose or upload your SVG in Cricut Design Space. Resize it to fit your mug — about 3–3.5 inches wide is ideal. - Cut the Vinyl:
Use permanent vinyl and select the proper material setting. Load it onto your mat shiny side up, cut, and remove it carefully once done. - Weed the Design:
Remove all unwanted vinyl, taking your time around small letters or shapes for a clean look. - Apply to the Mug:
Use transfer tape to pick up your design, then clean your mug with rubbing alcohol before applying. Press it on smoothly from center outward, removing bubbles. - Seal the Design (Optional):
For extra protection, use dishwasher-safe Mod Podge or bake the mug at 300°F (150°C) for about 15 minutes.
Now you have a personalized mug that’s both beautiful and practical — a daily reminder of appreciation for any teacher.
Customization Tips
- Mix fonts or add icons for personality.
- Use school colors for vinyl choices.
- Include the teacher’s initials or a fun saying on the back of the mug.
A personalized mug is both thoughtful and practical — ideal for coffee-loving teachers.
4. Customized Pencil Holder or Desk Organizer
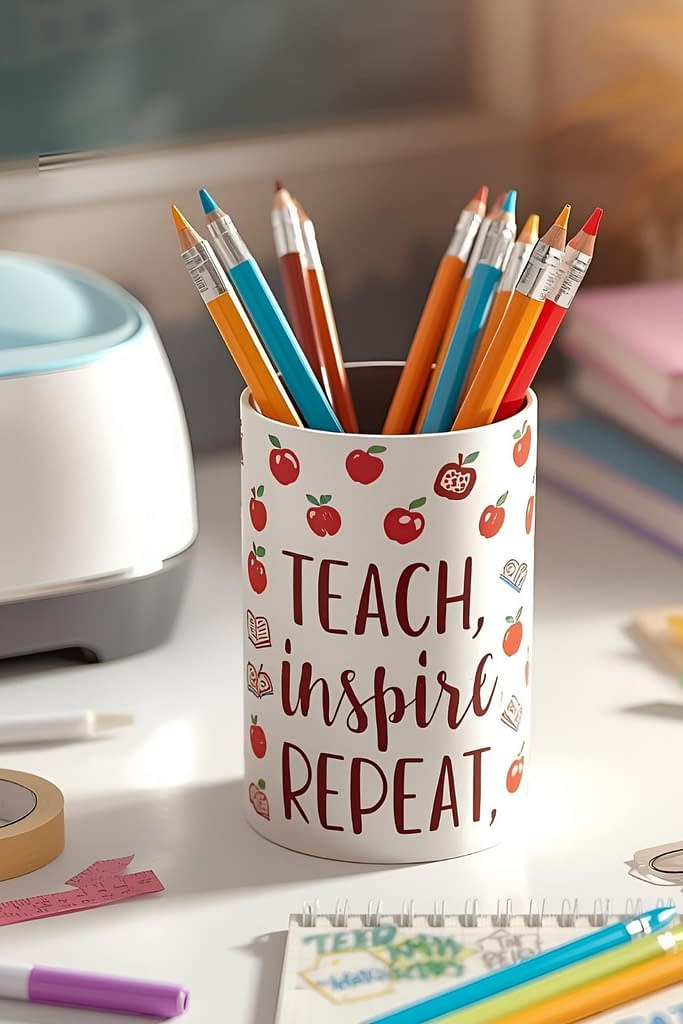
Perfect for: Adding style and order to the teacher’s workspace
Teachers can never have too many organizers. This Cricut project transforms a basic pencil holder into a charming, custom desk accessory.
Materials Needed
- Wooden, acrylic, or metal pencil holder
- Adhesive vinyl or Smart Vinyl
- Transfer tape
- Cricut machine
- Paint (optional)
- Clear sealant (optional)
Design Ideas
- “Teach, Love, Inspire” around the base
- Teacher’s name and subject icons (books, pencils, apples)
- Minimalist monogram for a modern touch
Step-by-Step Tutorial
- Prep the Surface:
Clean the holder with rubbing alcohol. If painting it, let it dry fully before applying vinyl. - Design the Decal:
In Cricut Design Space, add the teacher’s name, subject, or short quote. Keep the layout simple so it fits neatly on the holder. - Cut and Weed:
Load your vinyl, cut the design, and carefully weed away the extra pieces. - Apply the Vinyl:
Use transfer tape to move the design to the holder’s surface. Smooth it down firmly, then peel the tape off slowly. - Seal for Protection (Optional):
A light layer of clear sealant will help preserve the design for long-term use.
This quick project creates a professional, personalized touch for any teacher’s desk.
Customization Tips
- Use holographic or patterned vinyl for visual interest.
- Match the holder’s design to the classroom color scheme.
- Add a motivational word like “Inspire” or “Create” in bold lettering.
A personalized desk organizer keeps supplies tidy and adds a unique touch to any classroom.
5. Teacher Appreciation Gift Tags & Cards
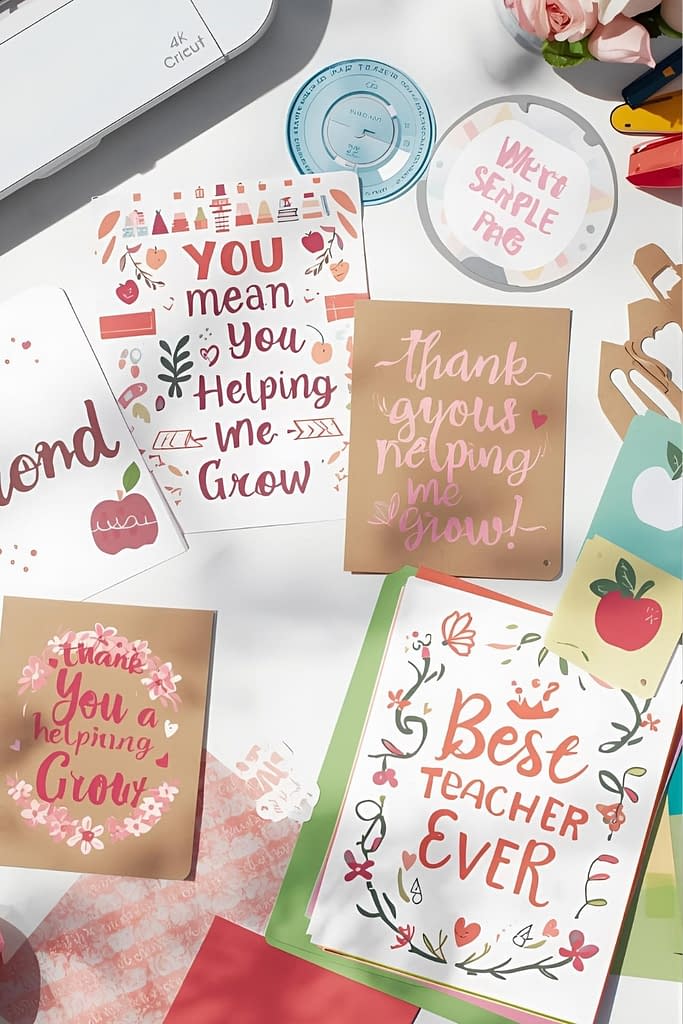
Perfect for: Pairing with other gifts or standalone thank-you notes
Sometimes, a heartfelt message can mean as much as a big gift. With Cricut, you can craft professional-looking cards and gift tags that add a handmade touch to your teacher gifts.
Materials Needed
- Cardstock (various colors)
- Cricut pens (for writing feature)
- Cricut cutting mat
- Glue or double-sided tape
- Ribbons or string
Design Ideas
- Apple-shaped gift tag with “Thank You for Helping Me Grow”
- Folded card with teacher-themed illustrations
- Layered paper design with school icons
Step-by-Step Tutorial
- Design the Layout:
Open Cricut Design Space and select or create your own gift tag or card design. Add messages like “Thank You” or “You Make a Difference.” - Add Writing or Details:
Use Cricut pens to write the message or draw details. You can mix text and small icons for a polished finish. - Cut the Cardstock:
Load your chosen cardstock color onto a LightGrip mat and let Cricut cut the shapes. - Assemble the Layers:
If your design includes multiple layers, glue or tape them together carefully for a clean look. - Finish and Decorate:
Punch a hole at the top for ribbons or twine if it’s a tag. Add small embellishments or metallic accents to make it stand out.
Your handmade tags and cards will beautifully complete any teacher gift, adding a personal touch straight from the heart.
Customization Tips
- Layer different cardstock colors for depth.
- Include a student’s handwritten note for extra sentiment.
- Use metallic pens or foil accents for a polished look.
These handmade cards and tags pair beautifully with any of the other Cricut teacher gifts on this list.
Tips for Perfecting Your Cricut Teacher Gifts
- Test cut first: Always do a test cut to avoid wasting materials.
- Use high-quality vinyl: It makes a noticeable difference in durability and appearance.
- Keep designs balanced: Avoid overcrowding; simplicity often looks more elegant.
- Personalize with purpose: Include names, school colors, or quotes that resonate with the teacher’s personality.
- Package creatively: Wrap the gift in tissue paper, tie with ribbon, or place it in a decorative box with a handwritten note.
Final Thoughts
Making DIY Cricut Teacher Gifts isn’t just about crafting — it’s about appreciation, thoughtfulness, and creativity. Each of these five tutorials combines personal meaning with practicality, resulting in gifts teachers will genuinely enjoy using and displaying.
From the personalized tote bag to the classroom sign and handmade cards, these projects prove that the best teacher gifts don’t come from a store — they come from the heart (and your Cricut).


