
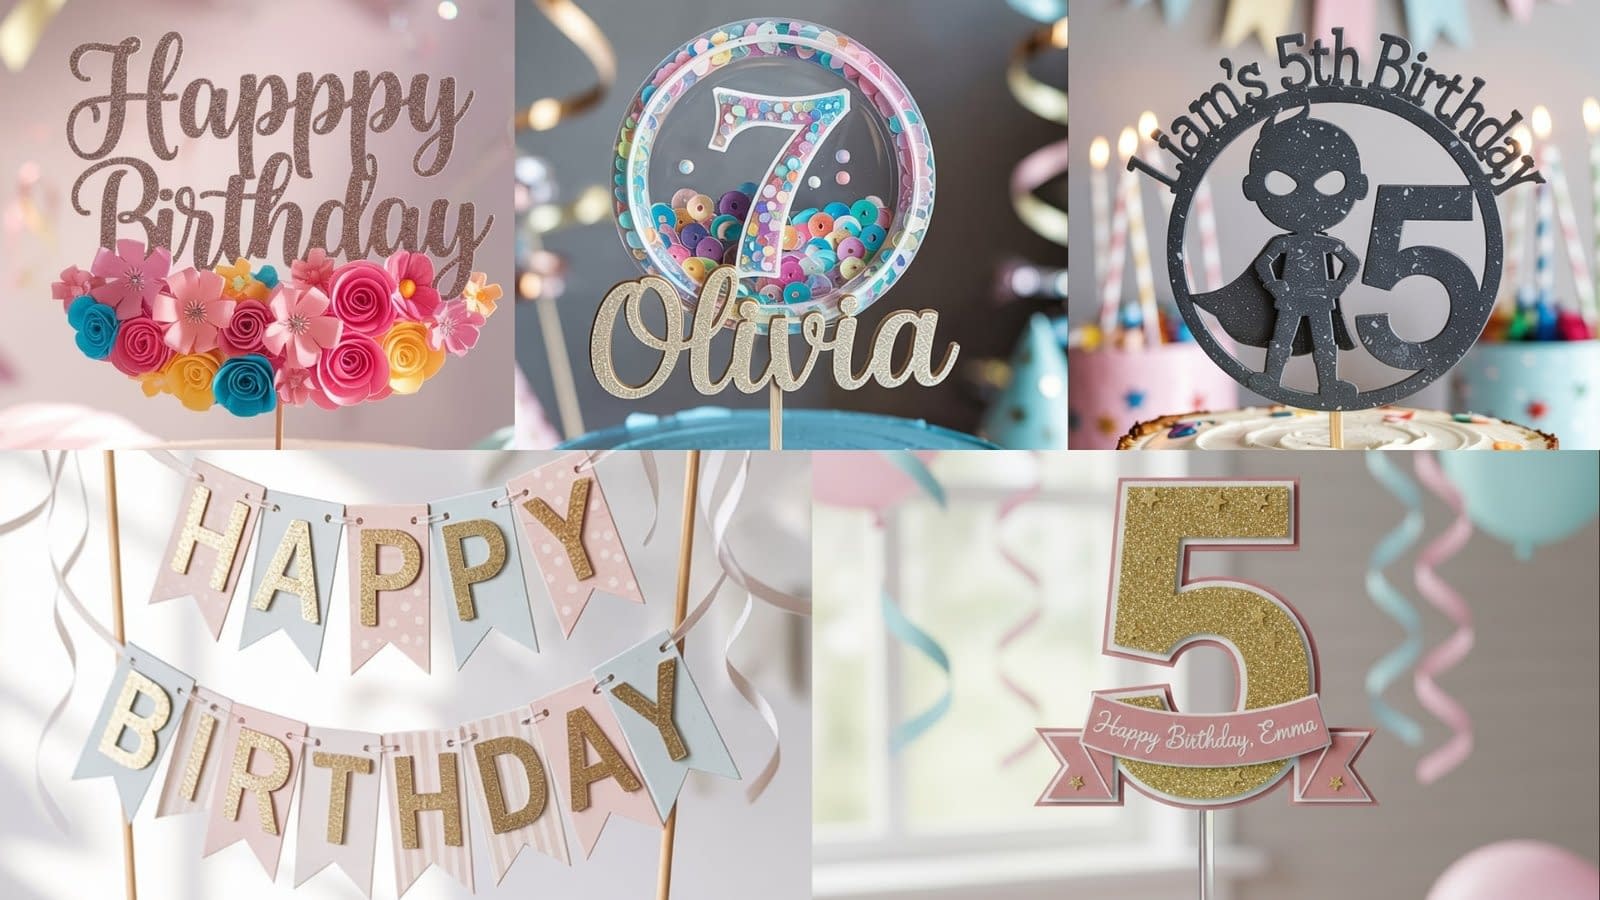
Creating a birthday cake topper with a Cricut machine is one of the most satisfying ways to personalize a celebration. A topper that reflects the birthday theme not only adds style to the cake, but also becomes a cherished part of the event’s décor. Whether you are making designs for your family or selling toppers as part of a crafting business, this 5 Cricut Birthday Cake Topper Tutorial provides everything you need to craft professional-quality toppers with precision.
This in-depth guide explains how to design, cut, assemble, layer, glue, and reinforce five different birthday topper styles. Every tutorial includes detailed instructions, including how to position layers, where to apply glue, how to attach sticks neatly, and how to build durable layered structures that stay stable on a cake.
Materials and Tools Needed for All Tutorials
Before beginning any of the five projects, gather the crafting essentials. These materials are standard for most Cricut cake toppers and will be referenced repeatedly throughout the tutorials.
Cardstock Options
• 65 lb solid cardstock for detailed cuts
• 80 lb to 110 lb cardstock for backing and reinforcement
• Glitter cardstock for top accent layers
• Holographic or metallic cardstock for decorative highlights
Adhesives
• Liquid craft glue with a fine tip for clean edges
• Double-sided foam tape for raised 3D elements
• Glue stick for large flat surfaces
• Optional hot glue gun for attaching sticks securely
Tools
• Cricut Maker, Explore, or Joy machine
• StandardGrip mat (green)
• LightGrip mat (blue) for delicate materials
• Fine Point blade
• Scraper tool
• Spatula tool
• Bone folder
• Precision tweezers
• Scissors
• Cutting ruler
• Acrylic or bamboo cake sticks
Optional Decorative Additions
• Rhinestones
• Sequins
• Ribbon elements
• Vellum
• Acetate sheets for shaker designs
• Mini bows
• Metallic vinyl lettering
Understanding Cricut Cake Topper Construction
Before you begin the five tutorials, it helps to understand the principles behind a strong and clean cake topper.
Layering
Most toppers consist of several layers to give a defined structure. These usually include:
• A top decorative layer
• One or two offset shadow layers
• A thick backing layer
• Optional accent layers
• A reinforcement layer to support the stick
Cutting for Clean Edges
• Use a sharp Fine Point blade.
• Stick cardstock firmly on the mat so it lies flat without air pockets.
• For small or detailed cuts, select 65 lb cardstock to reduce tearing.
• Remove material slowly using a spatula to avoid bending corners.
Gluing Technique
• Apply glue in thin, light lines around the back of each piece.
• Avoid spreading glue too close to the edge; keep it at least 2 mm from borders.
• Press pieces together lightly using fingertips or a bone folder.
Stick Attachment
• Place the stick between two layers so it remains hidden.
• Use a reinforcement strip to keep the stick stable and straight.
• Avoid adding the stick directly onto the back without a cover layer.
Layered Birthday Number Cake Topper
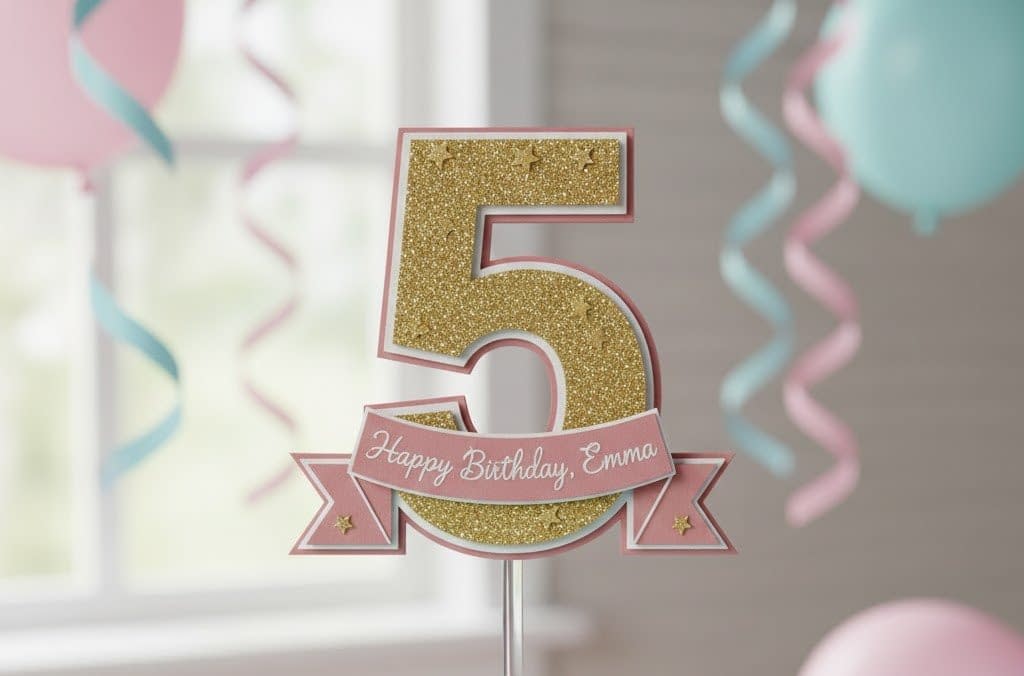
This first topper is a bold, eye-catching design featuring large birthday numbers with multiple layered offsets. It is ideal for any age and theme, and it works particularly well for milestone birthdays.
Design Overview
This topper includes:
• A main number (for example, one large digit or two digits)
• Three shadow offsets for depth
• Name banner or curved name
• Small decorative elements like stars or confetti
• Reinforcement backing layer for stick support
Materials
• Glitter cardstock for the top number
• Solid cardstock for shadow layers
• Heavier cardstock for the back reinforcement
• Foam tape for dimension
• Liquid glue
Step 1: Uploading and Sizing the Number
- Open Cricut Design Space.
- Select or upload a bold number SVG. Fonts such as varsity, block, or chunky styles work best.
- Resize the number to around 6–8 inches tall, depending on your cake size.
- Use the offset feature to create three outlines: one thin, one medium thickness, and one thicker layer.
- Ensure that each offset layer has smooth curves and visible separation.
Step 2: Cutting the Layers
- Place glitter cardstock on the StandardGrip mat. Smooth it with your scraper to remove air pockets.
- Cut the top number layer using the Fine Point blade.
- Switch to solid 65 lb cardstock for the middle layers to prevent tearing in offset corners.
- Cut the backmost layer using 110 lb cardstock so it provides full support.
- Gently lift each piece with a spatula so corners don’t bend upward or tear.
Step 3: Assembling the Layers
- Begin with the largest offset layer and place it on your table.
- Add a thin line of liquid glue around its inner area.
- Press the next offset layer directly on top, aligning edges carefully.
- Continue until all offset layers are stacked.
- For the top number layer, use thin squares of foam tape to create dimension.
- Place the foam tape evenly, especially behind larger areas of the number so it stays level.
Step 4: Adding Decorative Elements
- Cut small shapes such as confetti, stars, or tiny hearts from glitter cardstock.
- Use tweezers to position each piece around the number.
- If adding a name banner:
• Cut a small rectangle.
• Slightly fold the two ends backward to create a real ribbon effect.
• Glue the name on the banner.
• Attach to the number using a gentle curve.
Step 5: Stick Attachment
- Cut a reinforcement strip of thick cardstock, around 1 inch wide.
- Place the cake stick on the back of the topper.
- Apply hot glue or strong liquid glue.
- Press the reinforcement strip over the stick.
- Make sure the strip lies completely flat to prevent bulging.
Character Silhouette Birthday Topper
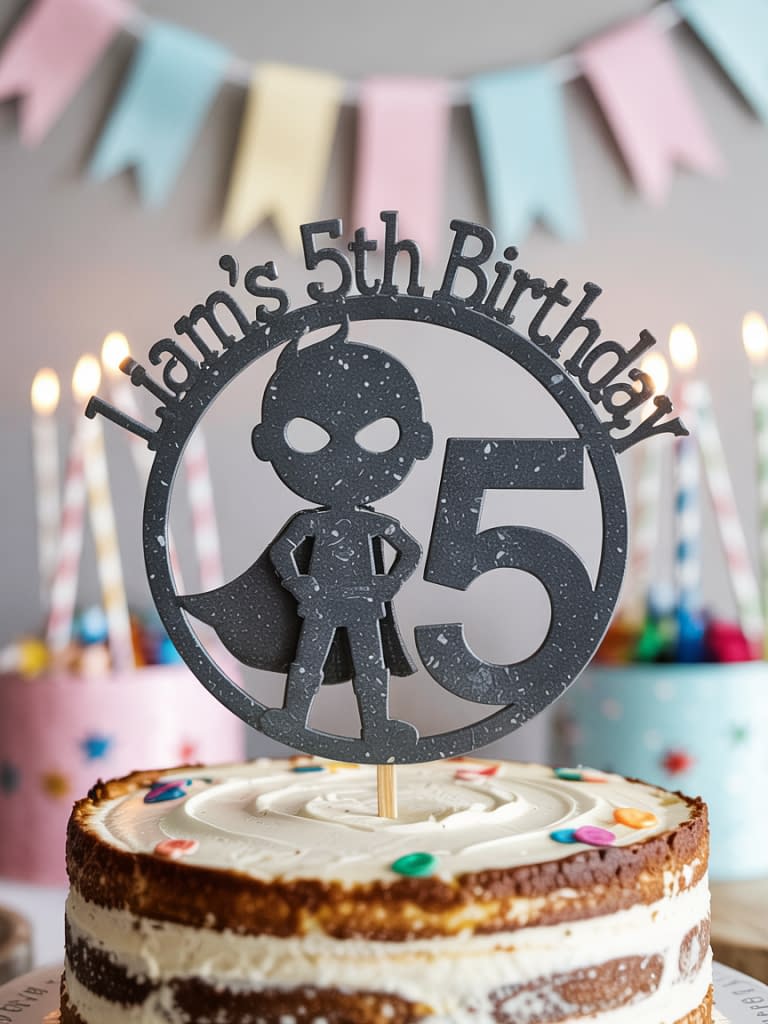
This topper features a solid character silhouette matched with a decorative base. It works well with themes like superheroes, animals, princesses, or cartoon figures.
Design Overview
• Circular or shaped base
• Centered character silhouette
• Curved name or straight banner
• Age number and small decorative cutouts
Materials
• Solid cardstock
• Black or glitter cardstock for the silhouette
• Foam tape
• Glue
• Lollipop or acrylic stick
Step 1: Designing the Base
- Insert a circle into Design Space.
- Resize it to 6–7 inches wide.
- Use the offset tool to create one or two shadow layers.
- Adjust the thickness so the edges remain strong for layering.
Step 2: Adding the Character
- Upload or insert a silhouette design.
- Resize it so it covers about two-thirds of the circle.
- Center it vertically or slightly lower to allow space for text above.
Step 3: Cutting the Pieces
- Cut the base layers using heavier cardstock.
- For the silhouette, use glitter or plain black cardstock and place it on the LightGrip mat to avoid tearing.
- Cut name letters or a curved name using thinner cardstock for clean edges.
Step 4: Assembling the Topper
- Glue the shadow layers together first.
- Apply glue on the back of the silhouette using small dots concentrated near thicker parts of the design, such as the head, cape, or shoulders.
- Place the silhouette onto the center of the base.
- Use foam tape to attach the age number for slight elevation.
- Curve the name letters slightly backward with your fingers to reduce stiffness before gluing them along the circle’s curve.
Step 5: Stick Attachment
- Position the stick slightly below center so the topper remains balanced.
- Add glue and place the stick flat.
- Cover the stick with a backing circle so the attachment remains hidden.
Shaker Birthday Cake Topper
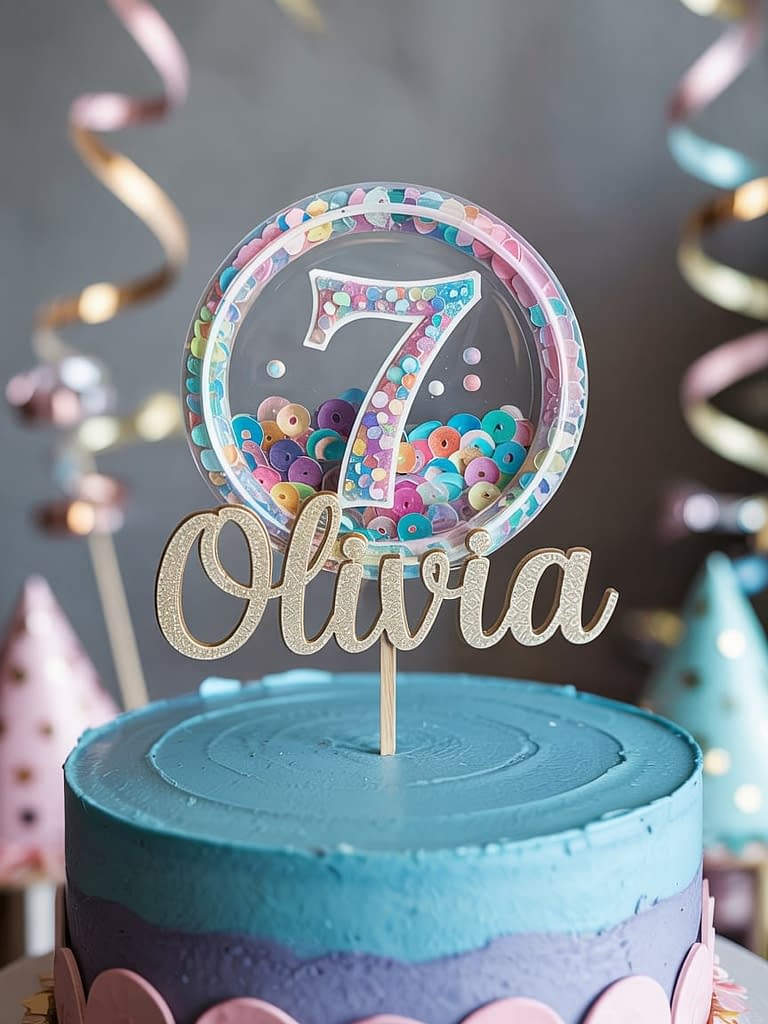
This design creates an interactive shaker effect using an acetate window and sequins. It is more advanced but produces a highly professional look.
Design Overview
• Shaker frame
• Acetate window
• Stacked walls made from several cardstock layers
• Sequins inside the shaker
• Decorative name and age layers outside the frame
• Reinforced backing
Materials
• Acetate sheet
• Foam tape
• Solid and glitter cardstock
• Sequins
• Liquid glue
• Tweezers
Step 1: Creating the Shaker Frame
- Insert a circle or other shape in Design Space.
- Duplicate it.
- Select one copy and apply an offset to create a thick border. The border should be thick enough to support sequins, usually around 0.4 inches.
- This thick outline becomes the frame.
Step 2: Cutting
- Cut the glitter frame first.
- Cut three or four copies of the same frame shape using thicker cardstock. These layers will stack and form the shaker wall.
- Cut the acetate shape without a border so it aligns perfectly behind the glitter frame.
- Cut the background circle in a contrasting color.
Step 3: Building the Shaker Walls
- Stack the cardstock frames, applying glue sparingly around edges.
- Align each frame precisely to avoid gaps.
- Press each layer firmly using a bone folder.
- Glue the acetate sheet behind the glitter frame using a thin, even line of glue around the back.
Step 4: Assembling the Shaker
- Glue the stacked frames onto the background circle.
- Allow the glue to dry fully so no sequins cling to damp spots.
- Pour a small amount of sequins inside. Do not overfill.
- Finally, place the acetate-covered glitter frame on top to close the shaker.
Step 5: Decorating the Outside
- Attach a name using foam tape or flat glue depending on the design.
- Add an age number with a shadow for contrast.
- Decorate the edges with themed icons or small cutouts.
Step 6: Stick Attachment
- Secure the stick to the back using strong glue.
- Add a full backing circle to cover the attachment and strengthen the topper.
Layered Banner Style Birthday Topper

This topper includes several overlapping banner strips arranged in a tiered style. It’s great for themes requiring text phrases like Happy Birthday or the celebrant’s name.
Design Overview
• Multiple banner strips
• Layered text
• Slightly curled edges for dimension
• Reinforced backing and stick
Materials
• Patterned cardstock
• Solid cardstock
• Liquid glue
• Foam tape
• Cake stick
Step 1: Designing the Banner Strips
- Insert a rectangle shape.
- Unlock the proportions and adjust the width to about 7–9 inches and the height to about 1.5 inches.
- Add a triangular cutout on one side to create the banner shape.
- Duplicate three to five times to create multiple banner layers.
Step 2: Cutting
- Cut the top banner using patterned cardstock.
- Cut the remaining banners using solid colors.
- Cut the text phrase or name separately using 65 lb cardstock for crisp letters.
Step 3: Assembling the Banner
- Slightly curl the ends of each banner strip by pulling them gently over a bone folder.
- Lay the largest banner at the bottom.
- Add foam tape along its center for light elevation.
- Attach the next banner slightly overlapping it.
- Continue layering until all banners sit in a tiered pattern.
- Attach the text on the top-most banner using tweezers for precision.
Step 4: Reinforcing and Attaching the Stick
- Cut a long backing strip from 110 lb cardstock.
- Glue it across the back of the stacked banners.
- Attach the stick with glue.
- Add another backing strip if necessary for extra support.
Floral Layered Birthday Cake Topper

This topper focuses on dimensional paper flowers and elegant lettering. It is a softer, more decorative option perfect for feminine themes, weddings, or adult birthdays.
Design Overview
• Large base shape
• Layered flowers
• Leaves
• Birthday phrase and number
• Reinforced backing
Materials
• Solid and glitter cardstock
• Liquid glue
• Foam tape
• Tweezers
• Bone folder
Step 1: Creating the Base and Text
- Insert an oval or circle into Design Space.
- Add an offset layer for depth.
- Cut the base using 110 lb cardstock so it remains firm on the cake.
- Cut the text and age number using glitter cardstock.
Step 2: Cutting the Flowers
- Choose layered flower SVGs with at least three petal layers.
- Cut the bottom petals from the darkest shade, middle petals from a medium shade, and top petals from the lightest shade.
- Cut the leaf pieces from green cardstock.
- Use the LightGrip mat to prevent more delicate petals from tearing.
Step 3: Assembling the Flowers
- Use the bone folder to slightly curl the petals outward.
- Stack the largest petal first, then the medium, then the smallest.
- Apply glue only at the center of each flower layer. This keeps the petals open for dimension.
- Add a small circular flower center.
Step 4: Designing the Layout
- Start by placing the largest flower at the lower left of the base.
- Add smaller flowers around it.
- Insert leaves behind the flowers before gluing anything down.
- Once satisfied with the layout, begin gluing each piece in place.
- Attach the birthday phrase in the center of the topper.
- Place the age number using foam tape for elevation.
Step 5: Attaching the Stick
- Add glue to the stick and place it on the back of the topper.
- Cover the stick with a backing oval or circle to hide it and strengthen the structure.
Final Tips for Making Professional Cricut Toppers
Use the Right Cardstock
• Heavyweight cardstock for backing
• Medium-weight for decorative layers
• Thin cardstock for small details
Prevent Glue Wrinkles
• Use thin lines of glue
• Avoid excess near edges
• Allow layers to dry flat
Layer Alignment
• Hold the top layer above the base before lowering it into place
• Align edges slowly for precision
Storage
• Keep toppers flat in a protective box
• Avoid moisture and direct heat
Conclusion
This 5 Cricut Birthday Cake Topper Tutorial offers a complete guide for creating five unique and professional-quality toppers. Whether you prefer simple layered numbers, elegant floral designs, or fun shaker-style toppers, each tutorial includes precise steps for cutting, layering, assembling, and attaching your finished project. With the right materials and careful attention to detail, you can produce toppers that elevate any birthday celebration and reflect your creativity.


