
Crocheting a rug is one of the most satisfying projects you can undertake. Unlike a simple scarf or hat, a rug becomes a permanent fixture in your home, grounding your furniture and adding warmth to your floors. The oval shape, in particular, offers a versatile alternative to standard rectangles or circles. It fits beautifully in narrow hallways, sits elegantly under coffee tables, and softens the harsh lines of modern architecture.
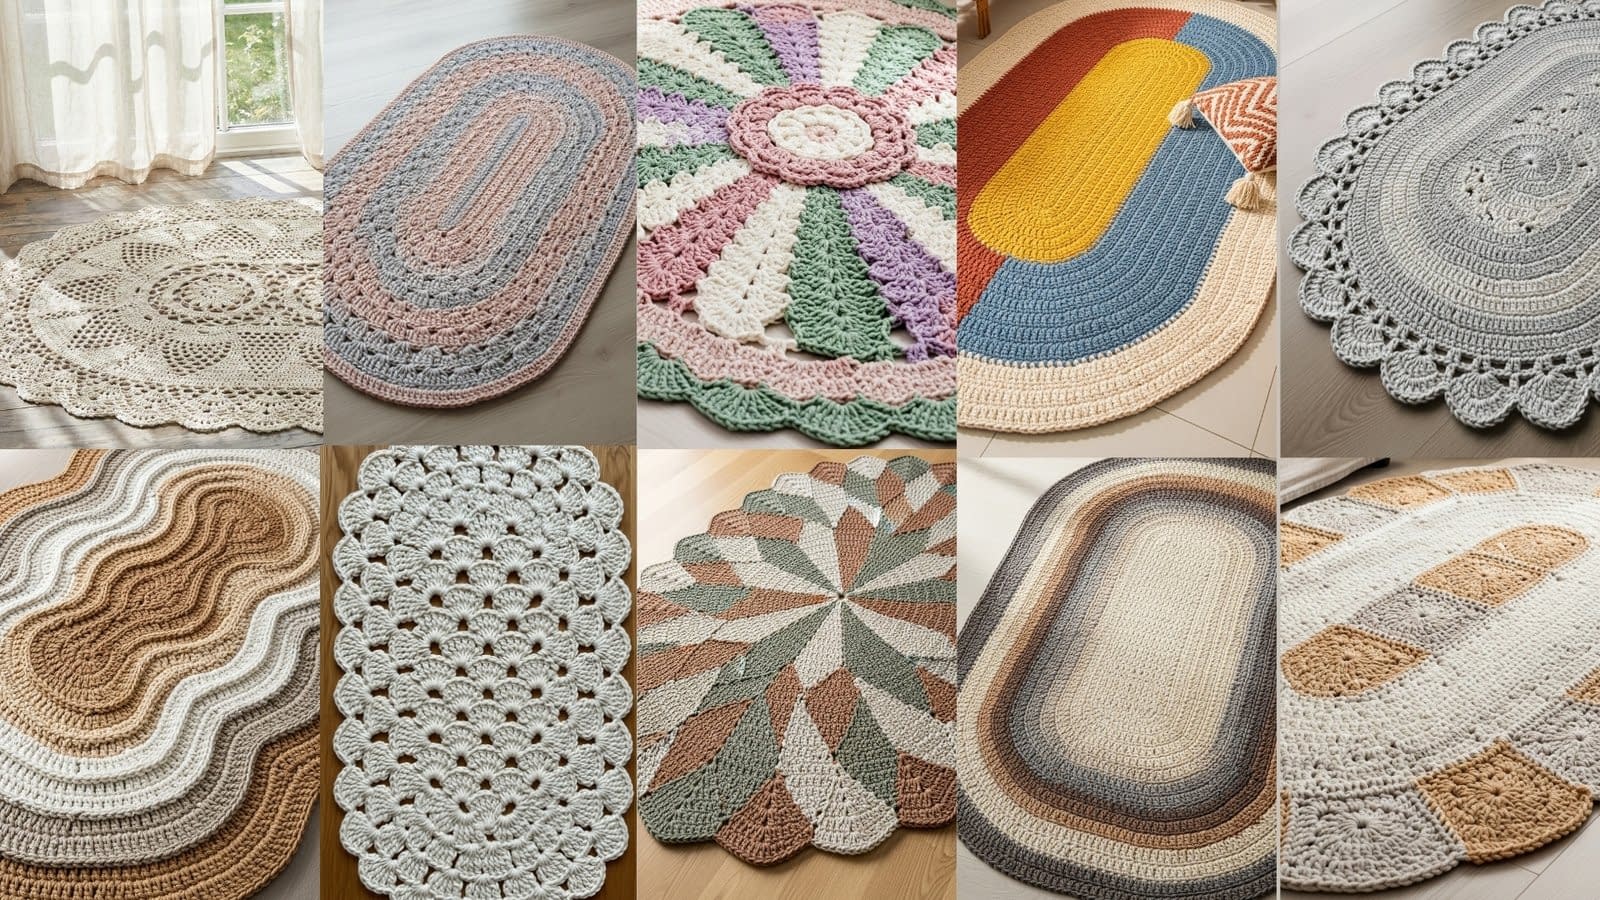
In this detailed guide, we will explore ten distinct designs inspired by a variety of aesthetics, from lace doily styles to bold geometric blocks. We will break down the construction of these rugs into manageable steps. You will learn not just the stitches, but the architecture of the rug—how to keep it flat, how to manage color changes, and how to finish your work so it lasts for years. We will also cover essential finishing techniques, including how to cut your yarn ends cleanly, how to block your rug to shape, and even how to apply non-slip backing to ensure safety.
Materials Used Across All Oval Crochet Rug Patterns
Before starting any of the tutorials, it helps to understand the common materials used for oval crochet rugs.
Most oval crochet rugs are made with:
– Cotton yarn, cotton blend yarn, or bulky acrylic yarn
– A crochet hook one or two sizes larger than recommended on the yarn label
– Scissors (only for cutting yarn ends, never the rug fabric)
– A yarn needle for weaving in ends
– A non-slip rug pad for placement after completion
No glue is used at any stage. All joins, color changes, and edging are secured through crochet techniques and proper weaving of yarn tails.
The Vintage Lace Doily Rug
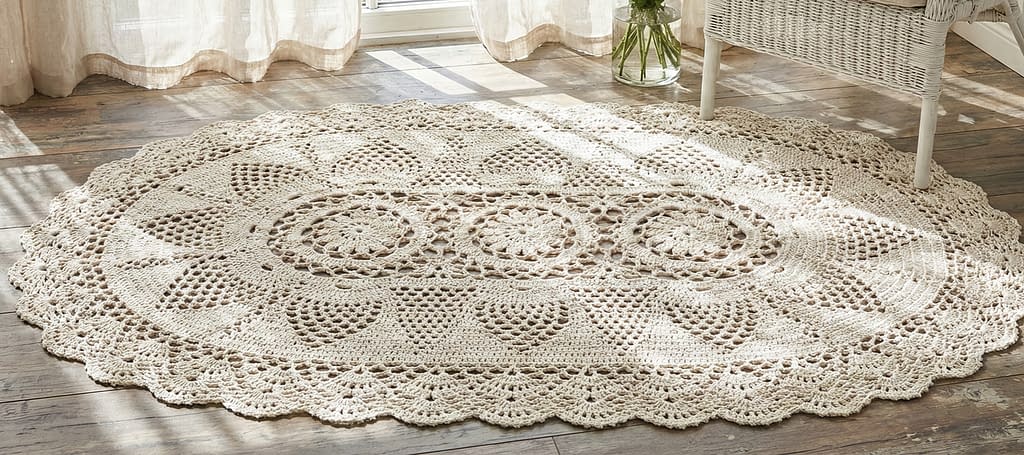
The first pattern in our collection of 10 oval crochet rug patterns is a breathtaking homage to the Victorian era. This rug mimics the intricate design of a tabletop doily but is scaled up using thick yarn to serve as a functional floor piece. The aesthetic is defined by its open lacework, pineapple motifs, and a delicate picot edge. It is perfect for a bedroom or a shabby-chic living space where you want to introduce texture without overwhelming the room with color.
Materials and Preparation
For this project, you will need a heavy-weight cotton cord or t-shirt yarn in a natural, unbleached cream color. A large hook, typically size 10mm or 12mm depending on your yarn thickness, is essential to keep the stitches airy but structured. Before you begin, ensure you have a clean, large workspace. You will need sharp scissors for cutting thick cord and a tapestry needle with a large eye. If you plan to make the rug non-slip, have a tube of liquid latex or silicone seam sealer ready for the final steps.
Creating the Central Oval Base
The foundation of any oval rug is the central chain. To begin, crochet a long chain that determines the length of the rug’s center. For a medium-sized rug, a foundation chain of roughly 20 to 30 stitches is standard. Work double crochets down one side of the chain. When you reach the last chain, work multiple stitches (usually 3 to 5) into that single loop to turn the corner. Continue working down the opposite side of the chain. This creates a long, pill-shaped center. It is crucial to mark your corners with stitch markers, as this is where all your increases will happen to keep the rug flat.
Building the Lace and Pineapple Motifs
Once you have a solid oval base of about five to six rounds, you will begin the decorative openwork. This involves skipping stitches and creating chain spaces. You will work groups of double crochets into the same stitch to create “shells.” As the rounds progress, you will stack these shells to form the classic “pineapple” shape, which looks like a teardrop made of mesh.
To execute this, you must pay close attention to your tension. If your chains are too tight, the rug will bowl up (curl like a bowl). If they are too loose, the edges will ruffle. Lay your work flat on the floor after every single round. If you notice ruffling, you may need to skip an extra stitch between shells. If it is curling, add an extra chain stitch between your clusters.
The Decorative Scalloped Border
The final rounds are what give this rug its vintage character. You will transition from the main lace pattern to a dense border. The very last round consists of picot stitches. To make a picot, you will single crochet, chain three, and then slip stitch back into the first chain before making the next single crochet. This creates a tiny, decorative nub or point on top of the scallop.
Finishing and Blocking
Once the crochet work is done, cut your yarn leaving a distinct 6-inch tail. Thread this tail into your large needle and weave it back and forth through the dense stitches of the center base, not the open lace, to hide it. For this specific lace design, “blocking” is mandatory. Dampen the rug thoroughly with a spray bottle. Stretch it out on a mat or carpet. Pin the picot edges out to sharp points using rust-proof pins. Let it dry completely for 24 hours. This process “sets” the fibers and ensures the lace opens up beautifully. Finally, flip the rug over. Apply thin lines of liquid latex or hot glue dots on the solid parts of the backside to prevent slipping. Let the glue cure completely before placing the rug on your floor.
The Pastel Ribbed Oval Rug
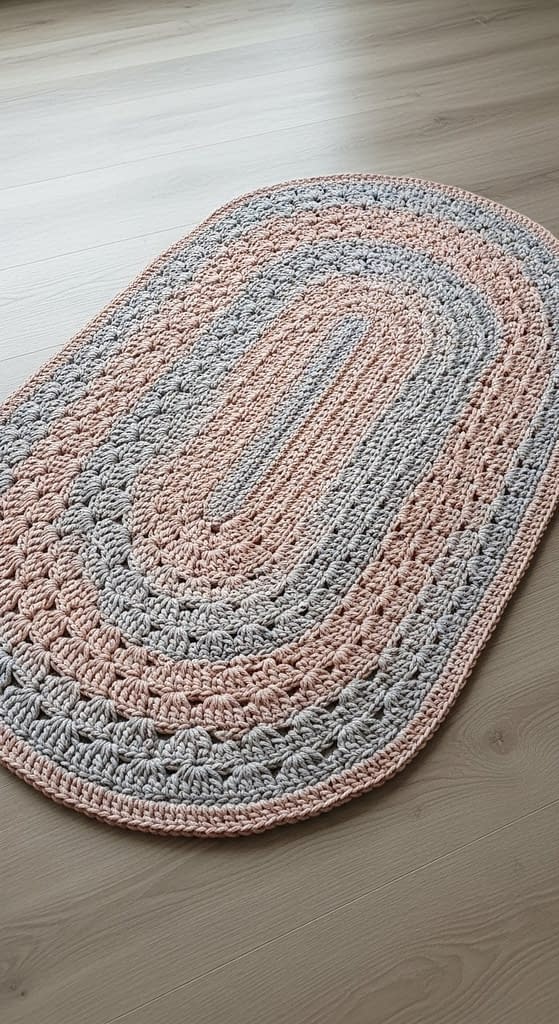
Moving to a more modern and cozy aesthetic, the second design in our list of 10 oval crochet rug patterns is the Pastel Ribbed Oval. This rug features thick, plush bands of color—dusty pink, heather grey, and muted lilac—separated by distinct textured ridges. The design relies on texture rather than lacy holes, making it an excellent choice for a nursery or a high-traffic play area where durability is key.
Understanding the Color Palette and Yarn
Select a super bulky weight yarn or two strands of worsted weight yarn held together. The color changes are the highlight here. You will need three distinct colors. The “ribbed” effect is created using a specific stitch technique called the Front Post Double Crochet (FPdc) or by working strictly in the Back Loop Only (BLO). This pushes the top loop of the stitch forward, creating a horizontal ridge that frames each color band.
Constructing the Concentric Bands
Start with your central oval base using the dusty pink yarn. Crochet standard double crochet rounds, increasing at the curved ends as usual. After three rounds, it is time to change colors. To do this seamlessly, stop your last stitch of the pink round before the final pull-through. Cut the pink yarn, leaving a tail. Fold the new grey yarn over the hook and pull it through to finish the stitch. This locks the new color in place without a knot.
Now, begin the texture round. Instead of inserting your hook under the top V of the stitch, insert it from front to back around the post of the stitch below. Complete your double crochet. This raises the stitch and creates the signature ribbing. Do one full round of this textured stitch in the new color, then switch back to normal flat stitches for the next two rounds. Repeat this pattern—one ribbed round, two flat rounds—every time you change color bands.
Managing the Oval Shape
The challenge with ribbed rugs is that the textured stitches can be tighter than normal stitches. You must be vigilant with your increases. In the ribbed rounds, ensure you are still performing the necessary increases at the curve (usually adding 3 to 4 extra stitches per curve). If the rug begins to curl, do not be afraid to add an extra increase stitch. The texture is forgiving and will hide minor adjustments.
The Micro-Shell Border
Finish this rug with a subtle border that doesn’t compete with the ribs. A “micro-shell” or “scallop” is perfect here. Using the lilac yarn, single crochet into a stitch, skip one stitch, work 3 double crochets into the next, skip one stitch, and single crochet into the next. Repeat this around the entire edge. This creates a gentle wave.
Final touches involve cutting the yarn tails at every color change. Because this rug has solid stitches, you can hide the tails easily. Thread the tail, weave it horizontally through the matching color row, turn back, and weave it firmly in the opposite direction. This “locking” technique ensures the ends never pop out, even after washing.
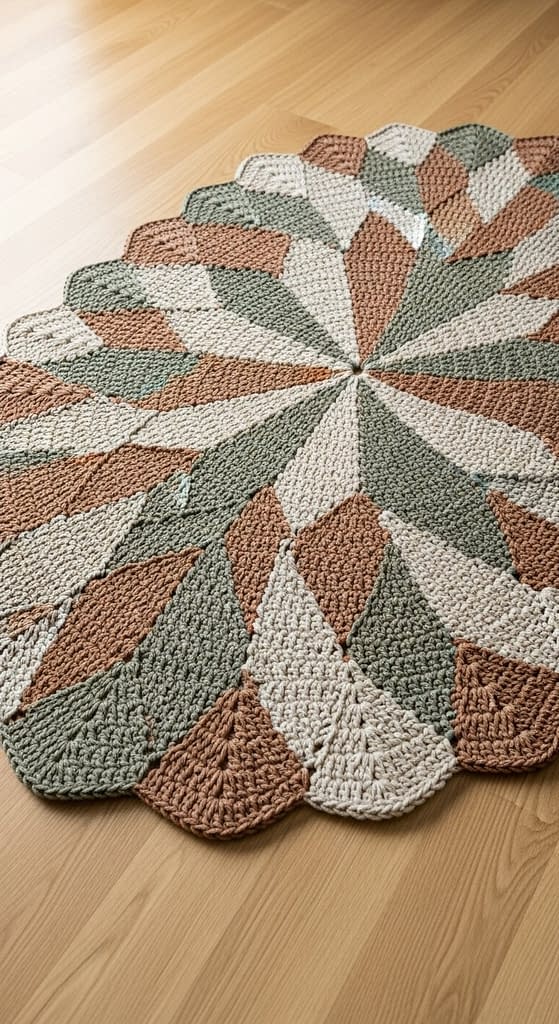
The Pastel Pinwheel Starburst Rug
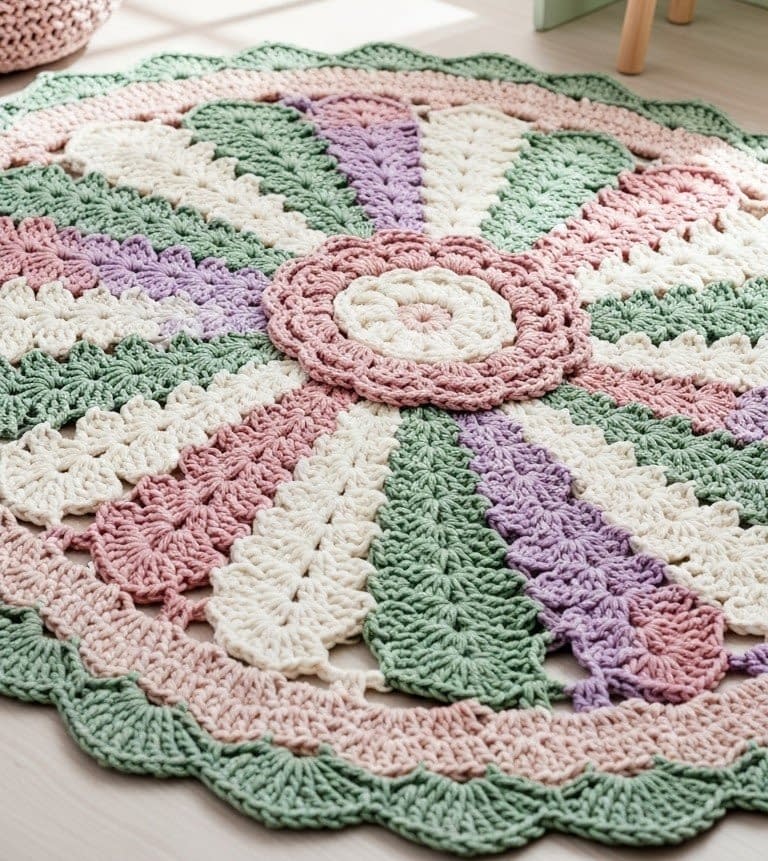
The third entry in our exploration of 10 oval crochet rug patterns is the whimsical Pastel Pinwheel. This design is a hybrid, starting with a circular logic that expands into an oval. It resembles a sunburst or a flower with petals radiating outward. The colors—mint green, lavender, soft pink, and white—make it a festive addition to any room.
Designing the Radial Structure
This rug is built on the concept of radial increases. You start with a long oval center, but unlike the previous rugs, you will create defined “slices” or “spokes.” In the first round, you will establish groups of double crochets separated by chain spaces. These groups form the base of the petals.
As you grow the rug, you will increase the number of stitches within each petal segment while keeping the chain spaces between them constant. For example, if a petal has 3 stitches in round one, it will have 4 in round two, and 5 in round three. This constant expansion creates the wedge shapes.
Incorporating the Color Shifts
The beauty of this rug lies in the alternating colors of the wedges. You can carry the yarn behind the work, but for a cleaner look, it is often better to cut and join new colors for each distinct ring. When transitioning from the white center to the pink petals, ensure your join is secure. Use the “standing double crochet” method to join new yarn: start with a slip knot on your hook, yarn over, and insert directly into the stitch to begin the round. This avoids the unsightly chain-3 start that often reveals the seam.
Creating the Fancy Fan Border
The Pinwheel rug deserves a dramatic finish. The border shown in the visual is a large fan border in mint green. This is constructed over two rounds.
Round 1: Create a base of chain loops. Single crochet, chain 5, skip 3 stitches, single crochet. Repeat around. Round 2: Work 8 to 10 tall double crochets or treble crochets into each chain-5 loop. Anchor these large fans with a single crochet into the single crochet of the previous row.
This creates a heavy, ruffled edge that looks like flower petals.
Shaping and Maintenance
Because of the chain spaces between the petals, this rug is more flexible and prone to stretching. When blocking this rug, pay special attention to the “spokes.” Pin each spoke straight so the oval maintains its symmetry. If the rug is going on a wooden floor, the open spaces can be slippery. It is highly recommended to cut a non-slip rug pad into an oval shape slightly smaller than the rug. Glue the pad to the rug using generous dots of hot glue or silicone adhesive applied to the solid petal sections. Press firmly and let it cure. This hidden layer adds weight and stability, keeping your beautiful pinwheel design perfectly in place.
The Retro Color Block Oval Rug
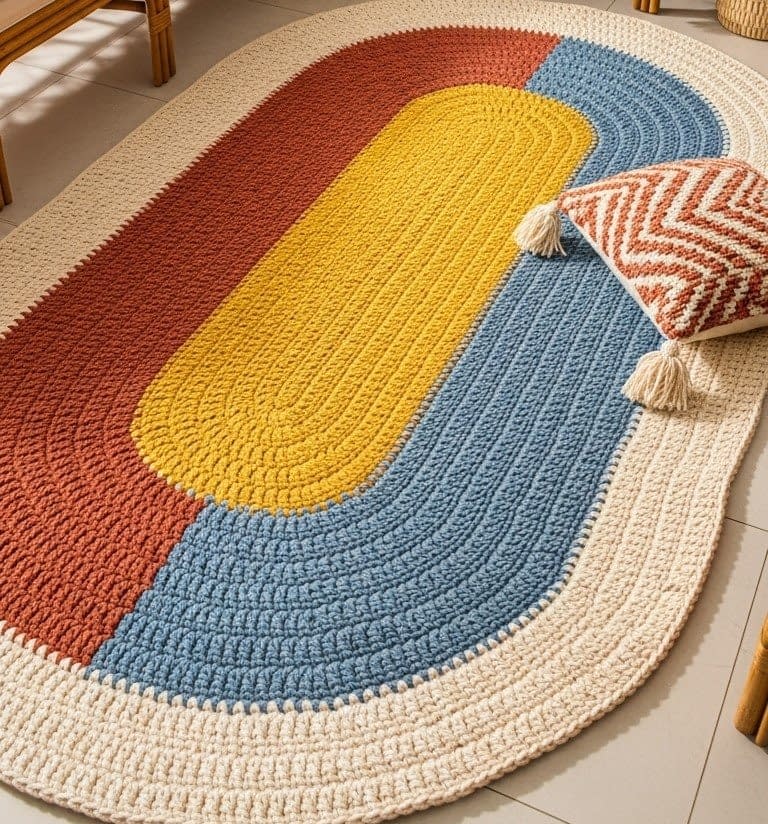
The fourth design shifts away from intricate lacework and embraces the bold, graphic appeal of the mid-century modern aesthetic. This rug, characterized by its distinct blocks of rust orange, mustard yellow, slate blue, and cream, uses a classic capsule or racetrack oval shape. Unlike the previous patterns that might rely on texture, this design relies on clean lines and high contrast. It is the perfect statement piece for a living room with wooden furniture or a retro-inspired bedroom. The surface is smooth and dense, making it comfortable underfoot and easy to clean.
Choosing the Right Yarn and Colors
To achieve the solid, blocky look seen in the visual, you need a yarn that provides excellent stitch definition. A bulky weight cotton-acrylic blend is ideal because the cotton provides durability while the acrylic adds a slight sheen and softness. You will need four distinct colors. When selecting your palette, look for high contrast. If the colors are too similar, the “block” effect will be lost. You will also need a hook that is slightly smaller than recommended for the yarn (e.g., a 5.5mm hook for bulky yarn) to ensure the fabric is stiff and sturdy, preventing gaps where the floor might show through.
Mastering the Capsule Shape
While many oval rugs swell slightly in the middle, this retro design maintains parallel straight sides, resembling a medicinal capsule. To achieve this, your foundation chain must be significantly longer than usual. Measure the area where you want the rug to lie. Subtract the desired width of the rug from the desired length; the result is the length of your starting chain.
Work the center in the cream color. Crochet in standard Double Crochet (DC) stitches. The key to the capsule shape is how you treat the “straightaways” versus the “turns.” On the straight sides, place exactly one stitch in each chain. At the very ends, work 5 to 7 stitches into the single turning chain to fan around the corner. Do not space these increases out; they must be clustered at the very tip to keep the turn tight and semi-circular.
Executing Clean Color Changes
The visual impact of this rug depends on sharp, crisp lines between the colored sections. You will not be tapering the colors or blending them. When you finish the cream section and are ready to switch to the rust orange, complete the final yarn-over of your last cream stitch using the orange yarn. This is called a seamless color change.
Do not knot the yarns together, as this creates a hard lump that is painful to step on. Instead, leave 6-inch tails of both the old and new colors. Crochet over these tails for 4 to 5 stitches to secure them, then drop them to the back. Later, you will thread them onto a needle and weave them back in the opposite direction to fully lock them.
The Border Frame
Once you have completed the large blocks of color—moving from cream to blue, then yellow, then orange—you will finish with a framing border. As seen in the image, the border returns to the cream color, which ties the whole design together. This should be a simple round of Single Crochet (SC). The Single Crochet is shorter and tighter than the Double Crochet used in the body, acting like a binding that tightens the edges and prevents the rug from stretching out of shape over time.
The Grey Shell Border Rug
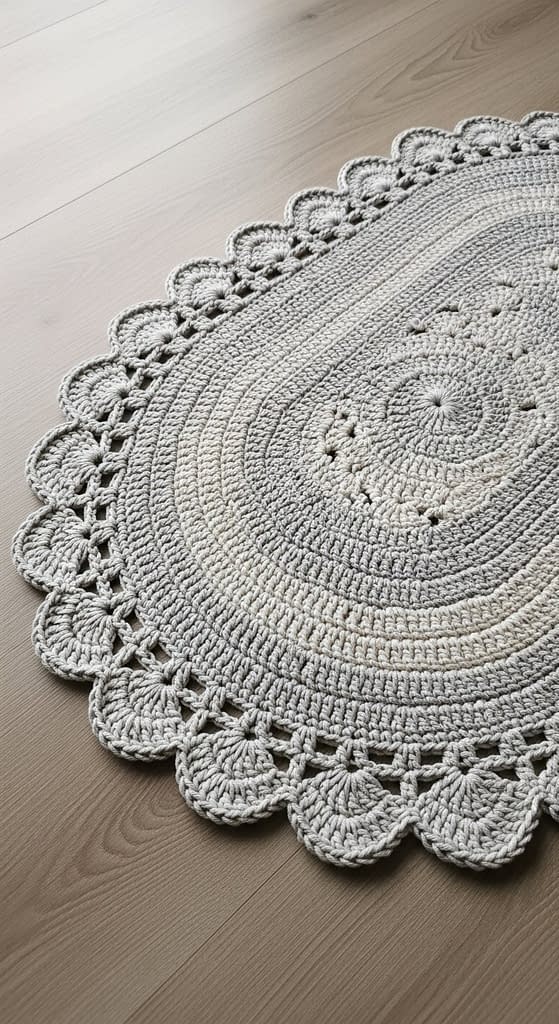
Fifth on our list is a masterclass in minimalist elegance. This monochromatic light grey rug proves that you do not need multiple colors to create a stunning focal point. The beauty of this rug lies entirely in the contrast between a simple, understated center and a dramatic, oversized shell border. It evokes a farmhouse or French country style and is ideal for bathrooms or beside a bed where a calming, neutral texture is desired.
Creating the Dense Center
The center of this rug is designed to be functional and unobtrusive. Use a soft, chunky grey wool or a synthetic alternative that is machine washable. The stitch pattern for the main body is the Half Double Crochet (HDC). This stitch is taller than a single crochet but shorter than a double, providing the perfect balance of speed and density.
Work in continuous spirals rather than joining each round. This eliminates the visible “seam” line that often travels up the back of crochet projects. Place a stitch marker in the first stitch of every round so you know where your increases begin. Continue this simple spiral until the rug is about 4 inches smaller than your desired final size. The massive border will make up the difference.
Calculating the Shell Border
The border of this rug features large, petal-like scallops. Before you begin the border, you must do a little math. Count the total number of stitches in your final round. The shell pattern typically requires a multiple of 6 or 8 stitches. For example, if your shell uses 6 stitches (skip 2, 5 DC in next, skip 2, SC), your total count must be divisible by 6.
If your stitch count is off by 1 or 2 stitches, do not panic. In the final round of the center base, sneak in an extra increase or two in the curved sections to reach the magic number. No one will notice this minor adjustment, but it ensures your border pattern flows perfectly without an awkward half-shell at the end.
Constructing the Oversized Shells
To get the dramatic “flower petal” look seen in the image, standard shells are not enough. You will create “Tall Shells.” Instead of using Double Crochet, use Treble Crochet (TR) for the shells.
Step 1: Single crochet in the first stitch to anchor the scallop. Step 2: Skip 3 stitches. Step 3: Work 9 Treble Crochets into the next stitch. This fans out broadly. Step 4: Skip 3 stitches. Step 5: Single crochet in the next to anchor the fan down.
Repeat this sequence around the entire perimeter. The Treble stitches give the border height and floppiness, creating that soft, romantic edge.
Steam Blocking for Definition
Because the border stitches are tall and heavy, they may crumple or fold in on themselves initially. Steam blocking is essential here. Lay the rug on a heat-proof surface. Set your iron to the steam setting but do not touch the iron to the yarn. Hover it an inch above the border and blast it with steam. While the yarn is warm and damp, use your fingers to spread the shells out flat, pressing them into their perfect rounded shape. Let it cool completely. This “trains” the yarn to stay flat.
The Organic Wavy Gradient Rug
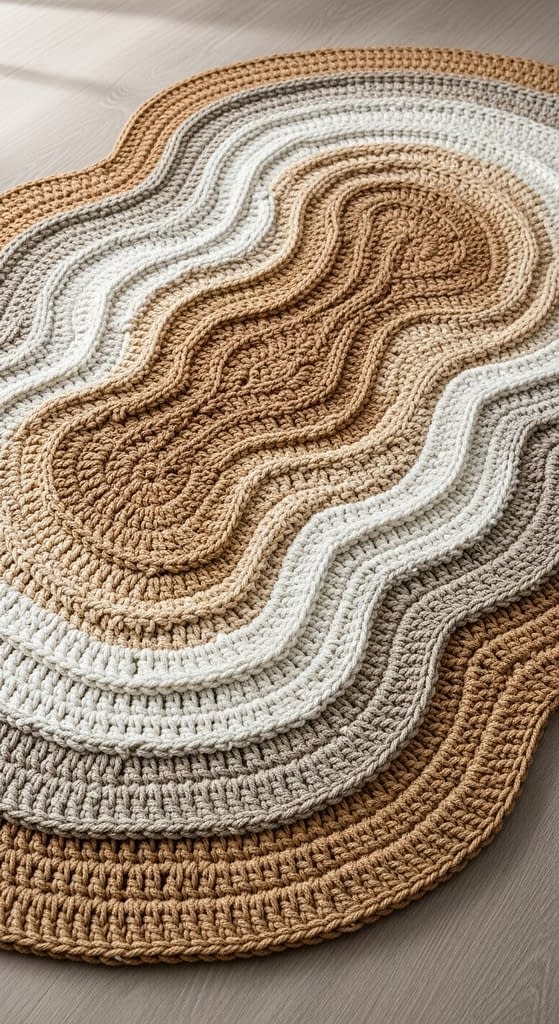
The sixth pattern breaks all the traditional rules of rug making. While most tutorials teach you how to keep a rug perfectly flat, this Organic Wavy Gradient rug embraces ripples and movement. Inspired by nature—sand dunes, ocean waves, or topographical maps—this rug uses an irregular shape and a technique called “hyperbolic crochet” to create a textured, 3D surface. The color palette creates an ombré effect, transitioning from dark earth tones to light creams.
The Art of Intentional Rippling
In standard rug making, you place a specific number of increases at the curves to keep the rug flat. In this design, you intentionally add too many increases. This causes the fabric to buckle and wave, creating the ridges seen in the image.
Start with a standard oval base in the darkest brown shade. As you work your rounds, insert “increase clusters” at random intervals along the straight sides, not just the curves. For instance, put 3 Double Crochets into one stitch, then 5 Double Crochets into the next. This sudden expansion forces the fabric to ripple outward. Do this organically—do not count perfectly. The lack of symmetry is what gives the rug its natural look.
Creating the Gradient with Marling
To achieve the smooth, seamless fade from dark brown to cream shown in the visual, use the “marling” technique. This involves holding two strands of thinner yarn together as you crochet.
Phase 1: Hold 2 strands of Dark Brown together. Crochet for several rounds. Phase 2: Cut one strand of Dark Brown and tie in one strand of Medium Tan. Crochet with 1 Brown + 1 Tan. This creates a speckled transition. Phase 3: Cut the remaining Dark Brown and replace it with a second strand of Medium Tan. Now you are working with 2 Tan strands. Phase 4: Repeat the process, transitioning to Cream.
This technique blends the colors softly like a watercolor painting, avoiding harsh stripes.
Sculpting the Irregular Shape
The visual shows that this rug is not a perfect oval; it has bulbous, uneven edges. To create this, you will use “Short Rows.” A short row means you do not crochet all the way around the rug. Instead, you crochet halfway down a side, turn your work, and crochet back. This builds up height in just one specific area, creating a bulge or a wave.
Combine short rows with slip stitches to blend the layers. When you finish a short row, do not just stop; slip stitch into the next 2 or 3 stitches of the row below to create a smooth slope down to the main level. Use this technique to extend one end of the oval more than the other, or to make one side wider, mimicking the random formation of a natural landscape.
Backing for Safety
Because this rug has a 3D texture and an irregular shape, it does not sit as flush to the floor as a flat rug. It is strictly necessary to apply a non-slip backing. Buy a roll of non-slip rug underlay. Trace the rough shape of your organic rug onto the underlay, but cut it about 2 inches smaller on all sides.
Use a hot glue gun to attach the underlay. Apply the glue in a zigzag pattern across the center of the rug’s underside, pressing the underlay down firmly. Pay special attention to the edges of the underlay—glue them well so they do not peel up. This backing will grip the floor and pull the wavy texture somewhat taut, ensuring that while the rug looks organic and flowing, it is not a tripping hazard.
The All-Over Shell Scale Rug
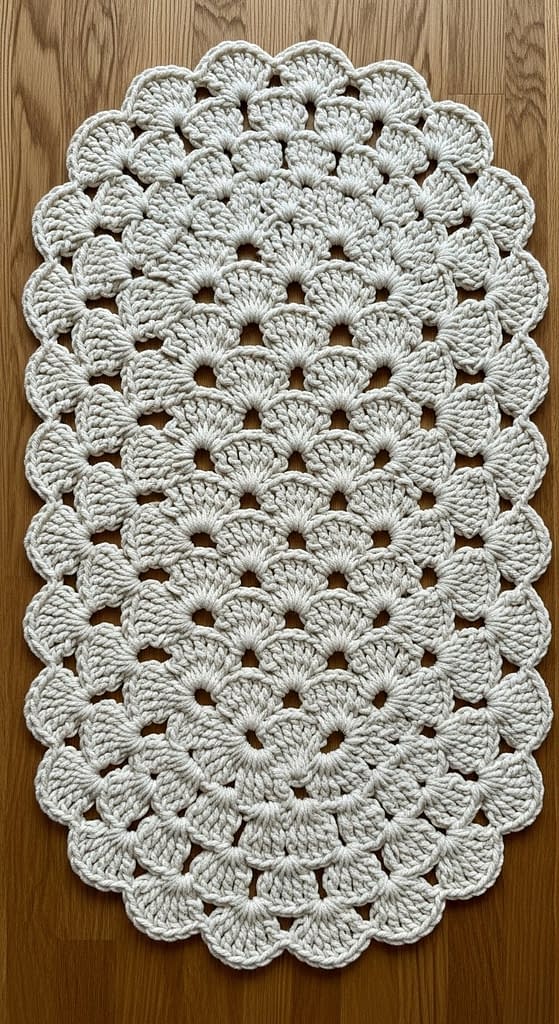
The seventh pattern in our collection introduces a luxurious, tactile element to your floor. This design moves away from flat surfaces and embraces a three-dimensional texture that mimics dragon scales or sea shells. The rug features a “pill” shape—a rectangle with perfectly rounded ends—covered entirely in overlapping shell stitches. In the visual, it is presented in a pristine white, which highlights the shadows and depth of the texture, making it an ideal choice for a spa-like bathroom or a cozy reading nook.
Selecting the Right Yarn for Texture
This rug is a “yarn eater.” The overlapping stitches require significantly more yardage than a standard flat rug. You should choose a worsted or aran weight cotton yarn. Cotton is preferred because it holds the shape of the shells effectively; softer acrylics might flatten out underfoot. Because you are using a single color, dye lots are critical. Ensure you buy enough yarn upfront (typically 1200–1500 yards for a medium rug) and check that every skein shares the same lot number to avoid subtle color shifts that will be visible in the final piece.
Constructing the Pill Shape Base
Unlike the standard ovals we have discussed, this rug starts with a distinct rectangular geometry that rounds off at the ends.
Start with a foundation chain that equals the length of the rug minus the width. Row 1: Double crochet in the 4th chain from the hook and in each chain across. When you reach the last chain, do not turn. Instead, work 5 to 7 double crochets into that single end loop to create a semi-circle. Rotate the work and crochet down the underside of the chain. Work another 5 to 7 stitches in the final loop to round the second end. Join with a slip stitch.
You now have a long oval base. You should work 2 or 3 flat rounds of double crochet, increasing only at the semi-circular ends, to create a solid foundation before beginning the textured scales.
Creating the Overlapping Shell Texture
The scale effect is created using a specific stitch pattern known as the “Close Scallop” or “Shell Stitch.”
Round 1 (Setup): You need a base of single crochets. Work one round of Single Crochet (SC) around the entire base. Round 2 (Shells): Skip 2 stitches. Work 5 Double Crochets into the next stitch. Skip 2 stitches. Single Crochet into the next. Repeat this sequence around the entire rug. Round 3 (Offset): To make the scales overlap like roof tiles, you must offset the next row. Chain 3 (counts as a DC). Work 2 DC into the first SC. Now, Single Crochet into the center stitch of the shell below. Then, work a full shell (5 DC) into the Single Crochet between the shells of the previous row.
By anchoring the new shells into the gaps of the old ones, you create a dense, interlocking fabric. Continue this pattern, increasing the number of shells at the curved ends to keep the rug flat. If you find the rug curling, use a larger hook for the shells or add an extra chain stitch between the shell and the anchor stitch.
Finishing the Scalloped Edge
The beauty of this pattern is that the border is built-in. When you reach your desired size, simply complete a final round of shells. There is no need for a separate border. To finish, cut the yarn and use a tapestry needle to weave the end invisibly into the center of the last shell. Because the rug is highly textured, it can trap dust easily. Advise users to shake it out regularly rather than vacuuming it with a beater bar, which could snag the 3D loops.
The Geometric Windmill Rug
The eighth design is a striking piece of floor art that resembles a quilt block or a stained-glass window. This rug uses a technique called Tapestry Crochet to create sharp, geometric diamond shapes that radiate from the center like a windmill. The color palette of sage green, cinnamon brown, beige, and white gives it an earthy, grounded feel, while the pattern keeps it modern. This rug is perfect for adding a focal point to a minimalist room.
Understanding Tapestry Crochet
To achieve the clean lines seen in the image without carrying messy “floats” of yarn on the back, you will use the Tapestry Crochet method. This involves working with multiple colors at once. When you are crocheting with the Beige yarn, you will hold the Sage and Brown yarns flat against the top of the row you are working into. You literally crochet over these unused strands, burying them inside the stitches.
This technique has two benefits: it makes the rug reversible (it looks the same on both sides), and it creates a very thick, durable fabric perfect for high-traffic areas. However, it also makes the stitches tighter. You must consistently check your gauge. If you pull the buried yarns too tight, the rug will pucker. If they are too loose, they will loop out.
Drafting the Diamond Grid
This rug relies on a strict mathematical grid. It is helpful to draw a chart or follow a pixel grid pattern.
The Center: Start with a beige oval center. The Radiating Lines: As you move outward, you will introduce the “spokes” of the windmill. In the first pattern round, switch to Brown for 2 stitches every 10 stitches. Expanding the Diamonds: In the next round, the Brown section will expand to 4 stitches (2 on either side of the original 2), creating a “V” shape. Filling the Gaps: As the Brown V’s widen, fill the space between them with Sage Green or White diamonds.
The key is to change colors at the exact right moment. To change color, stop the stitch before the final yarn-over. Drop the old color (do not cut it, just let it run inside the work) and pick up the new color to finish the stitch. This ensures the loop on top of the stitch matches the new color, keeping the jagged lines crisp.
Managing Multiple Yarn Balls
Working with three or four colors can lead to a tangled mess. To avoid frustration, place each ball of yarn in a separate bowl or bag. When you turn your work (if working in rows) or rotate the rug, consciously untwist the strands at the end of every round.
The Solid Frame Border
After the complexity of the geometric center, the rug needs a calm frame to contain the energy. As shown in the visual, finish with a solid band of the lightest color (Beige or Cream). Work 3 to 4 rounds of simple Half Double Crochet (HDC). This solid border hides any minor unevenness in the pattern edges and gives the eye a place to rest. Block this rug aggressively with steam to ensure the geometric lines are perfectly straight.
The Classic Ombré Oval Rug
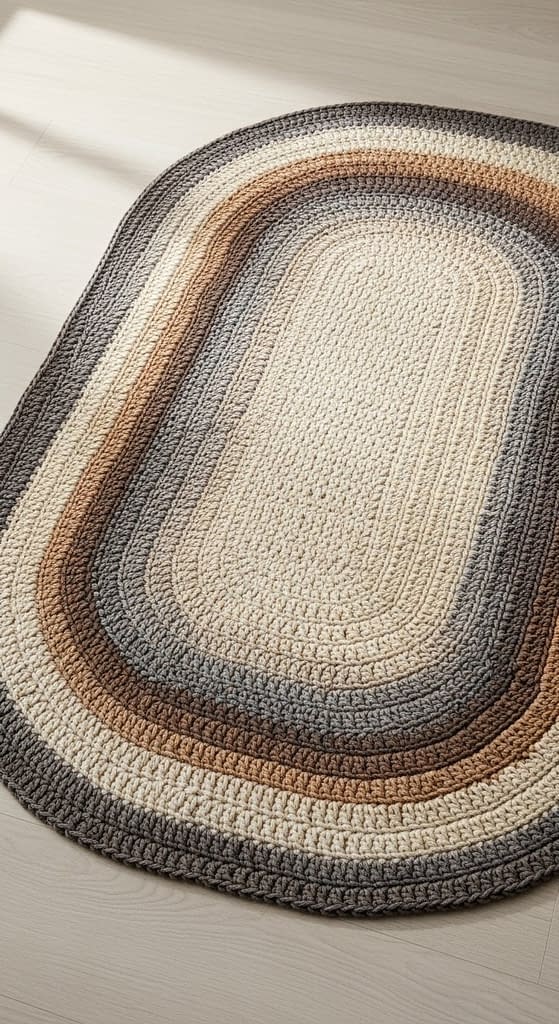
Pattern number nine brings us back to the beauty of simplicity. This rug features a smooth, mesmerizing gradient that transitions from a rich chocolate brown on the outer edge, through a warm taupe, to a creamy center. It is a classic “rag rug” style but executed with such precision that it looks modern and sophisticated. This design is versatile and works exceptionally well in hallways, kitchens, or entryways where dirt might be tracked in, as the dark edges hide stains well.
Creating the Seamless Gradient
The most crucial element of this rug is the smooth color transition. You have two options to achieve this:
Option 1: Gradient Yarn. Purchase a “cake” of yarn that is dyed specifically to fade from dark to light. This is the easiest method but limits your control over where the color changes happen.
Option 2: The Multi-Strand Method. This gives you the best results. Use a thin yarn (like a sport weight or fingering weight) and hold 3 strands together as one thick strand. Start with 3 strands of Cream for the center. After several rounds, drop 1 Cream strand and add 1 Taupe strand (2 Cream + 1 Taupe). Work a few rounds, then drop another Cream and add another Taupe (1 Cream + 2 Taupe). Switch to 3 strands of Taupe. Continue this process, slowly introducing the Dark Brown strands one by one. This creates a custom, buttery-smooth fade that looks professionally dyed.
The Spiral Construction
To maintain the clean look of the gradient, you must avoid the “step” that occurs when moving from one round to the next. Work this rug in a continuous spiral. Do not slip stitch to join rounds. Simply place a stitch marker in the first stitch of the round and keep crocheting.
Use the Single Crochet (SC) stitch. It is short, dense, and durable. Because you are working in a spiral, your “oval” is technically growing slightly skewed. To counteract this, you need to shift your increase points slightly in every round. If you always increase in the exact same spot, you will get corners (creating a hexagon). By shifting the increase by one or two stitches each time, you maintain a perfectly smooth curve.
Finishing the Outer Edge
When you have reached the darkest brown shade and the desired size, you need to resolve the spiral so the rug doesn’t look like it just “stopped.” Step 1: For the last 10 stitches, switch from Single Crochet to Slip Stitch. Step 2: Work 5 Slip Stitches loosely. Step 3: Work 5 Slip Stitches tighter, gradually tapering the yarn height down to nothing. Step 4: Cut the yarn and pull the tail through. Step 5: Use a technique called the “Invisible Join.” Thread the tail on a needle. Insert the needle under both loops of the next stitch (the first stitch of the round). Pull it through. Then, insert the needle down into the center of the last slip stitch you made. This mimics the look of a stitch top and makes the knot completely disappear.
Anti-Slip Application
Since this rug is likely destined for high-traffic areas, applying a non-slip backing is non-negotiable. For this specific dense texture, “sock stop” or puffy fabric paint works wonders. Squeeze dots of the rubberized paint all over the back of the rug, spaced about 2 inches apart. Let it dry for 24 hours. These little rubber dots provide excellent grip on tile or hardwood floors without adding bulk or stiffness to the rug.
The Patchwork Mosaic Oval Rug
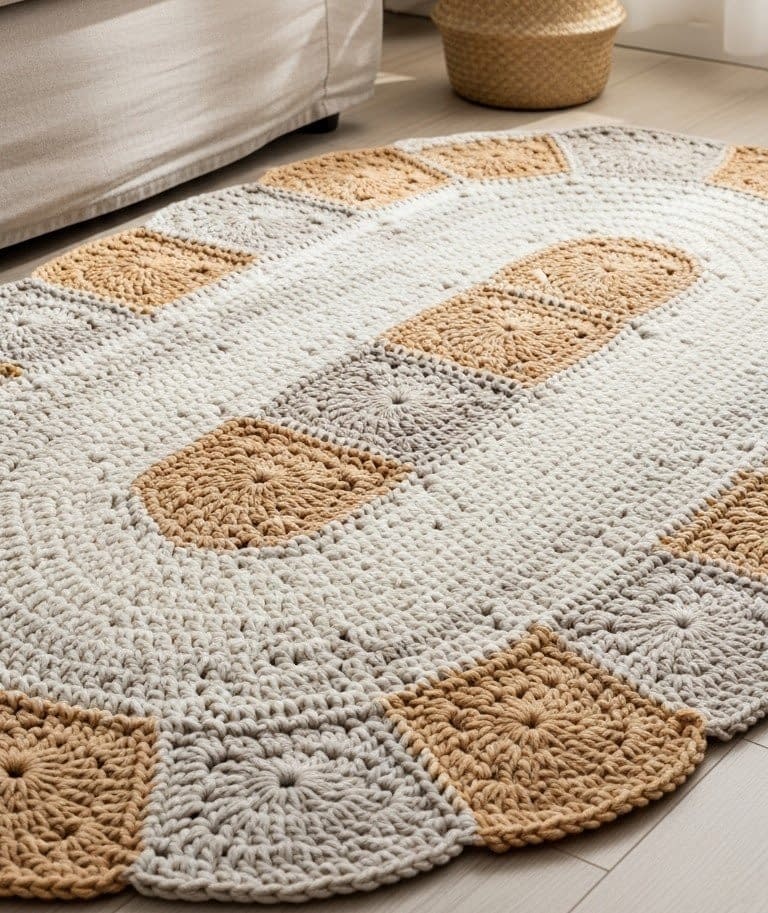
The final design in our collection is perhaps the most architecturally interesting. The Patchwork Mosaic rug moves away from standard rounds and spirals, opting instead for a modular construction that mimics the look of modern floor tiles or a deconstructed quilt. Featuring a sophisticated neutral palette of tan, beige, light grey, and cream, this rug is assembled in sections—squares, rectangles, and trapezoids—that fit together like a puzzle to form a smooth oval. It is an ideal project for intermediate crocheters who want to learn about shaping and modular join-as-you-go techniques. This rug fits perfectly in contemporary living spaces or Scandinavian-inspired interiors.
Understanding Modular Construction
Unlike the previous rugs where you start in the center and grow outward in continuous rounds, this rug is built in “blocks.” The advantage of this method is that you are working on smaller sections at a time, making the heavy rug easier to handle in your lap. The visual shows a central column of blocks flanked by longer side panels and rounded off with curved end-caps.
You will need a chunky weight yarn to give the tiles definition. The key to a professional finish here is the “Join-As-You-Go” (JAYG) method. Instead of making ten separate pieces and sewing them together (which creates bulky, uncomfortable seams), you will crochet the new block directly onto the edge of the previous one. This creates a flat, seamless connection that is durable enough for floor use.
Phase 1: The Central Column
Start by creating the spine of the rug. You will crochet a strip of three or four large squares. Step 1: Using the cream yarn, chain roughly 15 stitches. Step 2: Work rows of Single Crochet until you have a perfect square. Fasten off. Step 3: To start the next square (in tan), attach your yarn to the corner of the cream square. Crochet your first row into the stitches of the cream square’s edge, then continue working normal rows until the tan square is complete. Repeat this until you have a long, rectangular strip consisting of alternating colored squares. This determines the total length of your rug’s center.
Phase 2: The Side Panels
Once the center strip is complete, you need to widen the rug. The visual shows long, solid bands of color running parallel to the center squares. Orient your center strip vertically. Attach your grey yarn to the bottom-right corner of the strip. You will now crochet along the entire long side of the strip. Row 1: Pick up and single crochet stitches evenly along the side edge of the squares. Row 2: Work back and forth in rows of Half Double Crochet (HDC) to build a wide panel. Continue until this side panel is about 6 to 8 inches wide. Fasten off and repeat the exact same process on the opposite side of the strip with the beige yarn. You now have a wide rectangle.
Phase 3: The Rounded End-Caps
The challenge now is turning this rectangle into an oval. You will add “semi-circle” blocks to the top and bottom short edges. Attach your cream yarn to one of the short ends. Row 1: Single crochet across the edge. Row 2: Determine the center point of the row. You will need to create a “fan” shape. As you work back and forth, you must decrease stitches at the start and end of every row (creating a pyramid shape) or use short rows to build height in the center while keeping the edges low. For a smoother curve, it is easier to crochet a separate semi-circle (like half a doily) and sew it to the ends, but for true modular purists, you pick up stitches across the width and decrease 1 stitch at the beginning and end of every row until you reach a point, creating a trapezoid. Then, work a final border round to smooth those sharp corners into a gentle curve.
The Unifying Border
Because this rug is made of many sections, the edges might be slightly uneven. A strong, thick border is essential to unify the shape. Use the darkest color (Tan or Grey) for the border. Round 1: Single crochet evenly around the entire perimeter. Be careful at the “steps” or corners where blocks meet; you may need to decrease to prevent the border from flaring. Round 2 & 3: Switch to Double Crochet. Work 2 or 3 rounds to frame the mosaic. Final Round: Work a “Reverse Single Crochet” (also known as Crab Stitch). This involves working single crochets from left to right (backwards). It creates a twisted, cord-like finish that is incredibly durable and looks very high-end.
Conclusion
Creating a handmade rug is a labor of love that transforms a house into a home. Throughout this guide, we have explored the immense versatility of the humble oval rug. We journeyed from the delicate, airy loops of the Vintage Lace Doily design to the structural integrity of the Retro Color Block. We discovered how texture can define a space with the All-Over Shell Scale rug and how color theory creates movement in the Organic Wavy Gradient and Classic Ombré designs.
These ten patterns demonstrate that crochet is not just about making small accessories; it is a powerful medium for interior design. Whether you chose the playful Pastel Pinwheel for a child’s room or the sophisticated Geometric Windmill for your study, you have created a functional piece of art.
Remember that the longevity of your rug depends on care. Always use a non-slip backing to protect both the rug and your family. When washing these heavy items, opt for a delicate cycle with cold water and, most importantly, lay them flat to dry. Hanging a heavy wet rug can distort the stitches and ruin the oval shape you worked so hard to perfect.
We hope these patterns have inspired you to pick up your hook and cast on. The floor is your canvas—fill it with color, texture, and the warmth of handmade craftsmanship.


